

A mobile home window size such as 30 x 27 tells you little until you know what was measured. It might describe a catalog label, the window frame or the opening in the wall. Get those boundaries straight before you compare a replacement.
Use the doors and windows planning guide for a larger repair project. A proposed residential substitute also needs the parts compatibility checks.
Record width first, then height, with the measurement type beside both numbers. Keep the original readings separate from any ordering allowance. The supplier should confirm the exact frame dimensions and required opening for the window you intend to buy.
Which mobile home window size do you actually need?
For a complete window replacement, you need the available opening and the replacement unit’s specified dimensions. For replacement glass, a sash or a screen, you need that component’s own measurements. These are separate orders, even when they belong to the same window.
| Measurement | What the number describes | What it cannot establish alone |
|---|---|---|
| Call or nominal size | A catalog designation or ordering label. | The exact frame size, opening allowance or usable escape opening. |
| Actual unit or frame size | The physical window frame at the manufacturer’s stated boundaries. | The outside edge of a projecting flange or the required wall opening. |
| Rough opening | The prepared opening in the wall framing that receives the unit. | The glass size or finished interior trim opening. |
| Flange dimensions | The outer limits of the projecting mounting flange or fin. | The size of the window body entering the wall. |
| Visible glass | The glass area you can see inside the surrounding frame or glazing members. | The hidden glass edges or a replacement glass order. |
| Sash dimensions | The framed panel holding glass, which may move or be fixed. | The complete window frame or wall opening. |
| Clear opening | The unobstructed space available through an open window. | The unit size or proof of required emergency exit performance. |
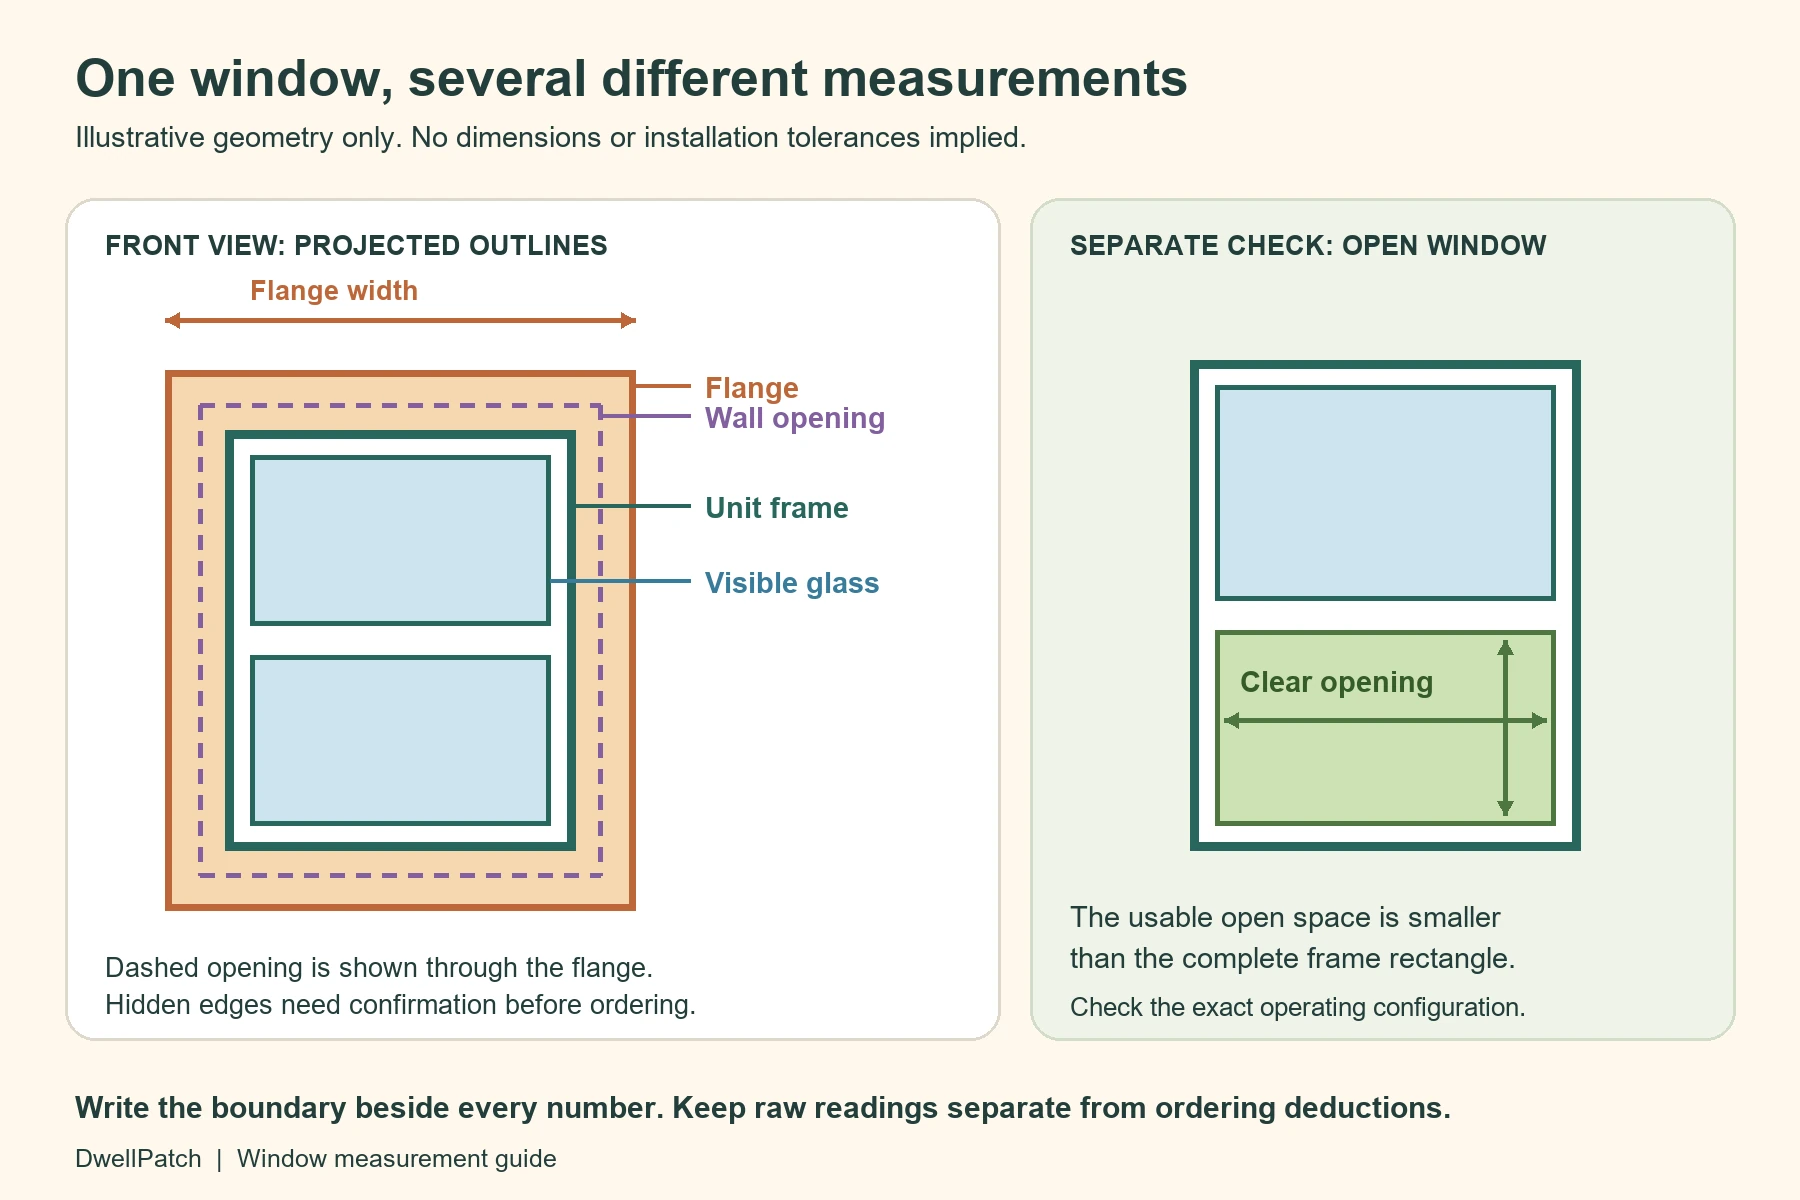
Also separate the rough opening from an insert opening. An insert replacement fits inside a retained frame when the chosen system permits it. A complete frame replacement uses a different receiving opening.
Ask the supplier to mark its measurement boundaries on a drawing. Words such as frame, box, opening and replacement can otherwise hide different assumptions. Keep that marked drawing with the quote.
Are there standard mobile home window sizes?
There is no single size you can safely order for every mobile home. A size chart describes a particular product range. It does not identify the openings in your home.
For example, a current seller lists a 30 x 36 window for manufactured and modular housing. Another lists a Kinro 9750 window as 46 x 54 and explicitly calls those numbers its rough opening size. Those labels are useful search starting points, not interchangeable measurements.
A 30 x 27 mobile home window search needs the same care. Do not assume the opening, frame and flange each measure 30 x 27 inches. Obtain the drawing for that exact listing and variant.
Likewise, a search for a 46 x 54 window does not prove that your existing window has that order size. A measurement near those numbers may come from trim, the actual frame or a different series. Send the supplier your labeled readings before choosing the nearest label.
The home’s age, manufacturer and original window style can help identify records. They cannot replace measurements after earlier repairs or alterations. Measure every opening individually, including windows that look identical.
How to read a real sizing chart
A manufacturer’s chart shows why labels deserve checking. The Ply Gem Pro Series Classic modular sizing supplement separates call size, unit dimensions and rough opening dimensions. Its double hung single unit width chart includes these examples:
| Call width | Actual unit width | Rough opening width |
|---|---|---|
| 2 feet 0 inches | 25 7/8 inches | 26 3/8 inches |
| 2 feet 4 inches | 29 7/8 inches | 30 3/8 inches |
| 3 feet 0 inches | 37 7/8 inches | 38 3/8 inches |
The inch values above are calculated conversions of the chart’s feet and inches. They apply to that specific chart, which describes traditional wood window rough openings. They do not establish approval for a manufactured home.
Use the manufacturer’s labeled sizing chart to see the distinction. A call width of 2 feet does not mean this frame measures exactly 24 inches. This is why a universal conversion chart would be misleading.
Start with a window record, not an order
Give each window a location code before measuring. Kitchen north, bedroom east and bath west are clearer than large or small. Add a room photo so the supplier can match the record to the opening.
Photograph any accessible manufacturer label, certification label and model identification. Copy the complete wording rather than assuming a familiar brand name identifies the series. Keep the labels in place.
Record the operating style, too. A vertical sliding window, horizontal slider, casement and fixed window have different operating geometry. Matching outer dimensions does not guarantee matching clear opening or hardware.
For a quote, accessible preliminary measurements may be enough. Mark them as preliminary if trim or the installed unit hides the receiving opening. A precise looking number does not become an ordering measurement simply because you wrote it to a fraction.
Do not remove the whole window just to obtain an early estimate. Ask the installer how the true opening will be confirmed and protected before ordering. Leave glass handling, inaccessible exterior measurements and uncertain disassembly to someone equipped for them.
Tools and recording habits
Use a readable tape measure, a level and a notebook or printed worksheet. A second person can check endpoints and record readings. Keep the tape straight rather than following a bowed surface.
Write fractions exactly as read. Do not round 29 7/8 inches to 30 inches, or silently convert an approximate measurement into a catalog size. Photograph the tape with both endpoints visible when practical.
Use one unit system throughout the record. If a supplier needs a conversion, retain the original alongside the converted value. Let the supplier confirm the ordering precision and rounding convention.
How to measure mobile home windows for replacement
The first measurement decision is what will remain in the wall. That determines which opening receives the replacement. Confirm this with the installer before applying any measuring instructions.
1. Identify the receiving boundaries
For a complete frame replacement, identify the framing opening rather than measuring between decorative trim edges. Interior casing, liners and returns can conceal its edges. If you cannot see the boundaries, label the measurement accordingly.
For a permitted insert replacement, use that manufacturer’s measurement points within the retained frame. Do not combine insert measurements with rough opening instructions. Ask the installer whether the existing frame is suitable to retain.
Do not disturb painted trim until its condition and any material hazards have been assessed. Older surfaces may need special handling. You can still gather labels, photos and accessible preliminary dimensions.
2. Record three widths and three heights
Measure width at the top, middle and bottom of the same receiving opening. Measure height at the left, center and right. Keep all six readings instead of saving only the smallest pair.
The smallest readings identify potential restrictions. They do not automatically become the final frame order dimensions. Clearance, liners and the opening’s shape still need checking.
Simonton’s regional replacement instructions use three readings in each direction and the smallest dimensions as a starting point. They also warn that further reduction may be necessary for a square, level installation. That is guidance for their replacement system, not permission to choose an arbitrary deduction for another brand.
3. Compare diagonals and inspect the sides
Measure between opposite corners in both diagonal directions. Label each diagonal on your sketch. Also check whether the sill is level and the sides are plumb.
Equal diagonals alone do not prove every surface is straight. Check for a bowed sill, bowed sides and twisting around the perimeter. A window must operate correctly after installation, rather than merely pass through the opening.
There is no universal diagonal tolerance established by this guide. The installer must compare the actual condition with the chosen product’s instructions. Send all readings when a supplier reviews an irregular opening.
4. Record the materials that occupy the opening
Note any liners, panel returns or other materials extending into the measured space. State whether each will stay or be removed. Otherwise, two people may calculate different available dimensions from the same wall.
Do not subtract a liner twice. If your tape already measures between the finished liner faces, its thickness is already excluded. If you measured the bare framing, a retained liner still occupies space.
A sketch should show both the measured boundary and the intended finished boundary. Have the installer resolve uncertain layers. This is especially useful when previous work has added trim around an older opening.
5. Check wall depth and frame projection
Record the distance between the intended exterior mounting plane and the interior finish plane. Identify those planes in a side sketch. Measure accessible points around the opening and note variations.
Keep wall depth separate from the depth of a recessed sill or decorative stool. Also record how far the proposed frame projects inward and outward. Those dimensions determine where interior trim, blinds and screens can sit.
A replacement can have the right width and height yet interfere with interior trim. Ask for the frame section drawing and any required extension or finishing details. Check room for sash tilt, latches and normal opening movement.
6. Photograph the exterior mounting condition
A projecting flange overlaps the wall around the window body. Its outer measurement does not tell you the size entering the opening. Note whether siding covers the flange or creates an uneven mounting surface.
The Lippert vinyl instructions specifically distinguish vinyl fins from aluminum flanges for installation over metal siding. That distinction belongs in the fit discussion before purchase. A size match cannot resolve the wrong mounting system.
Do not flatten, cut or bend a flange to force a match based on this guide. Ask for the correct product and approved installation detail. Keep fastening and waterproofing work in the replacement plan.
Why a blanket deduction can produce the wrong order
There are two separate questions: how large the prepared opening must be, and what dimensions you enter when ordering. A supplier may want rough opening dimensions or exact unit dimensions. Applying an allowance without checking that convention can subtract it twice.
The current Lippert vinyl flush mount and recessed fin instructions specify a minimum 1/8 inch clearance at each side, head and sill. Their allowance includes materials such as paneling, shims and liners. This is a named installation system’s requirement, not a rule for every replacement window.
Check the current vinyl window installation instructions against the actual unit. Ask the supplier to identify which frame dimension receives that clearance. Do not apply it to the outer flange or visible glass.
A calculated example with the assumptions exposed
Imagine an accessible, prepared opening with the following readings. These are invented teaching measurements, not a surveyed home. Assume no remaining liner reduces the measured space.
| Direction | First reading | Second reading | Third reading | Smallest |
|---|---|---|---|---|
| Width: top, middle, bottom | 30 1/2 | 30 3/8 | 30 1/2 | 30 3/8 |
| Height: left, center, right | 40 1/2 | 40 1/2 | 40 5/8 | 40 1/2 |
Suppose the proposed system requires at least 1/8 inch on every edge. Two side clearances total 1/4 inch across the width. Head and sill clearances also total 1/4 inch.
Arithmetic alone gives a frame no larger than 30 1/8 inches wide and 40 1/4 inches tall. The calculations are 30 3/8 minus 1/4, and 40 1/2 minus 1/4. These are geometric limits under the stated assumptions, not an order recommendation.
Now suppose the diagonals differ or a side bows inward between readings. The calculated rectangle may still fail to sit square with the required clearance. That condition needs an installer review, even if a catalog label looks close.
Send the raw measurements and the required clearance separately. Ask the supplier to return the exact physical frame dimensions in writing. That prevents an automatic order deduction from being added to a deduction you already made.
Bedroom windows need a separate clear opening check
A mobile home window size on a product label does not establish emergency exit suitability. Neither does multiplying the overall frame width by its height. The frame, fixed glass and operating sash occupy part of that rectangle.
The federal manufactured home construction standards provide a useful distinction. Section 3280.404 requires at least 20 inches of clear width, 24 inches of clear height and 5 square feet of clear area. All three conditions apply.
A clear opening measuring 20 x 24 inches provides only 480 square inches. Dividing by 144 gives about 3.33 square feet, below that area requirement. This calculated example shows why checking width and height alone fails.
Section 3280.106 generally requires an outside exit window or approved device in sleeping rooms without an exit door. It also limits opening bottom height to 36 inches and necessary operating devices to 54 inches above the floor. These are separate from the unit’s outer dimensions.
These Part 3280 provisions concern manufactured home construction. An existing home’s replacement project also needs its applicable state or local alteration requirements checked. Have the installer or responsible authority confirm the replacement’s required certification and clear opening.
Use the manufactured home egress window standard when discussing the product’s exit performance. Obtain data for the exact size and operating configuration. An egress claim for a larger sibling model does not establish yours.
Keep operating instructions and certification labels in place. Do not count an opening that requires removing the sash to meet the federal dimensions. Record any screen, storm panel or interior obstruction that could affect normal exit operation.
Use this worksheet before approving the order
Make one copy for each opening. Leave an unknown field blank and flag it for confirmation. Do not let a convenient catalog label fill missing measurements.
| Record | What to enter or request |
|---|---|
| Window identity | Room, wall direction, photo number, quantity and existing label details. |
| Replacement approach | Complete frame or approved insert; exactly what stays in the wall. |
| Measurement status | Preliminary estimate or exposed and confirmed receiving opening. |
| Boundary sketch | Tape endpoints, retained liners and exterior mounting plane. |
| Opening width | Top, middle and bottom readings, with units. |
| Opening height | Left, center and right readings, with units. |
| Shape and condition | Both diagonals, sill level, side plumb, bowing and visible deterioration. |
| Depth | Mounting plane to interior finish; proposed frame projections and trim clearance. |
| Exterior detail | Wall finish, flange type, overlap area and mounting surface condition. |
| Exact replacement | Maker, series, style, configuration and full order identifier. |
| Dimensions returned by supplier | Call size, exact frame width and height, flange dimensions and required prepared opening. |
| Allowance responsibility | Who applies each deduction; the instructions and revision used. |
| Bedroom exit check | Required listing, actual clear opening, opening height and accessible operating devices. |
| Approval | Installer measurement confirmation, remaining repairs and final written order acknowledgment. |
Add a simple question to every quote: are these numbers the opening you need, or the frame you will supply? Request the answer beside the dimensions. Keep the final acknowledgment with your photographs.
If the seller changes the series, style or configuration, repeat the dimension comparison. A substitution with the same nominal label may have different frame and clear opening dimensions. Approve the specified unit rather than an unspecified equivalent.
What to do when your measurement falls between sizes
First, check the measurement boundary. A fraction between catalog sizes can be a correct frame reading beside a nominal label. It can also be a trim reading that has not reached the actual opening.
Next, ask for the manufacturer’s exact size drawing. Compare the available space and required clearance, including retained materials. Do not round upward because the flange looks wide enough to cover the edge.
If the exact unit does not fit, ask about a compatible custom size or a different approved series. Have damaged framing assessed before confirming final dimensions. A repair can change the prepared opening you need to order against.
Changing the wall opening belongs in a separate assessed project. Do not cut a header, remove framing or reduce an exit opening just to use an available size. Establish the approved replacement approach before revising the order.
If you only need glass, a sash or a screen
Keep the complete window size in your record as identification context. Then ask for that component’s specific ordering method. A visible glass measurement cannot reveal concealed glass edges or required thickness.
A sash order also needs its profile, hardware and engagement details. A screen needs its own frame and retention measurements. Copying the whole window’s width and height into either order skips those fit requirements.
Your final mobile home window size record should therefore contain labeled measurements, not just one pair of numbers. When the opening, frame, mounting detail and operating requirements agree, you have a useful basis for ordering. Have the supplier and installer confirm that agreement before payment.
Found a detail that needs checking? Tell us about a correction.