

The right windows for mobile home repairs depend on what has failed and how the existing unit meets the wall. A broken lock, damaged glass, and a leaking opening call for different decisions. Before ordering, identify the repair scope, mounting system, exact dimensions, and any bedroom escape requirements.
A matching catalog size is only part of that check. A window also needs suitable anchorage, a workable connection to the home’s weather protection, and clearance for its moving parts. Use the selection process below to turn those checks into a written order.
For a project that includes entry doors too, use the doors and windows project overview.
Choosing windows for mobile home repairs: start with the failed part
Ask for the smallest repair that fully addresses the problem, then compare it with complete replacement. That does not mean saving every old frame. It means finding out whether the fault belongs to the glass, moving sash, hardware, installed frame, or surrounding wall.
| What you notice | What to investigate | What to request |
|---|---|---|
| Torn mesh with a sound window | The separate screen and its attachment | Screen repair or a correctly matched screen assembly |
| One broken lock, latch, or crank | Exact hardware identity and whether the frame still aligns | A compatible part and an assessment of any underlying binding |
| A sash drops or will not stay raised | The support mechanism and sash condition | Professional service before operating that sash again |
| Cracked glass or persistent haze inside sealed glazing | The glazing unit, sash, safety glass specification, and frame condition | A glass or sash repair assessment alongside a replacement quote |
| Water appears at the inside sill | Where water enters, the window drainage route, and the surrounding wall | Diagnosis before a glass upgrade or a bead of caulk |
| A distorted frame, damaged mounting area, or deteriorated opening | Both the window and its supporting wall connection | A repair scope that includes the opening where needed |
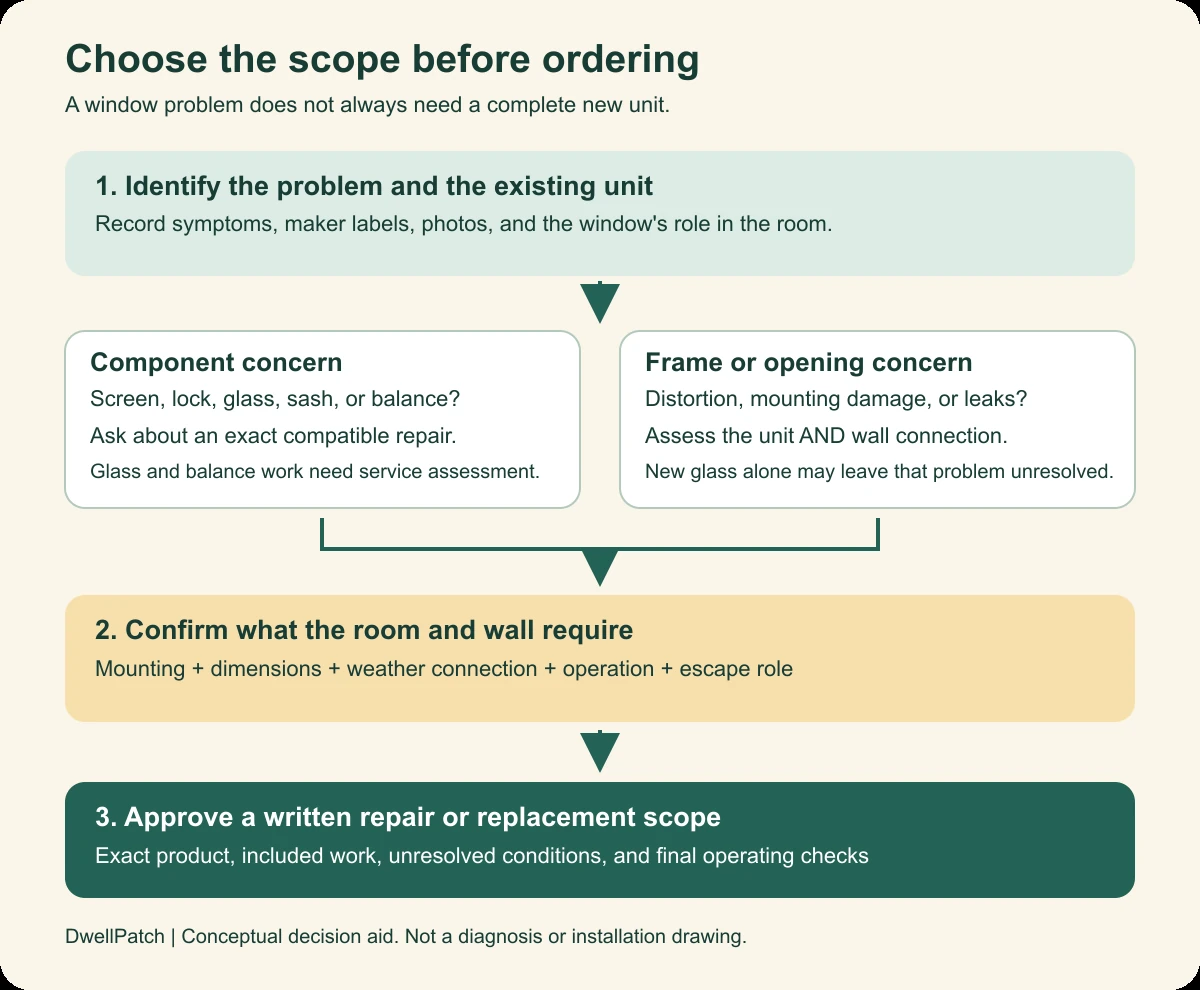
These are investigation routes, not diagnoses from appearance alone. A failed latch can be an isolated part problem. It can also be the first thing you notice when a frame no longer sits square.
When a component repair is worth pricing
Look for an identifiable manufacturer, a serviceable frame, and an available replacement part with confirmed compatibility. Ask whether the repair preserves the window’s intended operation and any required escape function. A similar looking part is not enough.
There is a real service route for some manufactured housing windows. Lippert’s current support library includes a vinyl window service manual covering glass, balances, latches, locks, and other components. That manual expressly restricts its procedures to Lippert or contracted service technicians.
Use that distinction when requesting help: ask whether your particular unit can be serviced. Do not treat the existence of a service manual as permission to remove glass or tensioned balance parts yourself. Keep people away from broken glass and a sash that cannot support itself.
When complete replacement deserves serious consideration
Replacement becomes more persuasive when several systems need work, parts cannot be confirmed, or the frame and mounting connection need attention. It may also suit an intentional change in glazing or operation. Compare a defined repair with a defined replacement, rather than comparing vague estimates.
A new unit cannot substitute for repairing a damaged opening. Ask what happens if the installer finds deteriorated framing, concealed water damage, or an unsuitable mounting surface. Agree on the approval process for additional work before removal begins.
Know which part of the window someone is quoting
The glass is the transparent pane or sealed glazing assembly. The sash is the frame holding glass within the larger window; it may move or remain fixed. The main frame is the outer assembly installed in the wall.
A screen is a separate insect barrier. Weatherstripping seals moving joints, while flashing and perimeter sealing address the connection between the window and building. Those parts work in different places, so replacing one does not automatically renew the others.
Ask a repair company to name the proposed scope in writing. “Replace the window” might mean glass replacement to one person and complete removal of the outer frame to another. Your quote should identify what stays, what leaves, and who restores the surrounding finishes.
- Glass work: confirm whether the price covers a single pane or a sealed insulating glass assembly.
- Sash work: confirm the exact compatible assembly, hardware needs, and effect on existing certification or warranty.
- Insert replacement: ask which existing frame remains and what that means for visible glass and usable opening.
- Complete unit work: ask how the installer will expose and restore the mounting and weather protection connection.
Do not accept an insert proposal until the retained frame has been assessed. Likewise, ask why complete removal is necessary if the fault is a readily serviceable component. The explanation should connect the proposed work to the actual condition.
Fit includes the wall connection, not just width and height
When shopping for windows for mobile home projects, make the mounting detail part of your first conversation. Product families use different frame profiles and flange arrangements. Siding, interior trim, and the available wall depth affect how those profiles can be installed.
Flush mount, recessed fin, and the existing siding
A flange or fin provides a mounting interface around the window. Its location relative to the frame matters. Compare the replacement’s section drawing with the actual wall and siding arrangement, rather than choosing by a front photograph.
One concrete restriction shows why this matters. Lippert’s current instructions prohibit placing the covered vinyl nailing fins over vertical or horizontal metal siding. They identify aluminum mounting flanges for that condition instead.
That is a restriction for the named products, not a universal conversion recipe. Have the supplier identify the approved configuration for your siding and installation. Do not flatten siding, cut off fins, or improvise an adapter to make an unsuitable unit appear to fit.
The manufacturer’s current window document library separates active instructions from obsolete Kinro manuals. Confirm the exact family and current document before using a drawing or clearance. A familiar brand name on an old PDF does not establish today’s installation requirements.
Depth, trim, and moving clearances
Ask where the new frame will sit relative to the exterior mounting surface. Then ask how far it projects toward the room and what finishes must change. A matching opening can still require different trim.
Have the installer check sash travel, locks, and any tilt function against the planned interior finish. A decorative return that obstructs movement is a functional problem. It is especially consequential where the unit serves as an escape route.
Use a detailed measurement record for each opening. Keep nominal catalog size, actual unit dimensions, rough opening, and outside flange dimensions in separate fields. The supplier should confirm which field controls the order and which clearances its instructions require.
Do not subtract a remembered fraction from every measurement. Manufacturer instructions define the relevant allowance for their products. An old home’s age, or its classification as a single wide or double wide, cannot confirm that allowance.
Can a regular residential window work?
Ask about a specific product and installation proposal. “Residential window” and “mobile home window” are broad shopping labels; neither answers every compatibility question. The proposed unit still needs a verified opening, mounting arrangement, wall connection, and required performance.
If the proposal changes framing or enlarges an opening, have that work assessed before purchase. A larger window is not simply a trim change. Ask the responsible building authority and qualified installer what approvals and design information the alteration needs.
Match the operating style to the room
Choose the function before the finish color. Think about reaching the handle, cleaning the glass, outside obstructions, and whether the opening has an escape role. Then ask which compatible product families offer that function.
| Style | How it operates | Selection question |
|---|---|---|
| Single hung | The lower sash slides upward | Can everyone who needs it reach and operate the sash safely? |
| Double hung | Both upper and lower sashes slide vertically | Does the added operation justify this exact model and installation? |
| Horizontal slider | One or more sashes move sideways | Which section opens, and what is the resulting clear opening? |
| Casement | A side hinge allows the sash to swing outward | Will the sash clear the exterior space and remain easy to operate? |
| Awning | A top hinge allows the sash to project outward | Does the model’s opening function suit the room and any escape requirement? |
| Fixed or picture | The glazing does not open | Where will the room obtain required ventilation and emergency escape? |
Do not confuse double hung with double pane. The first describes sash movement. The second describes glazing with two panes.
A style name also does not confirm an egress rating. Two windows with similar outside dimensions can provide different usable openings. Request documentation for the exact model, size, and operating arrangement you intend to buy.
Compare frame materials and energy performance separately
Vinyl and aluminum are useful categories, but they do not replace product specifications. The frame, glazing, and operation all contribute to performance. Compare the whole proposed unit rather than choosing on material alone.
Vinyl resists moisture and does not require painting. Metal conducts heat readily; a thermal break can reduce that transfer. Wood requires ongoing finish care, while fiberglass and composite products offer other construction choices.
Those broad differences do not establish fit, service life, or the best purchase for your home. Ask for the exact window’s ratings, maintenance instructions, warranty, and installation detail. An appealing material cannot rescue a poor wall connection.
Read the label instead of counting panes
Use the ratings for the exact product configuration. Glass options within one series can differ. Request a copy with the written proposal so you can compare competing quotes.
- U factor: lower values indicate less heat transfer through the rated product.
- Solar heat gain coefficient, or SHGC: lower values mean less solar heat passes through.
- Visible transmittance, or VT: higher values mean more visible light passes through.
- Air leakage: lower values indicate less air passage through the tested window joints.
- Condensation resistance: a higher reported value indicates greater resistance to condensation under the rating conditions.
Low emissivity coatings and insulating glass can improve thermal performance. Yet “double pane” alone does not tell you the U factor or solar heat gain. Ask for the rated combination of frame, glass, and other options on your order.
Choose for climate and exposure
A low U factor helps limit heat transfer. A low SHGC helps limit unwanted solar heat, which matters in cooling conditions. Daylight, shading, window orientation, and heating needs also belong in the choice.
Use the ENERGY STAR county climate zone finder when comparing certified products. Ask which climate zones the exact option qualifies for. Do not rely on an old criteria chart copied into a seller’s description.
An energy label does not confirm structural suitability, wind requirements, or escape function. Have the installer verify those separately. Avoid projected bill savings that assume every draft or comfort problem comes from the window.
Keep bedroom escape and safety glazing in the decision
Before selecting a bedroom replacement, identify whether the existing unit serves as an emergency exit. Preserve that role throughout product selection, trim planning, and final operation checks. A fixed replacement is not an equivalent choice merely because it fills the opening.
The federal manufactured home construction standard addresses sleeping room exits. Under 24 CFR 3280.106, a sleeping room generally needs an outside window or approved exit device unless it has an exit door. The section also limits opening height and the height of devices needed for exiting.
The opening bottom limit is 36 inches above the floor. Devices that must be operated for exit cannot exceed 54 inches above the finished floor. Read the federal egress provision with its referenced product standard.
Those are construction provisions, not a complete approval checklist for an alteration to an existing home. Ask the authority responsible for your project which requirements apply. Do not substitute a general residential egress chart for the requirements governing your home and proposed work.
Have the supplier document the required clear opening and approved operation for the exact unit. Discuss screens, storm panels, locks, and interior obstructions too. Preserve permanent operating instructions and certification labels on an egress unit.
Ask separately whether the location requires safety glazing and what specification the replacement must meet. Do not assume every pane needs tempered glass, or that ordinary glass is acceptable everywhere. That decision belongs in the approved product and project specification before ordering.
Separate rain leaks, surface condensation, and glazing trouble
Water on a sill is not enough information to choose a new window. Note when it appears and where you first see it. Photograph the condition without removing finishes or disturbing damaged glass.
Moisture on the room surface of cold glass may be condensation. Indoor moisture from daily activities can collect there, especially during cold weather. That calls for attention to moisture sources and ventilation as well as window performance.
Persistent haze within sealed glazing deserves a glass service assessment. Water that arrives during wind driven rain deserves investigation of the window and wall connection. Neither observation proves, by itself, that the entire window must be replaced.
Ask the person assessing a leak to explain the proposed entry route and repair location. A glass replacement addresses a different boundary from perimeter flashing. A wall leak above the unit also needs its own repair.
Do not seal visible slots simply because they look like openings. Some are part of the window’s drainage system. Use the exact maker’s care instructions and keep designated drainage paths clear.
If surrounding surfaces are soft, stained, or persistently damp, include that condition in the inspection request. Photograph before covering it. New trim should not become a way to conceal an unresolved moisture problem.
Where to buy, and how to compare complete quotes
Manufactured housing parts suppliers can help identify specialized frame and mounting options. Window dealers and installers may offer other suitable product families. Online sellers can be useful when they provide exact drawings, instructions, and meaningful order support.
Choose the seller who can resolve your compatibility questions in writing. Ask who checks the measurements, who approves the installation arrangement, and who handles damage or a specification error. A product photo and a broad “fits mobile homes” statement leave too much undecided.
Buying used deserves additional caution. Ask for the unit’s identity, condition, intact mounting parts, and any required labels. If you cannot verify those, do not treat a low price as evidence of a suitable replacement.
Compare the same work
For windows for mobile home upgrades, request an itemized scope before comparing totals. A delivered unit and a finished installation are different purchases. A low installation figure may exclude the very wall or trim work your opening needs.
- Exact manufacturer, series, size convention, operating style, and glass option.
- Removal scope, disposal, delivery, and handling of damaged shipments.
- Mounting configuration, opening preparation, weather protection, and perimeter sealing.
- Interior returns, exterior siding or trim work, and finish restoration.
- Applicable permits, inspections, safety glazing, and egress verification.
- How concealed damage is priced and who approves additional work.
- Product warranty, installation warranty, and the party handling each claim.
Ask the seller to identify custom order restrictions before payment. Confirm the deadline for reporting shipping damage and the procedure for a mismatch. Keep the approved order, drawings, photos, and correspondence together.
Choose an installer by the proposed method
Ask the installer to explain how this window connects to this wall. A useful answer identifies the mounting surface, weather protection, siding treatment, and interior finish. It also explains what cannot be confirmed until the old unit is exposed.
For a home built before 1978, discuss lead paint precautions before removal or sanding. EPA recommends trained, certified help for renovation in such homes. A newer replacement window does not establish that surrounding painted surfaces are free of lead.
A window order confirmation worksheet
Copy this worksheet for each opening and send it with photos to the supplier or installer. Leave uncertain fields marked “unconfirmed.” Ask the responsible person to resolve them before the order becomes final.
| Record | What to write or attach | Who should confirm it |
|---|---|---|
| Opening identity | Room, wall location, photo, and a unique label such as Kitchen A | Homeowner and installer use the same label |
| Repair decision | Failed part, inspection findings, repair option, and reason for chosen scope | Service provider or installer |
| Existing assembly | Maker, labels, operating style, frame profile, and accessible identifying marks | Supplier or manufacturer |
| Dimensions | Separate nominal, unit, opening, flange, and depth records with measuring points | Order approver states the controlling dimension |
| Wall interface | Siding type, mounting arrangement, proposed flashing, and trim changes | Installer using applicable product instructions |
| Required function | Ventilation, escape role, safety glazing, wind or exposure requirements | Qualified installer and responsible authority as needed |
| Exact replacement | Manufacturer, series, operation, glass package, finish, and ratings | Seller supplies matching order and technical documents |
| Commercial terms | Included labor, exclusions, damage handling, returns, warranty, and approval of extra work | Seller and installer in writing |
For example, a hypothetical Kitchen A record might show a sound frame and one failed lock. Start by asking for compatible lock identification. Do not turn that request into an order for a complete window until the inspection supports that scope.
A hypothetical Bedroom B record might instead show an unidentified unit with an escape role and a deteriorated mounting area. That needs a documented replacement and opening repair plan. A matching width and height would leave the most consequential questions unanswered.
Check the finished result before closing the job
Walk through the order record with the installer while the work is accessible. Confirm that the installed model and glass match the approved specification. Ask for an explanation of any change before accepting it.
Operate the sash, locks, and intended release devices without forcing them. Have binding, unexpected movement, or blocked travel corrected. Keep any required escape route clear of new trim, furnishings, and accessories.
Ask the installer to show the completed exterior connection and designated drainage features. Save the instructions, labels, invoice, and warranty information. Those records make later service requests much more precise.
The best purchase is a documented solution to your opening and your problem. Once those are clear, comparing windows for mobile home repairs becomes a manageable specification check. You can judge each proposal by what it resolves and what still needs an answer.
Found a detail that needs checking? Tell us about a correction.