
Mobile home doors and windows need the right repair scope before they need a shopping list. A torn screen, damaged sash, leaking frame, and worn door seal are different jobs. Identify the affected component, record the correct measurements, and check the replacement instructions before you order.
Start with what you can see and operate safely. Then decide whether you need a small part, a replacement panel, a complete unit, or help with the surrounding opening. That sequence gives you a useful starting point even when the original labels are missing.
For a proposed residential substitute, use the parts compatibility checklist before treating it as a direct replacement.
Choose the right job for your mobile home doors and windows
A complete replacement removes more than the part you touch every day. For a door, the moving panel is the slab; the surrounding frame includes its jambs. For a window, the sash holds the glass, while the outer frame connects the assembly to the wall.
A screen has its own mesh and frame. Replacing it does not replace the glass, repair the window seal, or correct the opening in the wall. Keep those boundaries clear when requesting parts or comparing estimates.
| What needs attention? | First scope to investigate | What must also be checked? |
|---|---|---|
| Screen mesh is torn | Mesh repair or a replacement screen assembly | Screen frame, retaining channel, corners, and attachment method |
| Door seal is damaged | Compatible weatherstripping | Door alignment and contact around the closed perimeter |
| Window latch or support mechanism is damaged | Exact replacement hardware or service | Model, mating components, and sash condition |
| Glass is broken but its supporting assembly appears sound | Glazing or sash assessment | Glass specification, retention system, and any safety or egress function |
| Door slab is damaged | Slab compatibility assessment | Frame condition, hinge geometry, thickness, lock preparation, and seals |
| Outer frame is damaged or a different operating style is wanted | Complete unit assessment | Wall opening, mounting method, weather protection, and required performance |
| Framing is soft, loose, or visibly distorted | Opening and moisture assessment before product selection | Cause, repair scope, and suitable anchorage for the replacement |
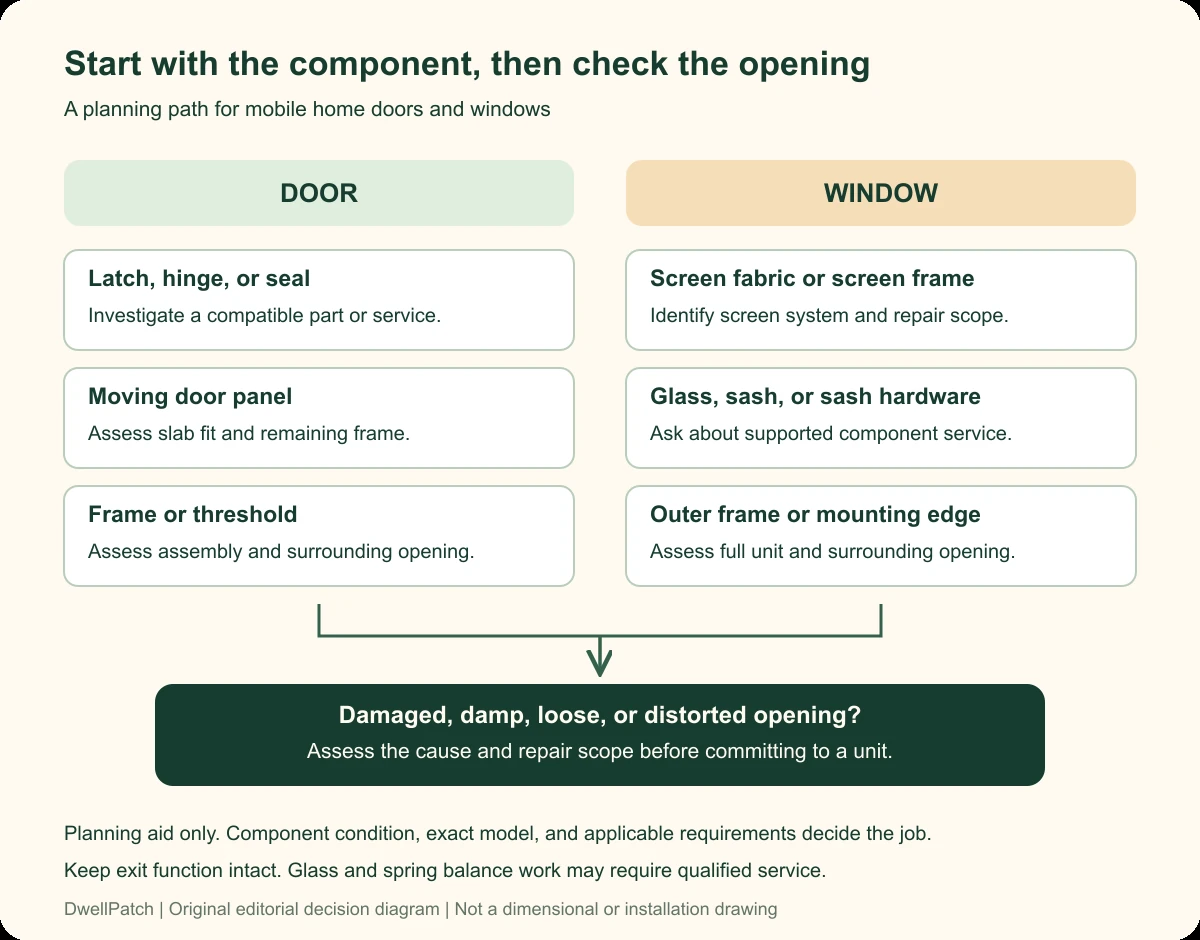
This is a sorting tool, not a diagnosis from appearance alone. A serviceable component can sit inside a damaged opening. Conversely, a replaceable latch can fail while the window around it remains usable.
Inspect the problem before choosing repair or replacement
Separate an operating problem from damaged material
With the unit intact, note where movement stops or contact becomes uneven. Does the door rub at one corner, or does its latch miss the strike plate? Does a window resist sliding, fail to stay supported, or refuse to lock?
Photograph the problem with the unit both open and closed, if safe. Include the surrounding frame and a close view of the affected hardware. Send both views when seeking identification; a close photograph alone can hide the installation context.
For an otherwise intact slider, start by checking the track for loose dirt and debris. Use the unit’s care instructions for cleaning and any lubrication. A manufacturer may restrict solvents, abrasive cleaners, pressure washing, or products applied to the glass.
Do not force a sash that drops, tilts unexpectedly, or has broken glass. Ask about service before removing its support hardware. Some window balances contain spring tension, and their adjustment is not an ordinary cleaning task.
Locate the moisture before reaching for sealant
Record whether moisture sits on the room surface, outside surface, between sealed panes, or around the wall opening. Those observations point toward different investigations. Photograph the first wet location before wiping up the water.
Surface condensation forms when humid air meets a sufficiently cold surface. Moisture between the panes of sealed insulating glass suggests a seal problem. Condensation on the outside can occur under ordinary weather conditions without proving that the window leaks.
Water appearing during rain deserves a separate leak investigation. Note the weather, location, and visible staining around the opening. Avoid assuming that the nearest visible caulk joint explains the entire water path.
Keep intended window drainage openings clear. Filling every visible opening with sealant can obstruct a path the unit needs for drainage. Use the exact installation detail to distinguish a drainage opening from a failed weather seal.
Look at the opening as well as the product
Check accessible areas for loose trim, damaged mounting edges, persistent dampness, and visibly deteriorated material. Report these observations before approving a replacement quote. A new unit still needs a suitable surface and sound framing for its specified attachment.
If several openings bind or their shapes have changed, ask for a broader assessment before ordering identical replacements. Record the pattern rather than deciding that the home needs leveling from one symptom. The cause needs to be established separately.
Know which measurement you have
The same width and height can describe different boundaries. A door slab measurement is not a framed opening measurement. Visible glass is not the outside dimension of a window assembly.
Write the name of the measured boundary beside each number. Add a photograph showing both ends of the tape. That small record is more useful than a message saying only that your door is 32 inches wide.
| Label | What it describes | Why it matters |
|---|---|---|
| Nominal or call size | The manufacturer’s product designation | It needs the maker’s definition before you can compare it with a measured opening. |
| Door slab size | The moving door panel’s width, height, and thickness | Useful for panel identification; insufficient by itself for a complete door unit. |
| Unit or frame size | The assembly dimension at the boundary shown in its drawing | May exclude projecting fins, trim, or other parts. |
| Rough opening | The framed opening that receives the assembly | Must suit the selected unit and its specified installation clearance. |
| Jamb depth or wall interface | The depth the frame must accommodate at the wall | Needs to match the actual installation detail and finish arrangement. |
| Clear opening | The unobstructed passage when the door or window is open | Relevant to exit function; it is not the product’s outside size. |
| Trim or flange outside dimension | The outer reach of a cover or mounting edge | Useful for planning coverage; does not reveal the framed hole by itself. |
Why there is no universal amount to add or subtract
Installation allowances belong to a particular product and system. The selected instructions may describe clearance on each side, an overall opening dimension, or a call size. Treat those as separate forms of information.
For example, a legacy Kinro flange door manual defines call size using the rough opening. Its inspection instructions describe smaller physical door dimensions. Those directions do not establish a conversion for every door sold for a manufactured home.
Current Lippert vinyl window instructions instead specify minimum clearance around the unit at the sides, head, and sill. That still does not tell you how a retailer labels its order sizes. Confirm which dimension the order form requests before applying any allowance.
Keep your original readings unchanged in your notes. If a supplier converts an opening measurement into an order size, save that calculation separately. Ask the supplier to identify the drawing and series used.
Take a survey without making the home insecure
Record accessible dimensions first. Note where trim hides the actual framing, rather than guessing what lies behind it. Arrange further measuring when the opening can be exposed safely and protected afterward.
For a rectangular opening, record widths at the top, middle, and bottom. Record heights at the left, center, and right. Add both diagonals when the framing is accessible.
Keep all readings, including the largest and smallest. Differences help reveal an opening that needs further inspection. The selected manufacturer’s limits decide what variation is acceptable; this guide supplies no universal squareness tolerance.
Do not remove an installed unit merely to complete an online shopping form. First establish who will secure the opening and finish the work. If trim removal would disturb old paint, resolve the paint precautions before measuring behind it.
Doors: identify the assembly before matching the parts
Exterior entry, storm, and combination doors
An exterior entry door closes the main passage. A storm or screen door is a separate outer layer. A combination assembly includes an entry door and storm door within its specified system.
Identify which layer is damaged before describing the replacement. A storm door panel, an entire storm assembly, and a complete combination door require different information. Photograph the attachment at the head, sides, and sill.
Record whether the entry door opens into the home or outward. Then photograph the hinge side from a stated viewing position. Confirm the maker’s handing diagram rather than relying on an unqualified label such as left hand.
Include nearby steps, rails, trim, and the outer door in your photographs. Ask the installer to check operating clearance with the proposed assembly. A size match alone does not settle how the door will open in its surroundings.
Slab replacement versus a complete framed unit
A slab replacement retains the existing frame. Its hinges, latch, thickness, and sealing surfaces must work with that frame. A matching outline does not verify those interfaces.
A complete unit brings its own frame and threshold arrangement. That makes the wall opening, mounting surfaces, and weather protection part of the job. Ask explicitly which of these components a quote includes.
If the frame is sound, have the supplier investigate a compatible panel or hardware repair. If it is damaged, include the frame assessment in the scope. Do not buy a slab to hide a problem at the threshold or jamb.
Locks, hinges, seals, and interior doors
For hardware identification, photograph the installed part, its mating surface, and any stamped numbers. Record the dimensions requested by its maker. A replacement lock may require door thickness, hole preparation, and latch backset, rather than the door’s width.
Backset means the distance from the door edge to the center of the lock hole. Hinge identification needs its mounting shape and hole arrangement as well as size. Avoid enlarging holes or moving hinges until compatibility is confirmed.
Interior doors need a separate check of the panel, frame, hinges, and latch. Include floor clearance in the survey. Do not assume an exterior door measurement method or trimming allowance also applies inside.
A bathroom privacy lock and an exterior entrance lock serve different purposes. Preserve the required emergency release and exit operation when replacing hardware. Ask for the right function before comparing finishes.
Windows: separate glass, sash, screen, and full replacement
Glass or sash work can be a different job
Glazing means the glass and its associated retention or sealing arrangement. A sash is the surrounding assembly that holds the glass. A glass repair and a complete sash replacement are therefore different service requests.
Ask whether the existing model has a supported glass, sash, or hardware repair. Availability and the condition of the remaining assembly decide whether that route is practical. A service drawing proves a repair exists for that system, not that parts fit every older window.
The current Lippert and Heritage vinyl service manual covers several component repairs. It also restricts that manual to Lippert or contracted service technicians. Use it to discuss repair scope with service support, rather than treating its balance or glass procedures as beginner instructions.
Identify how the window operates and mounts
Photograph the full opening from inside and outside. Note which panels move, their direction, and whether any panel tilts or hinges. Include the latch and any identification label.
A fixed picture window does not open. Sliding and hinged styles provide different operating paths. Changing the operating style requires a fresh check of clear opening and any required exit function.
Also identify the mounting arrangement. A fin or flange projects from the frame for attachment at the wall. An insert replacement retains an existing frame, so its suitability depends on that frame and the surrounding wall being appropriate.
Do not transfer an insert measuring method to a full unit replacement. Equally, a full unit rough opening does not establish an insert order size. Ask the supplier which parts stay in place.
Check the wall interface before ordering vinyl replacements
Exterior finish matters as much as the window’s listed width. A flange needs the mounting surface and weather protection described in its instructions. Trim must also leave operating hardware and any tilting sash free to work.
For the covered Lippert vinyl systems, the maker warns against placing vinyl nailing fins over metal siding. It identifies aluminum mounting flanges for that condition. Confirm the intended arrangement using the current building product installation documents.
That example is a reason to inspect the wall interface, not a reason to choose a particular window universally. Send a close photograph of the siding profile and existing mounting edge. Ask which specified flange and flashing detail will be used.
Keep exits and safety glazing in the replacement decision
An egress window provides an emergency exit. Its usable opening matters, not just the glass size or outer frame. Do not substitute a fixed panel for a required exit window.
The current federal manufactured housing construction standards address exterior exits and bedroom escape windows. They also set requirements for the operation and clear opening of egress systems. A replacement for an existing home needs its applicable requirements confirmed before an order is finalized.
Give the installer the room location, existing labels, operating style, and proposed product documents. Ask them to confirm the exit function and any safety glazing requirements. The home’s age alone cannot verify the proposed replacement.
For reference, the federal manufactured housing standards cover these issues in sections 3280.105, 3280.106, 3280.403, and 3280.404. Those are construction standards, not a complete permit determination for your alteration. Confirm the work with the authority responsible for your home.
Keep exit instructions and certification labels in place. Do not add screens, bars, interior trim, or window coverings that obstruct required escape operation. Include the final exit operation in the installer’s completion check.
Before disturbing paint in a home built before 1978, investigate the lead paint risk. Removing trim, scraping, drilling, and sanding can create hazardous dust. EPA recommends a certified contractor; its lead renovation guidance explains the precautions and contractor requirements.
Compare replacement proposals on the same scope
Two quotes can describe different jobs while using the same word: replacement. One may retain a frame and replace a moving component. Another may include full removal, opening repairs, flashing, and new finishes.
Ask each supplier to name the exact manufacturer, series, operating style, and included components. Then compare the installation scope separately. This helps you see what a lower number actually leaves out.
- Product identity: Exact model or series, dimensions, handing or operation, glass configuration, and relevant performance documents.
- Existing materials: Which frames, panels, trim, hardware, and finishes remain in place?
- Opening condition: Who assesses concealed damage, and how is additional repair approved?
- Weather protection: Which installation instructions and flashing detail apply to your wall?
- Finishing: Interior trim, exterior finish repair, cleanup, and disposal.
- Completion: Operation, locking, sealing, exit function where required, and written product records.
Use a quote for your home rather than a national price range as the budget decision. Record whether delivery, tax, labor, and additional opening repairs are included. Keep uncertain work visible instead of assuming it is covered.
Compare energy performance after fit is established
Pane count and frame material describe only part of a window. Compare the labeled performance of the complete product configuration. Then check whether that configuration suits your climate and location.
U factor describes heat transfer; a lower value indicates better resistance to heat flow. Solar heat gain coefficient describes how much solar heat enters. Lower solar gain can help limit unwanted sun heat, while the appropriate choice depends on the climate and application.
The energy label does not verify installation quality or structural suitability. Ask for the selected product’s ratings and installation requirements separately. Avoid accepting a promised utility saving without an assessment of your existing home and conditions.
Check the delivery and completed work
Before the old unit comes out, compare the delivered product with the approved order. Check its labels, operating arrangement, included parts, and visible condition. Report a bent mounting edge, broken glass, or a mismatched panel before installation proceeds.
Keep protective packing and shipping clips in place until the applicable instructions say to remove them. Some systems use those clips to preserve alignment during installation. Removing them early because another product’s instructions did so can create a different problem.
Ask the installer to show you the completed operation before the work is signed off. A door should open, close, latch, and make its specified seal contact. An operable window needs its panels, latches, and other mechanisms checked after installation.
Use the manufacturer’s operating instructions for the demonstration. A sash that binds, a lock that needs force, or trim that blocks movement needs correction. Do not accept those symptoms as something a new unit must simply wear through.
Where an opening serves as an exit, include its required escape operation in that demonstration. Check access after screens, trim, and coverings are back in place. Save the operating instructions with the opening record.
Finally, keep the invoice, product identification, installation instructions, and any warranty documents together. Add photographs of the finished interior and exterior. Those records give the next service request a clear starting point instead of another unidentified door or window.
Make one record for each opening
If several mobile home doors and windows need work, assign each opening a simple identifier. Use room names and locations, such as kitchen east or rear entry. Do not assume two openings are identical because they look similar.
Keep the following information together for each one. Leave unknown items blank with a note explaining what is hidden. An honest missing measurement is safer than an invented order dimension.
- Problem: Describe what fails, where it happens, and whether it relates to rain, temperature, or ordinary operation.
- Identity: Save the brand, series, serial label, part numbers, and full interior and exterior photographs.
- Scope: Name the proposed repair level: hardware, screen, glass, sash, slab, complete unit, or opening work.
- Measurements: Label the boundary, record width before height, include units, and retain every reading.
- Interfaces: Record wall depth, siding or trim arrangement, mounting detail, and operating clearance where relevant.
- Confirmation: Save the supplier’s matched product drawing, order size, applicable instructions, and installation responsibilities.
For a whole home project, sort this record by urgency and uncertainty. Flag impaired exits, broken glass, active water entry, and insecure doors for prompt professional attention. Group routine screen and seal work separately so it does not obscure those decisions.
Before approving the order, read back the component and measurement labels. Ask the supplier to confirm exactly what the order replaces and what stays. That is the useful finish line for planning mobile home doors and windows work.
Found a detail that needs checking? Tell us about a correction.