

Painting mobile home walls starts with identifying the surface and checking whether the home manufacturer permits coating it. Sound painted drywall is a different project from factory laminated panels. A primer that sticks to vinyl does not establish that changing your particular wall finish is appropriate.
If painting is permitted, the sequence is straightforward: correct damage, clean as instructed, test the complete coating system, then prime and paint. Let each layer reach its specified condition before continuing. Keep the battens unless changing the joints is a separately approved part of the work.
Before painting mobile home walls, identify what you have
Find the home’s owner manual, manufacturer and model information. Ask the manufacturer about the room and original wall finish, especially if the manual gives no repainting instructions. Photographs can help that conversation, but a photograph alone cannot confirm the coating or hidden assembly.
Use the wall and ceiling material guide if you need help separating the decorative face from the underlying sheet. Do not cut out a sample or peel the surface just to identify it. Record an unknown rather than creating damage.
| Surface you can identify | What must be confirmed | Painting implication |
|---|---|---|
| Previously painted drywall | Existing paint is sound; damage and hazardous materials have been assessed. | Use preparation and primer guidance for that existing coating and any repaired areas. |
| Vinyl faced gypsum, often called VOG | The manufacturer permits painting that specific factory face. | Obtain a compatible preparation, bonding primer and topcoat system; preserve the facing. |
| Paper faced or coated paper panels, sometimes called POG | Exact face and moisture sensitivity, plus permission to coat it. | Do not assume a vinyl primer or wet cleaning method transfers to paper. |
| Painted wood or decorative wood paneling | Actual wood, veneer or imitation finish; soundness and coating compatibility. | A wood finish system may differ from one for laminated gypsum. |
| Added wallpaper or an unidentified decorative layer | What was added, how it is attached and what lies beneath. | Resolve removal or coating with the appropriate manufacturers before starting. |
A printed pattern does not prove that the surface is removable wallpaper. A factory facing can be part of the panel. Generic wallpaper stripping directions are therefore not permission to steam, soak or peel a manufactured home wall.
There is a consequential exception to the usual painting advice. The January 2019 Champion owner guide generally discourages painting prefinished surfaces. It also connects replacement vinyl finishes with moisture control.
That example is not a rule for every home or a current instruction for your model. It shows why the actual manual takes priority over a generic primer recipe. If yours discourages painting, ask for written guidance about an acceptable alternative before buying coatings.
Clear moisture, damage and dust hazards first
Walk the room in daylight. Note stains, bubbles, loose edges, soft areas and recurring cracks without pushing or opening damaged material. These observations determine whether this is still a painting project.
A stain near an opening needs investigation before a stain blocking primer. Follow the window leak troubleshooting guide when the pattern points there. A surface that looks dry today does not prove the source has been corrected.
Do not paint over mold or unresolved dampness. EPA’s moisture and mold guidance explains why cleanup and water control come first. Extensive damage, contaminated water or suspected hidden mold calls for appropriate professional assessment.
A primer cannot glue a delaminating factory face back onto its core. Soft gypsum, separated layers or major damage may require panel repair or replacement. Establish that repair scope before choosing the finish.
Resolve lead concerns before sanding, scraping or disturbing old coatings. For homes built before 1978, or an unknown construction date, consult the current lead renovation guidance before preparation. A normal room painting checklist is not a lead containment plan.
Suspect asbestos materials also need qualified assessment before disturbance. Appearance cannot establish whether asbestos is present. Do not sand, drill, scrape or take your own sample of suspect material.
Repeated cracks, loose panels or doors that newly bind deserve investigation rather than another coat. If several rooms are involved, coordinate the cause and repair through your larger remodel plan. Finish work should follow the repair, not conceal an unresolved condition.
Choose a complete coating system, not a magic primer
For painting mobile home walls, compatibility involves several interfaces: existing finish, cleaner residue, repair material, primer and finish paint. Each must work with the next. A successful primer on someone else’s wall does not verify that chain in your room.
Take your surface identification and manufacturer guidance to the coating supplier. Ask for the exact primer and interior topcoat, plus their current technical sheets. Include any existing coating, patches, caulk and different batten material in the question.
A bonding primer addresses adhesion to a difficult surface. A stain blocking primer addresses a different problem. Some products serve both purposes, but that must be documented for the material and stain involved.
A drywall primer intended for bare porous board is not automatically a primer for a slick factory facing. Likewise, a paint labeled as paint and primer does not establish approval over that facing. Check the stated preparation and substrate requirements.
The Stix SXA-110 technical sheet is a useful example of product specific limits. It lists vinyl among its uses, yet still requires suitable preparation and testing of questionable substrates. That is evidence about a coating, not approval to change every manufactured home wall.
No single paint sheen solves adhesion. First establish the compatible system; then choose the desired appearance and documented cleaning performance. Look at an approved sample under the room’s daylight and evening light before committing to the color.
Use interior coatings for an interior room. Ask about ventilation, application conditions, cleanup and return to service at the same time. If a suggested solvent system creates conditions you cannot manage, resolve that before purchase.
Write down these answers
- Permission: Who confirmed that this home and surface may be painted?
- Preparation: Which cleaner, rinse method and surface treatment are approved?
- Materials: Which repair product, primer, topcoat and applicators form the proposed system?
- Conditions: What temperature, humidity and drying requirements apply to each product?
- Acceptance: How should the trial area be checked, and after what interval?
Keep the replies with photographs and copies of the technical sheets. If the coating maker’s preparation conflicts with the home instructions, stop at that conflict. Ask both parties for an acceptable method rather than silently choosing one.
Test the whole finish before coating the room
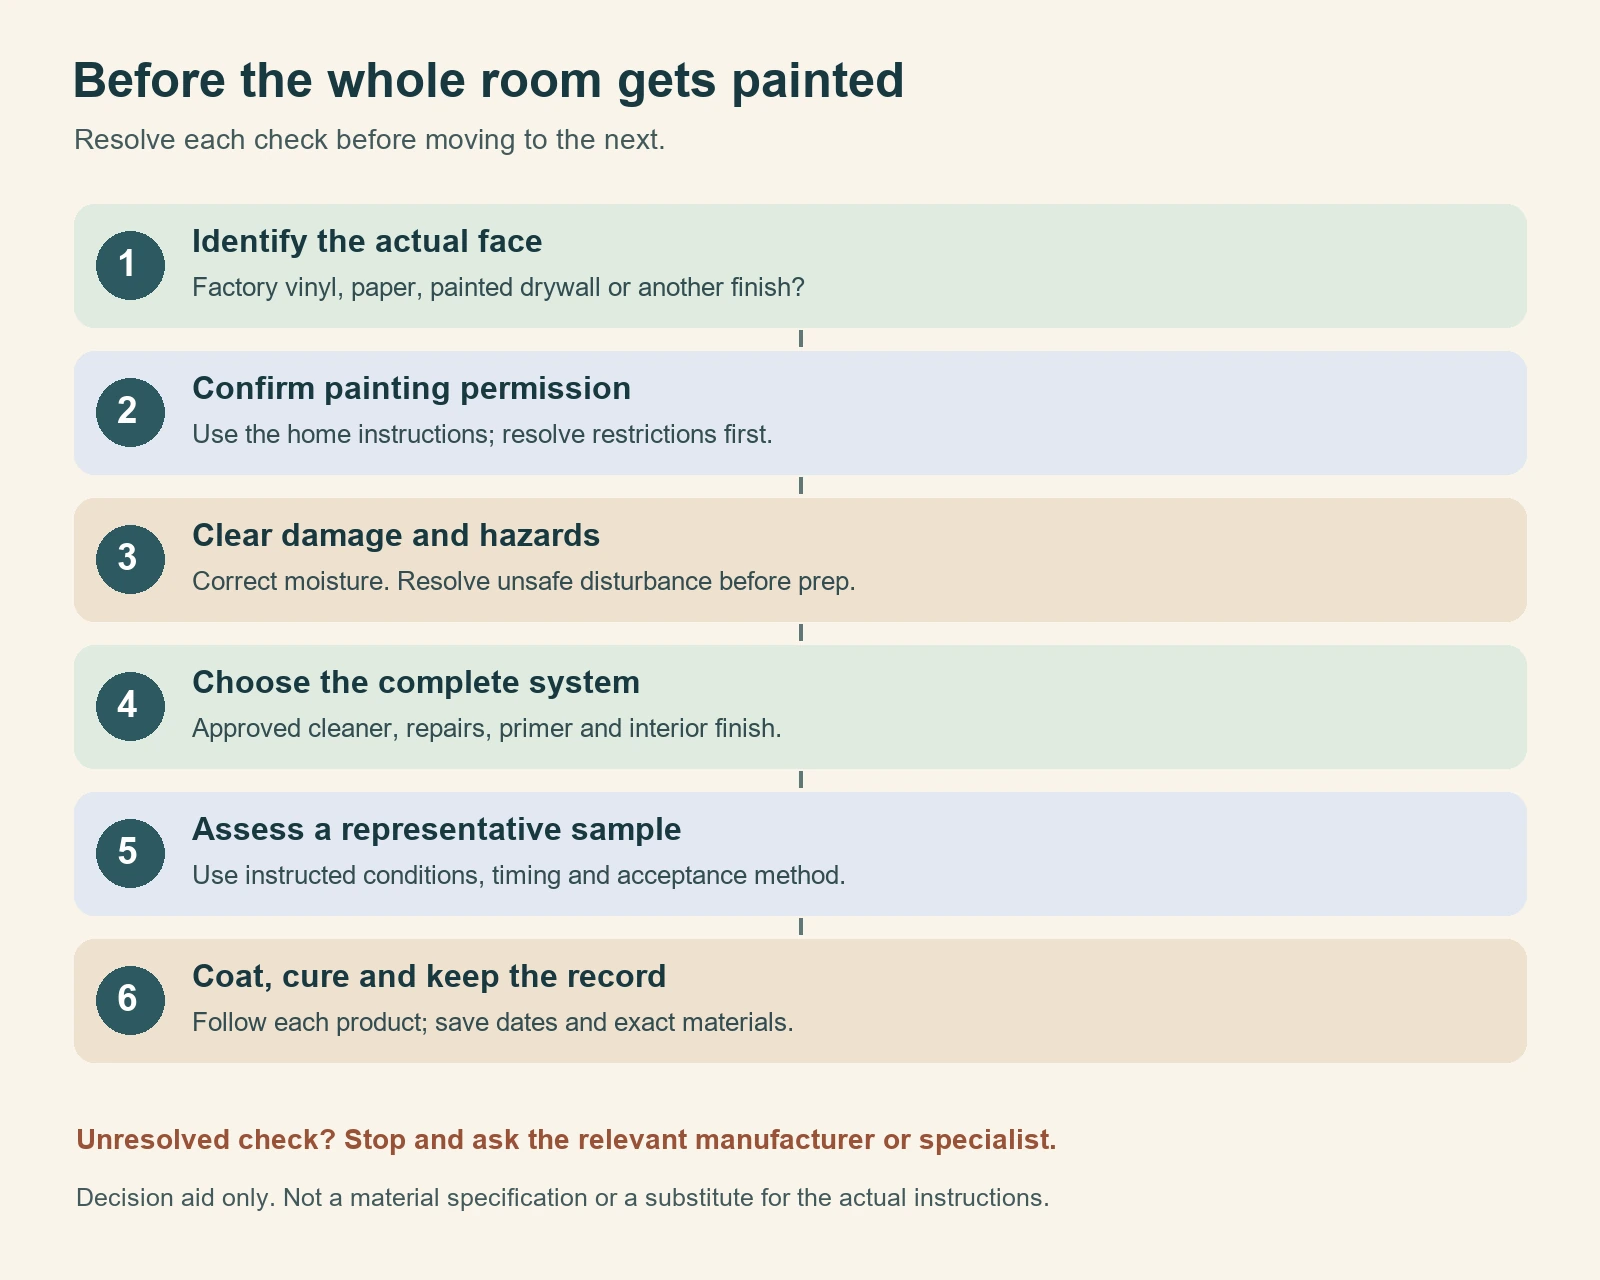
Use a small, inconspicuous trial area only after permission and material concerns are resolved. Follow the proposed cleaning, preparation, primer and paint sequence there. An unprepared dab of color tests neither the process nor its adhesion.
Include a representative batten if it will be painted and its material differs from the panel. Include an approved repaired spot when patches are part of the project. Label each sample location so you can connect a result with the surface underneath.
Record application dates, products and room conditions. Wait for the coating manufacturer’s specified assessment interval. Ask for an appropriate adhesion check rather than inventing a knife cut or aggressive tape test that could damage the panel.
Look for lifting, wrinkling, softening, bubbles, persistent tack, staining and an unsatisfactory texture. Stop if the original facing lifts, even when the new paint remains attached to it. That is a different failure from paint releasing cleanly from an intact face.
A passed sample reduces uncertainty; it does not predict every wall in the home. Repeat the assessment for a different existing finish or contamination history. A clean bedroom sample does not establish how a greasy kitchen wall will respond.
| Milestone | What it means | What it does not establish |
|---|---|---|
| Dry to touch | The film has reached the product’s stated touch condition. | Readiness for another coat, washing or adhesion assessment. |
| Ready to recoat | Another specified coating may be applied under the stated conditions. | Full hardness, final adhesion or normal cleaning resistance. |
| Cured or ready for service | The product has reached its stated later use milestone. | Approval of an unsuitable substrate or a guarantee against hidden damage. |
The primer example above allows certain topcoats within hours while describing several days for maximum scrape resistance. Those intervals belong to that product and its conditions. Do not turn them into a universal overnight test or a fixed completion promise.
Keep battens or plan a separate joint change
You can retain the vertical strips and change the wall color if the coating system is approved for both surfaces. Decide whether to paint the strips with the wall or preserve a contrasting finish. The strips will remain visible; paint changes their color, not their profile.
Removing battens changes more than the painting workload. The exposed joint may need an approved repair detail, compatible materials and a decision about movement. Do not fill every gap with a generic caulk or drywall compound.
Do not bridge an unidentified movement joint or the connection between home sections simply to make it disappear. Ask the home manufacturer or qualified remodeler how that joint should be treated. Keep that decision separate from selecting a wall color.
If you want a smooth wall, price and approve that surface conversion before purchasing finish paint. A trial coat over an intact panel does not test the proposed joint conversion. Reassess the completed, approved surface before coating the entire room.
Prepare and paint the approved surface
The following workflow applies after the home instructions, sound surface and sample checks are satisfied. Keep the chosen products’ instructions beside you. Where their method differs, resolve it rather than combining unrelated recipes.
1. Protect the room and arrange ventilation
Move furnishings away and cover floors and items that remain. Keep children and pets outside the work area. Arrange outdoor ventilation suitable for the products and continue it as instructed after application.
Do not assume a running air conditioner provides fresh outdoor air. Avoid spreading paint vapors through the home. Get guidance for the actual ventilation arrangement instead of covering a working system’s only return or blocking needed airflow.
Protect switches, receptacles and other devices from coatings and wet cleaning. This guide does not require removing electrical devices or working inside boxes. Have electrical defects addressed separately before painting nearby.
2. Clean without damaging the facing
Use only the cleaner and method approved for the identified surface and coating system. Start in the trial area. Follow any rinse requirement and let the surface reach the required dry condition.
Do not soak panel seams or flood paper faced material. A stronger detergent is not automatically better preparation. If the finish changes, softens or transfers during approved cleaning, stop and ask the manufacturer how to proceed.
Do not mix cleaners or copy a bleach mixture from an unrelated manual. Contamination that cannot be removed by an approved method needs a revised plan. Extra primer is not a substitute for cleaning.
3. Complete approved minor repairs
Repair only the damage already identified as suitable for cosmetic treatment. Follow the repair material’s compatibility and drying instructions. Serious damage, wet cores and loose laminates belong in the repair scope established earlier.
Do not routinely sand or strip factory vinyl to make primer stick. If a coating instruction calls for abrasion or chemical deglossing, verify permission for this exact face first. Resolve dust hazards before any permitted disturbance.
4. Apply the specified primer
Mix and apply it as instructed, using the stated brush or roller for the surface. Follow coverage and film requirements rather than stretching the can over an extra room. More material is not automatically a stronger bond.
Work around edges and then across manageable areas. Watch for lifting, beading or unusual reaction as you proceed. Stop at a new reaction instead of covering it with another coat.
Use the required number of primer coats and observe the recoat interval. There is no universal rule that every wall needs two primer coats. The substrate, chosen system and instructions decide.
5. Apply the compatible interior finish
Use the brush and roller specified for the paint and surface texture. Work in manageable sections so the edge remains wet as directed. Avoid pressing harder to force a nearly empty roller farther across the wall.
Apply the required coats with the prescribed interval between them. Assess coverage and color in normal room lighting. Do not keep working partly dried paint to chase a small mark; follow the product’s correction guidance.
6. Let the finish reach its use conditions
Wait for the specified cure or service interval before washing, placing objects against the wall or reinstalling items that touch it. Tape removal also follows the tape and coating instructions. Dry to touch is not permission to scrub a fresh finish.
Keep labels, color formula, batch information and a small suitable touchup supply according to storage directions. Record when the room was finished. Follow local disposal requirements for remaining coatings and cleanup materials.
Plan quantities and time without a false weekend promise
Measure each wall’s length and height, then calculate its area. Account for openings and include battens or other surfaces as appropriate to the product’s estimating method. Use the actual coating’s coverage and coat requirements; primer and finish may differ.
For a hypothetical estimate, suppose the paintable area is 320 square feet and the chosen finish requires two coats. That is 640 square feet of coating coverage before allowance for texture or waste. Divide by that product’s stated coverage, then round to available container sizes with the supplier.
Do not use this example as a room size or gallon recommendation. A finish that covers well on painted drywall may behave differently on your approved prepared surface. Count cleaning supplies, protection, sample materials and necessary repairs separately.
Schedule the sample assessment before the full room work. Include cleaning and drying, repairs, each recoat interval and the final service interval. A short application session can still require several calendar days before normal use.
If the paint fails, identify which layer failed
Painting mobile home walls should end with a record you can use if a problem appears. Photograph the affected area and note when it started. Keep the coating information available for the manufacturer or painter.
| Observation | Useful information to collect | Next decision |
|---|---|---|
| New coating releases from an intact face | Preparation, products, conditions, waiting intervals and locations affected. | Have the coating supplier review compatibility and the approved correction method. |
| The decorative face separates with the paint | Whether the face was already loose or damaged; any moisture history. | Assess the panel, not merely a stronger primer. |
| Bubbles, soft areas or returning stains | Location, timing and relation to leaks, weather or room use. | Investigate moisture and material condition before refinishing. |
| Cracks return at joints | Joint location and any other changing conditions in the room. | Review the joint treatment and possible movement rather than coating it repeatedly. |
These observations do not diagnose a cause by themselves. Avoid peeling a large area to investigate or sanding off the failed job without reassessing material hazards. The correction must suit both the original panel and the coating failure.
For normal maintenance, follow the finish manufacturer’s cleaning interval and approved cleaner. Test a gentle cleaning method in an inconspicuous spot before tackling a visible mark. Record recurring dampness or damage as a new repair issue rather than routine paint wear.
Found a detail that needs checking? Tell us about a correction.