

A mobile home remodel should start with the problems you want to solve and the condition behind the finishes. A new floor won’t repair a soft subfloor. Fresh wall paint won’t stop a window leak.
That doesn’t mean every project needs demolition or a complete rebuild. You can keep a sound layout and still improve storage, light, surfaces and daily convenience. The useful first decision is which changes can stand alone and which depend on repairs elsewhere.
Use this guide to organize the whole project before choosing materials or asking for bids. It separates owner observations from decisions that need a manufactured housing contractor, licensed trade or design professional. The aim is a home that works better after the attractive surfaces are installed.
Define what your mobile home remodel needs to accomplish
Write one specific problem for each room. “Update the kitchen” leaves almost every decision open. “Keep the sink location, improve drawer storage and replace worn cabinet fronts” gives the project a boundary.
Separate that list into three groups. First are defects that need assessment or repair. Next are changes that improve function, followed by appearance choices.
| Scope | Example | What you need before proceeding |
|---|---|---|
| Surface refresh | Repaint sound cabinets or replace window coverings | A suitable existing surface and the finish maker’s preparation instructions |
| Repair with replacement | Replace a leaking shower and investigate the damaged floor | The water source, extent of damage, approved repair scope and compatible fixture assembly |
| Alteration | Move a sink, change an opening or remove a wall | System or structural assessment, applicable approvals and a coordinated plan |
A project can contain all three. Keep them as separate lines in your scope, even when one contractor handles everything. Otherwise, a finish allowance can conceal an unresolved repair.
Decide what stays, too. Keeping a serviceable tub, cabinet layout or door opening can narrow the work considerably. Replacement should solve a defined problem rather than follow automatically from a room makeover.
Build a home record before anyone changes the layout
Gather the manufacturer, model, serial number, available plans, owner’s manual and records of earlier alterations. Photograph the data plate and certification labels if present. Keep copies with the project documents instead of removing identification during the work.
The original manual helps establish how the home and its installed systems were intended to work. It doesn’t reveal every later repair. Mark undocumented changes as questions for the people assessing the project.
Make a simple room sketch with existing doors, windows, fixtures and equipment. Add accessible shutoffs, service panels, access doors and heating or cooling openings. This is a coordination sketch, not a wiring diagram or an approved construction drawing.
Collect the exact instructions for proposed fixtures and finishes alongside it. A store’s “mobile home” label isn’t a complete fit specification. Our parts compatibility guide explains why measurements, connections and installation conditions matter together.
Check the authority for this existing home’s alteration
Federal manufactured housing construction standards explain the original building system. They aren’t a blanket approval for remodeling an occupied home. Ask the applicable state manufactured housing office and local building department who reviews your proposed work.
Describe the work precisely when asking. Replacing a floor covering differs from repairing floor decking or joists. Changing paint differs from adding gypsum board or cutting an opening.
For example, Washington’s alteration list treats those jobs differently. It lists similar floor covering replacement separately from floor structure work and added gypsum board. Those are Washington examples, so confirm the rules for your address.
Ask about required plans, trade permits and inspection stages before ordering materials. Community permission, where applicable, is a separate question from technical approval. Keep written answers with the scope so each bidder works from the same assumptions.
Find the damage source before choosing the covering
Start with an observation walk through the home. Note stains, soft flooring, swollen trim, recurring odors, sticking doors and visible cracks. Record the location and when each condition appears without naming a cause you haven’t verified.
A stain near a window could relate to water entry at that opening. It could also require investigation beyond the window itself. The window leak investigation guide helps organize that branch before damaged interior finishes are replaced.
Don’t turn the survey into a destructive test. Avoid standing on soft areas or entering a damaged space to obtain a better photograph. Sagging surfaces or suspected structural damage need assessment before ordinary room work continues.
Write three separate entries for each problem: observed symptom, confirmed cause and repair. Leave the middle entry blank until it is established. “Bathroom floor feels soft” is useful evidence; “needs new vinyl” is already an unsupported solution.
Water control and material condition are separate checks. Stopping a leak doesn’t restore damaged wood or make a closed cavity dry. The repair scope must address what can remain and what needs replacement.
EPA’s mold cleanup guidance calls for fixing water problems and drying materials. It also warns against painting or caulking moldy surfaces. Moldy porous materials may need replacement; a stain blocking coating isn’t a substitute for that decision.
Resolve material hazards before sanding or demolition
Older finishes need more than a visual guess. Paint in a home built before 1978 may contain lead. Arrange the appropriate evaluation and work practices before disturbing it, especially when children occupy the home.
Suspected asbestos is another reason to pause disturbance. You can’t establish its presence or absence from appearance alone. A trained asbestos professional should handle assessment and sampling when the proposed work could disturb suspect material.
Intact material that won’t be disturbed may call for a different approach from damaged material in a demolition area. Don’t pull up a sample or sand a small patch to find out. Ordinary dust masks and an open window don’t resolve an unknown material hazard.
Put the project in an order that avoids redoing work
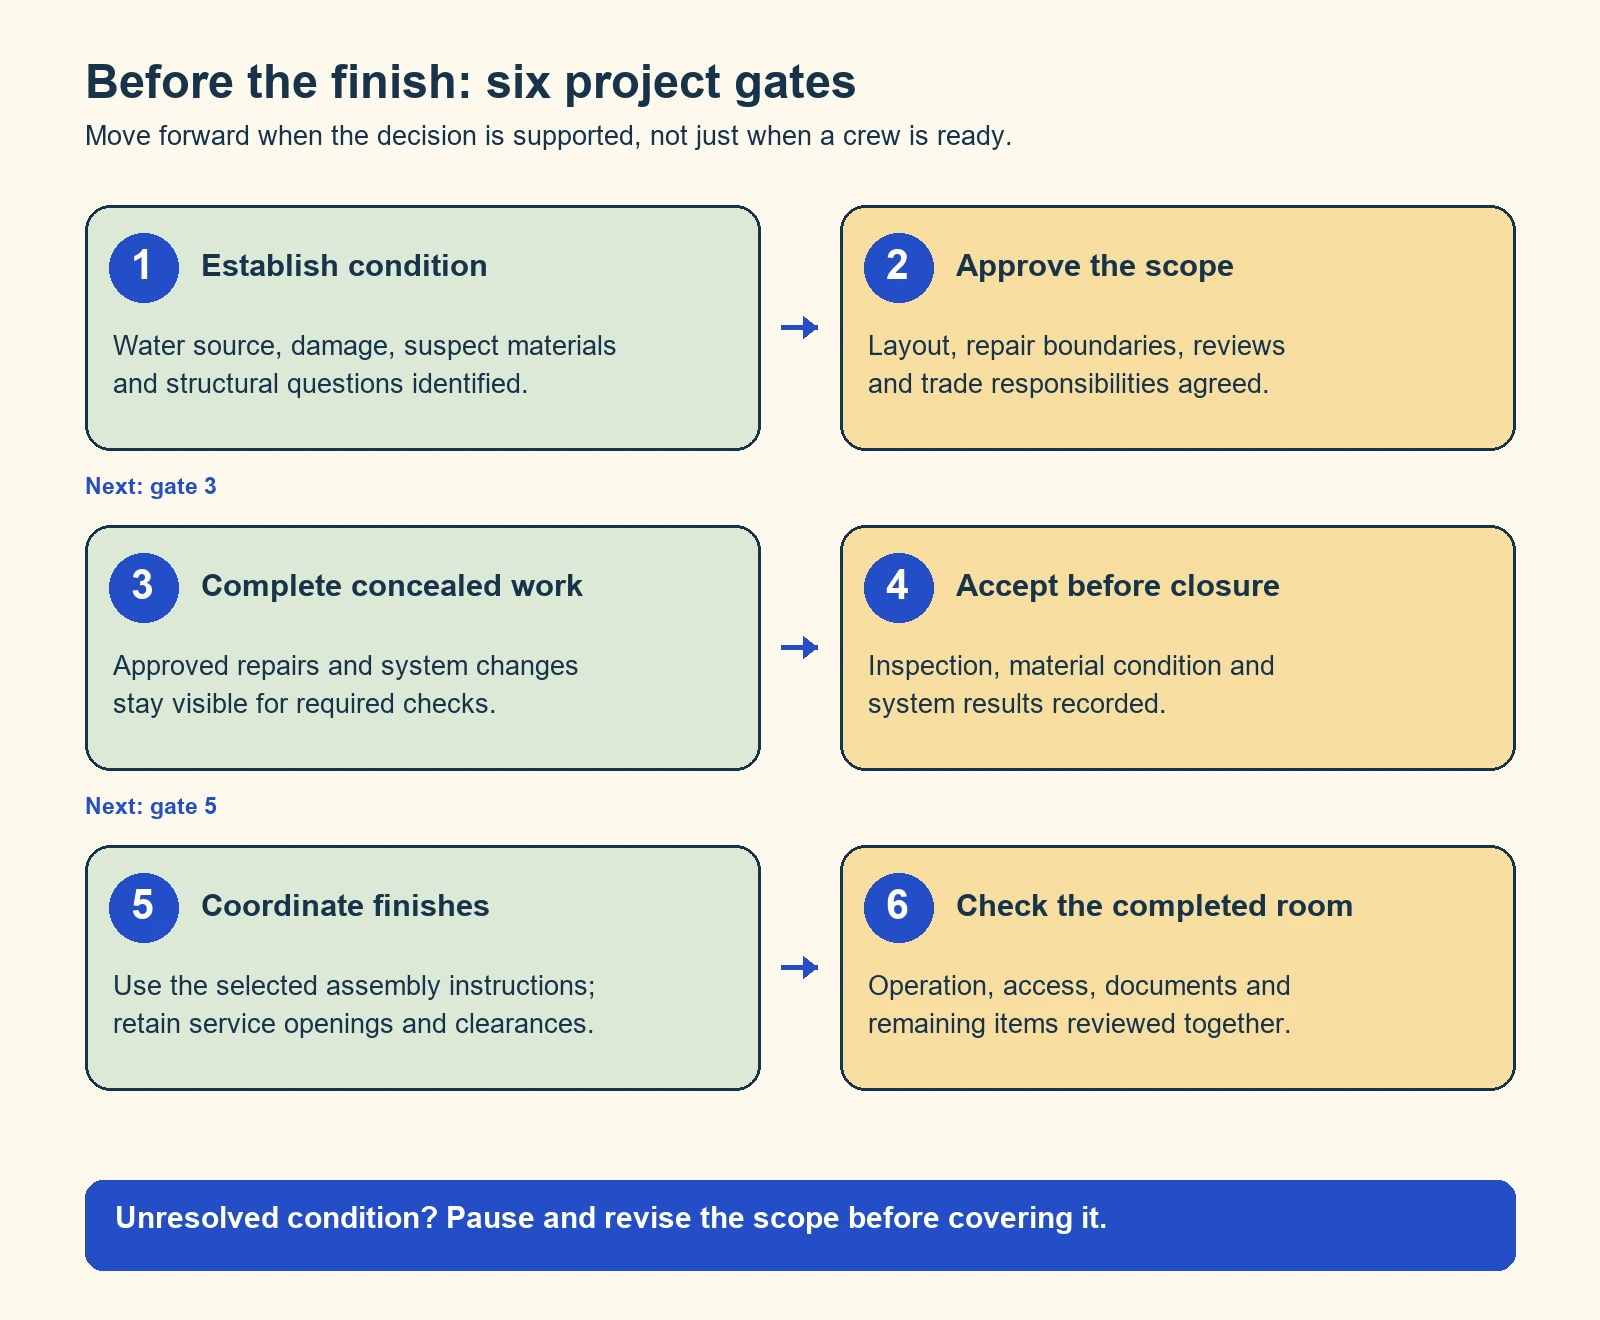
Use the following gates to release work into the next stage. A gate is a decision with evidence behind it, not a fixed number of days. The actual trade order and inspections still follow the approved plan.
- Establish the condition. Identify water sources, damaged areas, unknown materials and suspected support problems. Decide which assessments must precede design.
- Approve the scope. Confirm the layout, required reviews, repair boundaries and installation requirements. Assign responsibility for each connection between trades.
- Complete concealed work. Carry out the approved repairs and system changes. Keep the required work visible for inspections and tests.
- Accept the work before closure. Record inspection results, material condition and required system checks. Resolve defects before adding the covering.
- Install finishes in the agreed order. Coordinate flooring, cabinets, fixtures and trim with their exact instructions. Keep service openings usable.
- Check the finished room. Verify operation, clearances, access and outstanding items. Save the final instructions, photographs and approvals.
These gates prevent a common scheduling mistake: treating a finished wall as proof the work behind it is complete. A crew can be ready to hang panels while a required inspection is still outstanding. The covering waits until the responsible person releases it.
Sequence also depends on the selected assembly. “Floors last” isn’t an instruction for every flooring and cabinet system. Agree on that relationship before either installer arrives.
Choose room improvements by the problem they solve
A mobile home remodel can feel more spacious without moving a wall. Start by testing furniture placement and daily routes on your sketch. Then choose changes that improve use without creating unplanned system work.
| Goal | A change worth considering | Check before committing |
|---|---|---|
| A more usable kitchen | Improve drawers, cabinet interiors or task lighting while retaining fixture locations | Cabinet condition, fastening, drawer clearance, supply access and any electrical scope |
| An easier bathroom routine | Choose storage and fixtures around how the room is actually used | Floor condition, fixture fit, drain position, service access and ventilation |
| A calmer living room | Reduce furniture conflicts and coordinate wall colors, lighting and window coverings | Exit routes, operating windows, registers and equipment access |
| Better bedroom storage | Reorganize the closet or use furniture suited to the available floor space | Door swing, window access and the support required for anything mounted |
| A tidier laundry area | Plan reachable storage and a clear appliance service route | Hoses, shutoffs, drain, dryer exhaust and appliance instructions |
Keep the idea and its qualification together. A floating vanity may free visible floor space, but its appearance doesn’t establish adequate wall support. A deeper cabinet may add storage while making a door or service opening difficult to use.
For bathrooms, work through fixture and bathroom planning before ordering the suite. A matching finish doesn’t guarantee that the tub, faucet, drain and surround form a compatible installation.
Choose a small finish palette after these functional decisions. Compare samples in the actual rooms and lighting. Keep a record of the approved colors and product identities so substitutions don’t happen by memory.
Check walls, floors and weight as assemblies
A thin wall is not permission to remove it
Wall thickness, a hollow sound or a video of another home can’t establish a wall’s structural role. A manufactured home is designed as an integrated structure. Its framing and connections transfer loads through the building system.
If the project changes a wall, column, opening or connection between home sections, get the home specific assessment first. The person designing the change needs the existing conditions and proposed loads. Don’t cut framing to investigate whether it was necessary.
Even a wall confirmed as a partition can contain wiring, piping or other services. Structural permission doesn’t complete those checks. Record both the approved structural scope and the system work required by the change.
Floor covering and floor structure have different jobs
A wear surface can look sound while the material below needs repair. Conversely, an unattractive but stable floor may not need structural replacement. Have the actual condition established before choosing an overlay or removal plan.
For the proposed flooring, check the allowed substrate, preparation, moisture conditions, room use, expansion provisions and transitions. Also check the relationship to fixed cabinets and appliances. Installation methods have different requirements, so don’t transfer one product’s rules to another.
A waterproof flooring claim doesn’t establish that the existing wood is dry or sound. Nor does it settle how the room’s joints, edges and penetrations must be handled. Those details belong to the specific floor and room assembly.
Avoid buying a leveling compound as a response to an unexplained slope or soft spot. A smooth surface and a sound support system are separate goals. Ask the assessor what is causing the condition and which repair resolves it.
Added material changes the scope even when it looks cosmetic
Tell the designer or contractor about heavier finishes, added wall layers, large storage installations and changed fixtures. Include the proposed assembly rather than a single material sample. Existing damage and fastening conditions also matter.
There is no useful blanket rule that every manufactured home must avoid drywall or tile. There is also no sound rule that either material suits every home. The actual design, support, substrate and installation determine the answer.
Ask for a documented decision before accepting “it’s lightweight” as the explanation. That description doesn’t quantify the full change or verify the connection. Keep the selected specification with the approved work.
Keep plumbing, airflow and equipment serviceable
Draw a line around what the finish work must leave accessible. Include shutoffs, drain service points, fixture access panels and equipment service areas. The completed room should still allow the planned maintenance and replacement work.
Have plumbing changes assessed as a system. Moving a fixture can involve supply, drainage, venting and access together. The plumbing system guide explains those different paths before the room layout locks them in.
Keep heating and cooling openings clear in the design sketch. Don’t treat a grille as spare wall or floor space for a cabinet. If the layout changes airflow routes, include the HVAC contractor before selecting the final enclosure or door arrangement.
Exhaust and combustion equipment need coordination too. Increasing exhaust or changing enclosure conditions can affect pressure around fuel burning appliances. That assessment belongs with a qualified professional rather than a trial with a larger fan.
Plan dust containment, occupant separation and cleanup for the actual work. General indoor air practices for remodeling don’t replace specialized lead or asbestos procedures. Product instructions also govern ventilation and safe use during finish installation.
Use a scope sheet that exposes the unknowns
Give every bidder the same room list, photographs and proposed products. Ask each to identify what the price includes, excludes and assumes. A lower total isn’t comparable when one bid includes floor repair and another assumes the floor is sound.
| Field | What to write |
|---|---|
| Requested change | The outcome, retained items and exact location |
| Known condition | Observed defect, confirmed cause and supporting photographs or report |
| Unresolved condition | What remains hidden, who assesses it and what decision follows |
| Approval | Responsible authority, required plans, permits and inspection stages |
| Trade boundary | Who disconnects, repairs, reconnects, tests and releases the work |
| Finish assembly | Exact product instructions, substrate and installation responsibilities |
| Completion evidence | Required checks, retained service access, photographs and outstanding items |
Ask how a concealed defect changes the agreement. Identify who authorizes extra work and how the revised scope is documented. Keep that decision separate from a cosmetic upgrade you might choose later.
Set aside funds for identified uncertainties using actual project information and bids. A universal online percentage can’t tell you the cost of an unknown damaged cavity. If the essential repairs consume the available budget, phase the appearance work.
A practical first phase should leave a usable, protected room. Don’t spend the entire allowance on finishes while the cause of damage remains unresolved. Keep optional upgrades clearly marked so they can be deferred without disrupting required repairs.
A hypothetical kitchen example
Suppose you want painted cabinets, a new faucet and new flooring. You also see swelling inside the sink cabinet. Keep the fixture locations for now and record the swelling as a condition needing investigation.
The first decision is whether there is an active leak and what material has been damaged. Next, establish the cabinet and floor repair scope. Only then confirm which cabinet surfaces remain suitable for refinishing.
The plumber and cabinet installer agree on connection access. The flooring installer checks the chosen system’s cabinet relationship and preparation requirements. Painting and floor installation then follow that coordinated plan.
If the sink cabinet needs replacement, update the scope before ordering matching fronts. That discovery changes a retained component. It doesn’t automatically require moving the sink or replacing every kitchen cabinet.
Plan how the home will function during the work
For an occupied home, write down which rooms and services remain available during each phase. Ask when water or power interruptions are expected and who restores service. If the only bathroom becomes unavailable, resolve the living arrangement before removal begins.
Agree on material storage, waste removal, delivery access and protection for retained surfaces. Ask the contractor where materials can be placed without creating an unsupported storage load. Don’t assume a pile of renovation supplies belongs anywhere there is empty floor space.
Keep occupants away from work areas that require isolation. Plan a clear route through the usable part of the home. A project schedule should include cleanup and the conditions for reoccupying each room, not just the last installation date.
Check product lead times and the route into the room before demolition. Large fixtures may need more access than their final position suggests. Confirm delivery, fit and installer readiness so a removed fixture doesn’t leave an avoidable gap in essential services.
Close the mobile home remodel with records and operating checks
Walk through the completed scope with the responsible contractor. Match each item to the agreement, including approvals, tests and deferred work. Record an unresolved defect as an open item rather than accepting a promise that a new covering will hide it.
Check the ordinary functions you planned to improve. Open cabinet drawers and room doors, operate fixtures, and confirm that service panels remain accessible. Have the responsible trades explain the system checks they performed and supply the relevant results.
Save photographs of concealed work, product identities, instructions, inspection approvals and change records. Mark the date and location on each file. Keep the final room sketch with these documents so a later repair starts with useful information.
Distinguish finished work from remaining monitoring. A repaired leak may justify later observation during normal use or rain. Agree on what to watch, who to contact if symptoms return and any warranty procedure that applies.
Can you make an older interior look current without gutting it?
Yes, when the retained components are suitable and sound. Coordinated paint, furniture, cabinet hardware and window coverings can change a room while retaining its layout. Start with condition and compatibility checks so a refresh doesn’t conceal required repairs.
Should every room use the same flooring?
That’s a design choice subject to the selected product’s installation limits and each room’s conditions. Continuous appearance doesn’t erase transition, expansion or wet area requirements. Confirm the actual system before committing to a seamless layout.
Who should assess a wall you want to remove?
Start with a qualified manufactured housing contractor and the applicable alteration authority. A design professional may need to establish the structural plan. The assessment must address this home’s structure and concealed systems before removal starts.
Found a detail that needs checking? Tell us about a correction.