
A mobile home door size such as 34 x 76 does not tell you the panel dimensions by itself. It may identify the opening a particular assembly needs. Before ordering, separate the moving slab, installed frame, wall opening and usable passage.
Widths such as 32, 34, 36 and 38 inches appear in manufactured housing door catalogs. Heights vary by series and configuration. Your home’s measured opening and the exact replacement instructions decide the fit, not a chart based on its age.
This guide covers exterior entry doors. It gives you a measurement record to take to a supplier, plus actual manufacturer examples showing why generic sizing shortcuts fail.
Use the doors and windows overview to plan a project involving several kinds of opening.
What does a mobile home door size actually measure?
Start by asking what you are replacing. A complete assembly includes more than the moving door. A slab replacement keeps the existing frame, which creates a different matching problem.
| Term | What it describes | What to do with it |
|---|---|---|
| Call size or nominal size | The product’s ordering designation, such as 34 x 76 | Look up its meaning for that exact series. Do not assume it equals the slab. |
| Slab size | The width, height and thickness of the moving door | Use when investigating a replacement slab. Also compare hinges, latch locations and edge details. |
| Unit or frame size | The assembly’s outside dimensions at the surfaces defined by its drawing | Keep this separate from decorative trim and any projecting mounting flange. |
| Rough opening | The framed opening that receives the assembly | Compare exposed framing measurements with the manufacturer’s required opening and tolerance. |
| Clear opening | The usable passage through the installed door | Check separately for access and applicable exit requirements. A catalog width does not establish it. |
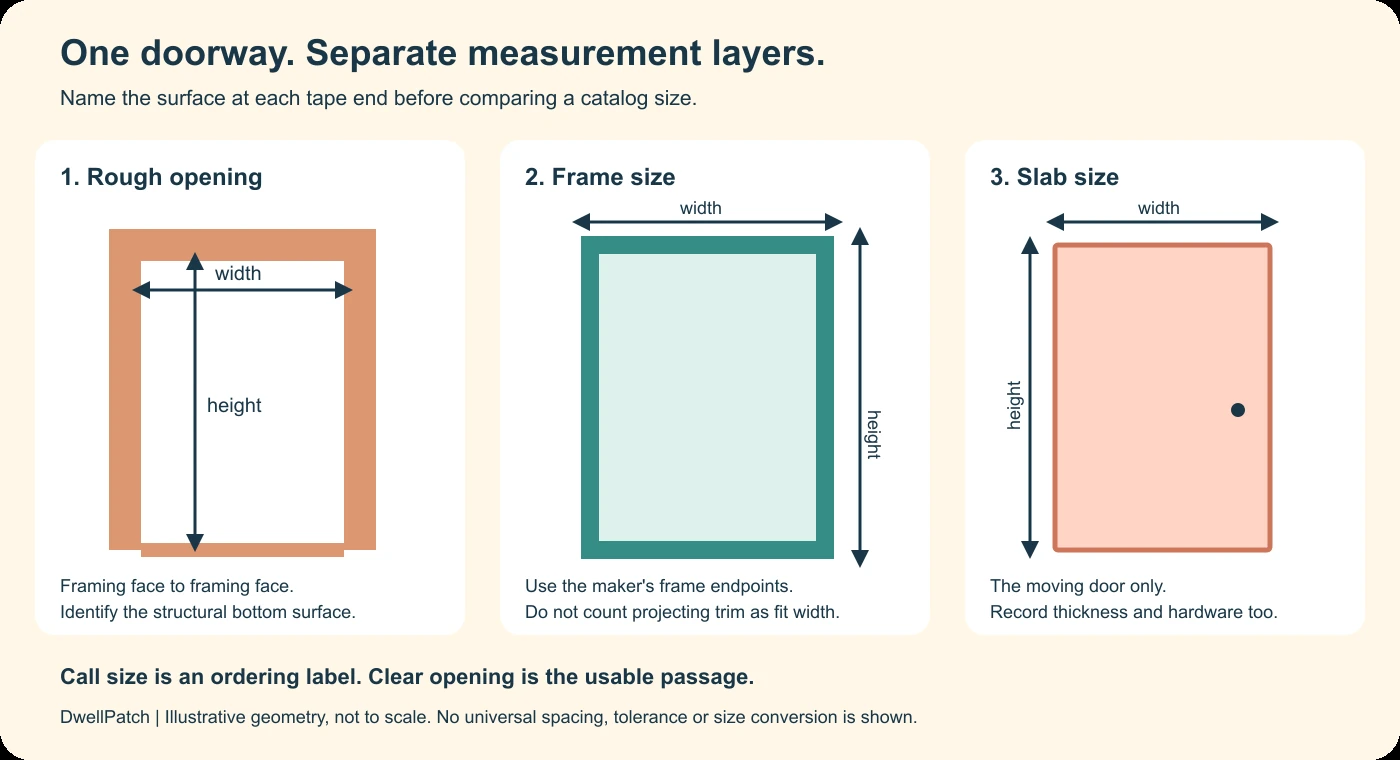
The frame sits inside the rough opening. The slab swings within the frame. Exterior trim and mounting flanges can project beyond the part that enters the wall.
That is why measuring across the outside metal trim can produce a misleading width. Measuring only the open passage can produce another misleading number. Label the tape’s endpoints before calling either result your door size.
Actual size examples, with the manufacturer limits attached
There is no single conversion that works for every manufactured home entry door. The following examples come from the Elixir door installation instructions, updated August 26, 2025. They are examples for named series, not permission to alter an opening.
| Door family | Call size, width x height | Recommended rough opening, width x height |
|---|---|---|
| Regular Outswing Series 200, 300 and 400 | 34 x 76 | 34 x 76 |
| Steel Residential Combination Series 7000 | 34 x 82 | 34 x 81 3/4 |
| Steel Residential Combination Series 7000 | 36 x 82 | 36 x 81 11/16 |
| Steel Residential Combination Series 7000 | 38 x 80 | 37 9/16 x 80 |
| Steel Residential Combination Series 7000 | 38 x 82 | 37 9/16 x 81 11/16 |
The manual gives these opening dimensions a tolerance of minus zero, plus 1/4 inch. Its Housetype Combination section lists the same table entries for Series 6000, 8000 and 9000. However, that section also says openings match call sizes, which conflicts with some table rows.
For those exceptions, get written confirmation for the exact ordered unit. Do not choose between conflicting statements by rounding your measurements. Save the confirmed drawing or order specification with your receipt.
The Regular Outswing example is particularly useful: a 34 x 76 opening calls for a 34 x 76 door. Adding a universal extra two inches would contradict that instruction. Subtracting two inches to guess the slab would also require information the opening specification does not provide.
A published size menu is only a starting point. A glass option, frame option or series can limit available combinations. Confirm the complete configuration before treating a catalog entry as an available replacement.
Measure the existing opening without mixing up the layers
Bring a tape measure, a level, paper and a phone for photos. An assistant makes long measurements easier to repeat. Record inches and fractions consistently, with width first and height second.
Keep the existing door secure and usable while gathering information. You do not need to dismantle the entire assembly merely to start a supplier inquiry. If critical framing is concealed, mark the measurement as unconfirmed.
1. Identify the assembly and record its labels
Photograph the full opening from inside and outside. Include the hinges, threshold, mounting flange or trim, and any label identifying the maker or series. Copy the label text rather than relying on a distant photo.
Note whether the main door opens inward or outward. If there is an attached storm door, record its movement separately. A combination assembly can have an inward opening main door and an outward opening storm door.
Write down whether you want a whole assembly or just one component. A screen, storm slab and main entry slab are not interchangeable measurement requests. Tell the supplier which part appears in each photo.
2. Locate the actual framing
The rough opening is measured between framing members, not between the exposed faces of the installed jamb. Interior casing can hide that boundary. Where access is straightforward, a competent person can expose enough trim to identify it.
Do not loosen the door’s attachment screws to create a measuring gap. Stop if access requires disturbing damaged material, unknown older coatings or the exterior weather seal. Ask the installer to confirm the concealed dimensions instead.
A photo should show the exact surface at both tape ends. A note reading “inside frame” is too vague. Use descriptions such as “left framing face to right framing face” or “inside jamb face to inside jamb face.”
3. Record the rough opening width at three heights
Measure between the facing sides of the opening framing near the top, middle and bottom. Keep the tape straight across rather than at an angle. Save all three results.
Flag the smallest width, but keep the others beside it. Their differences show the supplier a possible fit problem. A single smallest number cannot describe whether the opening is square or whether its sides bow.
Do not round an odd result to the nearest catalog width. A 33 1/2 inch measurement is information to investigate, not automatic authorization to buy a 34 inch assembly. First verify the endpoints and the manufacturer’s opening requirement.
4. Measure the opening height from a named bottom surface
Measure from the opening’s structural support surface to the underside of its header. Record the height at the left, center and right where accessible. Describe exactly where the tape starts.
The top of the installed threshold is not automatically that support surface. Neither is a new layer of finished flooring. If the old sill hides the support below it, label that dimension unconfirmed.
Take a close photo of the threshold and floor transition. Tell the installer about planned flooring changes. Do not combine a height measured above the threshold with an opening requirement measured below the assembly.
5. Check shape as well as size
Compare the two corner diagonals using matching reference points. Check the support surface for level and the sides for plumb. Record visible gaps, bowing or twist instead of trying to force the opening into a single neat rectangle.
Matching diagonals alone do not establish a sound, level opening. They also do not verify that the mounting faces lie in one plane. The installer must compare the actual condition with the chosen system’s instructions.
If the floor feels soft or framing looks deteriorated, settle that repair scope before final ordering. An assembly that fits today’s damaged opening may not fit the repaired opening. Do not trim away a suspect header or supporting member to gain clearance.
6. Record frame depth, wall layers and swing
Measure the existing jamb depth where accessible. Photograph how it meets the inside finish and outside mounting surface. Record added paneling, siding overlays or other layers rather than assuming the visible wall thickness tells the whole story.
For the replacement, ask which surfaces define its jamb dimension. A projecting trim lip is not necessarily part of that depth. Confirm how the chosen frame covers the wall and meets the weather barrier.
Also photograph the door partly open from outside. Write “hinges on left when viewed from outside” or the matching right side description. Add “main door swings inward” or “main door swings outward.”
Then match that description to the seller’s handing diagram. A bare “left hand” label can lose the viewpoint or swing information. The description and photo make a useful independent check.
Your mobile home door size worksheet
Copy this table into a note before contacting a supplier. Fill unknown entries with “not exposed” rather than an estimate. Keep measurements of the existing opening separate from requirements for the proposed replacement.
| Record | What to write down |
|---|---|
| Door identity | Maker, series, label text, whole assembly or component only |
| Rough opening width | Top ___; middle ___; bottom ___; smallest ___ inches |
| Rough opening height | Left ___; center ___; right ___; bottom reference surface ___ |
| Opening condition | Diagonal A ___; diagonal B ___; level, plumb, twist or damage notes ___ |
| Existing unit | Outside frame width ___; height ___; whether flange is excluded ___ |
| Depth | Existing jamb ___; wall layers ___; replacement depth reference points ___ |
| Slab, if relevant | Width ___; height ___; thickness ___; hardware details ___ |
| Swing | Main door inward/outward ___; outside hinge side ___; storm door swing ___ |
| Replacement specification | Exact series ___; call size ___; required opening ___; tolerance ___ |
| Confirmation | Supplier or installer ___; drawing date ___; concealed dimensions still awaiting confirmation ___ |
Ask the supplier to match this record to an exact assembly, not merely suggest the nearest size. Request the required rough opening, actual frame dimensions and jamb depth in writing. Include the flange dimensions when exterior trim coverage matters.
Keep a second copy for delivery inspection. That makes it easier to compare the ordered configuration with the package label. Confirm the product before installation begins.
If you only need a slab or storm door
For a slab replacement, the existing jamb stays. Record the moving slab’s actual width, height and thickness. Do not send only the whole assembly’s call size.
Photograph hinge locations and their shapes. Record hinge positions from one consistent reference, such as the slab’s top edge. Include latch and deadbolt positions, the latch setback, and the edge shape.
These details help the supplier determine whether a compatible slab exists. Equal width and height do not establish hardware alignment. An existing frame also needs inspection for condition and geometry before reuse.
For example, the JELD WEN exterior slab instructions require checking the existing jamb before installation. They distinguish slab fit, hinge work and lock alignment. Their specific clearances apply to the products covered by that manual, not every mobile home door.
For a replacement storm door, first identify whether it belongs to a combination unit. Its moving panel can be smaller than the complete opening. Ask whether the supplier wants the storm panel, its frame, or the original combination unit’s call size.
Do not use a universal “add two inches” rule to convert that panel measurement. Send the maker, assembly identification and photos with the actual dimensions. That avoids turning a useful identification clue into an unsupported order.
Why a standard house door might not fit
Compare complete systems rather than the numbers printed on their boxes. A nominal width can describe different things across product families. An 80 inch label does not tell you the finished assembly height or required opening.
A replacement also needs compatible depth, mounting details, threshold support and weather protection. Its swing must work with the landing, steps, interior floor and nearby obstacles. Width and height are only the first checks.
When an ordinary residential door has the right documented dimensions and application, a qualified installer can assess the whole fit. Do not assume every house door fits. Do not assume the label “mobile home” settles every compatibility question either.
If the proposed system requires a larger opening, pause before ordering. Header, wall framing and exit changes need qualified assessment under the applicable requirements. This is not a reason to cut a door or enlarge the wall by trial and error.
For a short opening, ask about a documented compatible size or an approved custom configuration first. Any trimming must be expressly permitted for the exact product. Do not transfer a wood slab’s trimming allowance to a steel or fiberglass assembly.
Clear opening is a separate safety measurement
A 32 inch catalog label does not prove a 32 inch usable passage. The installed frame, door and opening position affect the space available. Ask for documented clear opening dimensions when access or exit compliance matters.
The current federal manufactured home construction standard, 24 CFR 3280.105, addresses clear openings separately from door call sizes. It requires at least one exterior egress door with a minimum 32 inch wide by 74 inch high clear opening. Door seals and stops cannot reduce that required opening.
The same section sets other exterior swinging doors at a minimum 28 inch wide by 74 inch high clear opening. It permits a limited seal or stop reduction there, with the stated egress exception. Those are passage requirements, not a replacement ordering chart.
This is a manufactured home construction standard. Applying requirements to an alteration of an existing home depends on the applicable authority and project scope. Ask the local building department or state manufactured housing authority before reducing an exit or changing its configuration.
Keep needed exit access available during the project. A door that technically fits the wall can still be the wrong replacement if it reduces required passage. Have the installer confirm that question before the purchase.
Resolve these mismatches before placing the order
- The catalog size differs from the slab. Check whether it is a call size for the assembly. Keep both measurements on the worksheet.
- The outside trim is wider than the wall opening. Identify the flange or decorative projection. Compare the portion that enters the opening separately.
- Widths vary across the opening. Save all measurements and request a condition assessment. Buying smaller does not correct bowed framing.
- The height almost matches. Confirm the bottom reference surface and required tolerance. Do not round away the difference.
- The main door fits but the storm panel does not. Confirm the exact combination family and component. Matching the assembly label alone may not identify a compatible loose panel.
- Two documents disagree. Ask the manufacturer or supplier for the current specification tied to your exact order. Do not average the figures.
The safest mobile home door size to order is the one confirmed against your measured opening and the exact product specification. Your final record should name the series, call size, required opening, depth and swing. Once those agree, you can move on to installation planning with far fewer unknowns.
Found a detail that needs checking? Tell us about a correction.