
A manufactured home front door is an assembly purchase: the panel, frame, threshold, swing, and any storm door must work together. Start with those fit details before choosing steel, fiberglass, glass, or a decorative finish. A size label alone doesn’t tell you what will fit.
The most useful shopping document is a written order sheet tied to the exact manufacturer’s drawing. It should identify what was measured, where the tape started and stopped, and who confirmed the replacement. Keep separate entries for observations you can verify and dimensions still hidden behind trim.
Choose what you are replacing before choosing a door
First decide whether you need a complete entry assembly, a replacement panel, or a smaller repair. These are different purchases. A new panel won’t correct a damaged opening or automatically fit an unrelated frame.
| What you find | Purchase to investigate | What to confirm first |
|---|---|---|
| Worn contact seal; otherwise sound door | Matching weatherstrip or door bottom | Profile, attachment, compression, and normal latching |
| Loose or failed handle, latch, or hinge | Compatible hardware | Exact preparation, thickness, attachment, and available replacement parts |
| Damaged panel with a sound matching frame | Manufacturer approved replacement panel | Panel edge, hinges, lock preparation, and sealing surfaces |
| Damaged frame, threshold, or several failed components | Complete framed unit assessment | Opening condition, support, weather details, and installation scope |
| Damaged outer storm door; main door works | Compatible storm door or storm components | Whether it belongs to an integrated combination assembly |
Treat this table as a way to choose an investigation, not a diagnosis. Photograph the problem with the door open and closed. Include the lower corners, hinge attachment, latch, and threshold.
If several doors have recently begun sticking, tell the installer before ordering. Don’t assume the front door itself is the only problem. Ask for the opening and surrounding construction to be assessed before committing to a replacement.
A complete unit may be sensible when parts are unavailable or several components need work. Ask for both repair and replacement scopes when either appears viable. Compare the work each quote actually includes.
Which manufactured home front door configuration fits your entrance?
An entry door without a storm door
This is the main exterior door and its frame, without an outer storm layer. Confirm whether the proposed assembly swings inward or outward. Keep that choice separate from which side carries the hinges.
Use a photo and a simple plan view to show the existing arrangement. Mark the house interior, porch, hinges, and arc of travel. Include a nearby railing, light, wall, or furniture if it limits movement.
A combination entry and storm door
A combination assembly pairs the entry door with an outer storm door. In Elixir’s combination ordering system, the main panel swings inward and the storm swings outward. A combination door is therefore not the same purchase as a lone outswing entry door.
Ask whether the quoted unit includes the storm panel, glass, screen, closer, check chain, and hardware. Confirm each item in writing. A photograph showing a complete doorway doesn’t establish what is in the package.
Consider future parts before you pick a combination unit. Ask how to identify replacement hinges, storm panels, latches, seals, and glass. Keep the series and order number with your home records.
A separate storm door added to an existing entry
A separate storm door needs its own fit check. Its mounting surface and handle clearance matter alongside width and height. The entry door’s order size does not substitute for the storm manufacturer’s measurement instructions.
A manufacturer’s storm guide may measure between exterior trim faces rather than the structural opening. Don’t transfer that measurement to a complete entry door order. They describe different places in the doorway.
If your main door swings outward, have the supplier review the proposed screen arrangement before purchase. Show both door travel paths. Two individually suitable products still need a compatible layout.
Keep slab, jamb, unit, and rough opening measurements separate
The slab is the moving panel. The jambs are the frame members around it. The rough opening is the opening in the home’s framing that receives the assembly.
Trim covers the joint between the frame and the wall. A mounting flange is a projecting attachment edge on some assemblies. Neither the outside of the trim nor the outside of a flange should be casually labeled the rough opening.
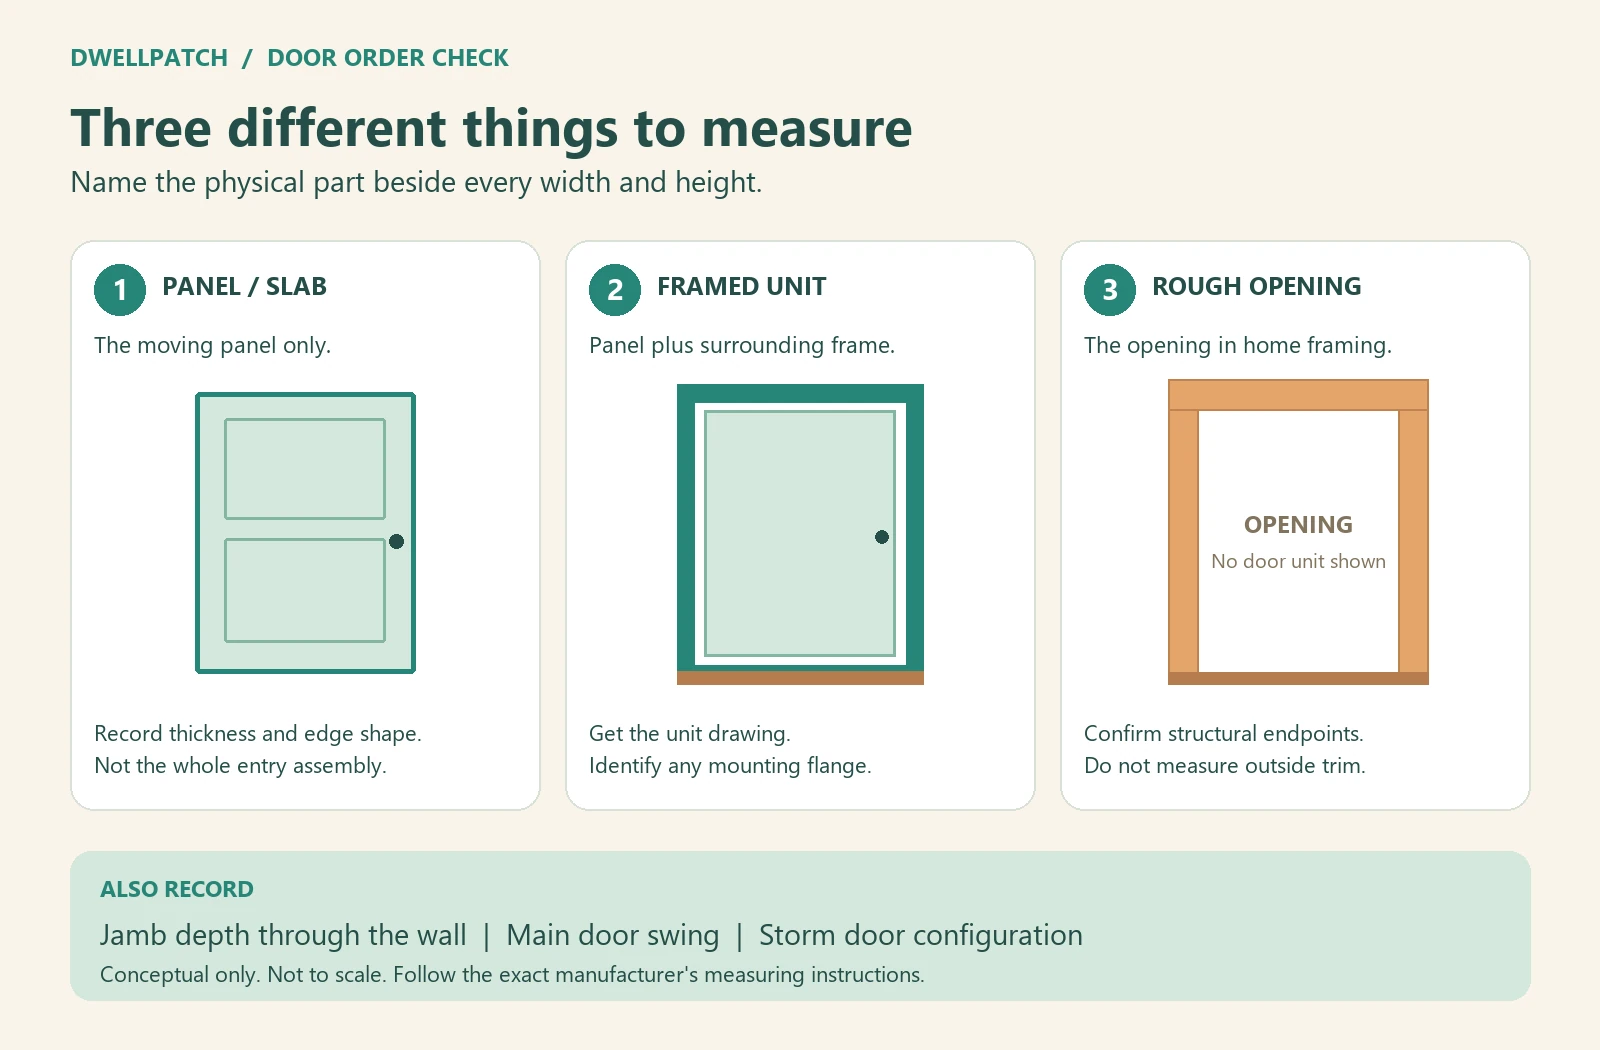
These distinctions matter even when two measurements look close. Write the physical feature beside every number. A supplier cannot reliably interpret an unexplained note that says only “door: 32 x 76.”
| Record separately | What the entry means | Order confirmation to request |
|---|---|---|
| Old manufacturer, series, labels, photos | Identity clues, not proof of replacement fit | Exact new model and applicable drawing |
| Panel width, height, thickness, and edge shape | The moving part only; identify the face measured | Whether panel replacement is supported |
| Existing frame and jamb depth | Frame dimensions; label the measurement endpoints | Required jamb option and finished wall relationship |
| Rough opening width and height | Structural opening, where safely exposed and confirmed | Required opening range for this exact unit |
| Unit dimensions and flange dimensions | Dimensions from the new manufacturer’s drawing | Which outline fits inside the opening and which overlaps it |
| Threshold and floor relationship | Existing support, finish floor, and landing observations | New sill support and clearance details |
| Main door swing and hinge location | Direction of travel and a stated viewing position | Supplier’s handing code matched to a sketch |
| Storm door details | Integrated or separate; mounting and hardware space | Included components and confirmed clearance |
| Unknown or concealed areas | Information not yet established | Who will inspect it before the order becomes final |
Take several readings where the selected measuring instructions call for them. Keep all readings, not just a rounded number. Differences belong in the supplier’s assessment of the opening.
If trim hides the framing, record the rough opening as unconfirmed. An installer can arrange limited exposure and a final measurement. Don’t remove the functioning entry assembly just to fill a shopping worksheet.
If a panel has an overlapping edge, identify both faces in your notes. Note which face and edge you measured. For a panel order, send photographs of the edge profile and hinge arrangement.
Why adding a generic allowance can create a wrong order
“Call size” means the size used to identify a product. Its relationship to the physical unit depends on the product line. Don’t automatically add the allowance used for a different brand or conventional prehung assembly.
A documented legacy example makes the distinction clear. The discontinued Lippert 5500 manual identifies a 34 x 76 call size with a 34 inch by 76 inch rough opening. That example describes its ordering convention, not a universal size recommendation.
The actual unit and the opening can still have different dimensions within such a system. Request both values on the new unit’s drawing. Don’t convert an old panel measurement into an order by guessing the frame thickness.
Even one manufacturer’s product families can differ. Elixir’s August 2025 instructions specify these two examples for the STR 7000 combination series:
| Call size | Specified rough opening |
|---|---|
| 34 x 80 | 34 inches wide x 80 inches high |
| 38 x 82 | 37 9/16 inches wide x 81 11/16 inches high |
The table shows why order labels need interpretation. It doesn’t establish fit for another series or describe the clear exit passage. Have the seller confirm the applicable opening and tolerance for your exact selection.
There is also an inconsistency in the same document’s housetype combination section. Its prose says rough opening and call size match, while some table entries differ. Ask the manufacturer to resolve the exact order in writing rather than choosing whichever statement seems convenient.
For the current order, obtain the exact model’s instructions through the manufacturer’s support library. Confirm the revision and intended manufactured housing application. An archived manual can identify an old door without proving a replacement is still available.
Match jamb depth and mounting style to the wall
Jamb depth is a separate specification from door width and height. It describes the frame’s depth through the wall. Don’t substitute the thickness of a bare stud for the finished relationship the manufacturer requires.
As one model specific example, the current Elixir 6000 page lists cellular PVC jamb options of 4, 4.5, and 6.5 inches. Those are options for that family. They aren’t a table of wall depths for every manufactured home.
Give the supplier the existing jamb measurement and photos of both wall finishes. Note added siding, interior paneling, or previous doorway changes. Ask where the new frame will sit relative to each finished surface.
Also identify how the proposed assembly attaches. A flange mounting system and a side jamb mounting system have different instructions. Don’t combine the fastening details from one with the sealing details from another.
The installer should resolve support and weather protection at the threshold before ordering. Ask whether the existing floor edge is sound and whether the new sill needs additional support. Keep any repair allowance visible in the quote.
A deeper frame, extension, or trim adjustment is a design detail to confirm, not a reason to guess. Ask who supplies it and which instructions cover it. This is especially useful when an old doorway has already been altered.
Specify swing and handing without an ambiguous label
“Left hand” alone leaves too much unsaid. State where you are standing, which side has the hinges, and whether the main panel moves inward or outward. Then match that description to the supplier’s diagram.
For example: “Standing outside facing the house, hinges are on my left; the main door opens inward.” Add the storm door’s hinge side and outward travel separately. This describes the arrangement before anyone translates it into an order code.
Elixir’s combination order form defines the hand by hinge side while standing outside the house. That definition belongs to this ordering system. Use the selected product’s own diagram rather than assuming a remembered hardware rule applies.
Send a top view sketch with an arrow showing each swing. Ask the seller to mark the ordered configuration on it. This is particularly helpful if the online selector uses codes without a clear illustration.
Check the full travel, not merely whether the door cracks open. Consider the porch approach, handrail, closer position, and access to the latch. Inside, consider furniture and the route through the room.
Don’t plan to reverse a complete exterior assembly after delivery unless its manufacturer specifically supports that conversion. Treat a change in swing as part of the order and installation assessment. It should not be an improvised solution to the wrong product.
Choose materials by upkeep and the complete assembly
Steel, fiberglass, and wood are useful categories, but they don’t describe the entire door. Ask about the panel skin, core, frame, threshold, glass, seals, and finish separately. Compare those details only after each candidate passes the fit check.
| Material or description | Reason to consider it | What deserves a closer look |
|---|---|---|
| Steel skin with an insulated core | A painted or decorative panel offered in a suitable entry system | Finish care, dent exposure, corrosion protection, and repair instructions |
| Fiberglass skin | A smooth or wood appearance without a wood panel | Exact finish requirements, frame material, glass options, and permitted modifications |
| Wood exterior door | Wood appearance and a supported custom configuration | Exposure, overhang requirements, edge sealing, and ongoing finish care |
| Vinyl covered or vinyl steel | A specific finished skin offered by the manufacturer | What lies beneath the finish and how the maker describes its maintenance |
Fiberglass doesn’t eliminate finish maintenance. Read the finishing instructions for the exact product, including edges and any wood components. Ask whether the delivered surface is finished, primed, or waiting for your coating.
For steel, include finish inspection and scratch repair in your upkeep plan. For wood, verify the exposure allowed by the selected warranty. Some wood door systems have specific protection requirements, with different provisions for specially designed exposed locations.
Don’t select a wood door on the assumption that it can simply be cut to any opening. Trimming limits are product specific. Obtain written limits before paying for a panel that needs alteration.
The same restraint applies to fiberglass and steel. Therma Tru’s installation FAQ does not recommend cutting door height on site. A door that is too tall is an order problem to resolve before installation.
A decorative name can also hide a material distinction. Ask whether “vinyl” describes the skin finish, a frame component, or something else. Compare the specification sheet rather than treating every use of that word as the same construction.
Compare energy performance for the door you will actually receive
Ask for the energy label or certification record for the quoted configuration. A foam core description or a material name doesn’t provide that comparison. Glass selection can change the rating within one door family.
U factor describes heat transfer through the rated product; lower values indicate better resistance to heat flow. Solar heat gain coefficient, or SHGC, describes admitted solar heat. Air leakage is a separate measure.
Keep those measures separate when reviewing a quote. A low U factor doesn’t tell you that an installed perimeter has been sealed correctly. It also doesn’t establish an approved installation in your particular opening.
The NFRC Certified Products Directory provides a way to check certified product information. Ask the seller for enough identification to match the proposed door. Use the record for the actual glass arrangement.
ENERGY STAR uses glazing levels when setting criteria for swinging doors. Don’t transfer a window climate table to a swinging entry door. Confirm the specific product’s certification instead.
If the reason for replacement is a draft, ask where the air is entering. Contact seals, the frame perimeter, and the panel are different issues to evaluate. Don’t expect a premium panel to compensate for unfinished installation details.
Decide how much glass and screening you need
A door lite is a glazed section within the panel. Compare its location and size with your privacy needs. Consider what is visible from the porch after dark, with the interior lights on.
Ask whether glass is clear, obscure, decorative, or insulated. Get the exact selection on the order sheet. A display photo may show a different glass option from the one priced.
If ventilation matters, ask which part actually opens. A fixed glass entry lite does not provide the same function as an operable screened opening. Confirm what screen and glass components come with the chosen storm configuration.
Have the supplier confirm applicable safety glazing and any required product approvals. Don’t add a decorative glass insert by copying an unrelated door. The resulting panel would need its own supported specifications.
For an entry behind a glass storm door, check the main door manufacturer’s ventilation, finish, and warranty conditions. Permission to add a storm door may coexist with an exclusion for damage it causes. Ask about the exact panel, lite frame, color, and exposure.
Choose storm features around daily use as well as appearance. Ask how glass and screens are changed, cleaned, and stored. Make sure you can operate the closer and latch comfortably.
Check locks, hinges, and parts support before ordering
Ask which lock preparation the new door includes. Record panel thickness, bore arrangement, backset, and deadbolt preparation where applicable. Backset is the distance from the door edge to the center of the lock bore.
Have the lock supplier confirm the match to that preparation. Don’t assume the old handle will transfer. A new lock’s finish and appearance are secondary to its compatibility.
For a door with an outer storm layer, check both handle projections. Andersen’s storm measuring guidance specifically flags entry handle clearance. The two handles and the storm glass need enough room in the selected arrangement.
Ask the installer how the frame and strike will be secured under the applicable instructions. A more expensive lock is not a substitute for evaluating its attachment. Don’t accept a security claim based only on the panel material.
Before buying, ask how replacement seals, sweeps, hinges, and glass are identified. Request the parts drawing if one is available. Future maintenance is easier when you can name the assembly instead of searching by its color.
Confirm exit requirements before changing the opening
A catalog size and a clear exit opening are different measurements. Clear opening describes the usable passage with the door open. Don’t infer it directly from the panel width or the rough opening.
The current federal manufactured home construction rule for exterior doors includes specific clear opening, lock, and door check provisions. It requires at least one exterior egress door with a 32 inch by 74 inch clear opening. Its provisions for other exterior doors differ.
That is construction standard context, not a determination of the replacement rules for your existing home. Have the responsible state or local authority and installer establish what applies to your project. Provide the home’s identification, existing arrangement, and proposed change.
Do this before reducing an opening, changing the exit arrangement, or selecting a different swing. Request the proposed unit’s clear opening information. A listing that says “mobile home door” does not answer those questions.
Enlarging an opening also calls for a construction assessment. Ask who will evaluate the framing, support, exterior water protection, and any required approvals. A lower door price cannot establish that the alteration is appropriate.
Compare the delivered project cost, not just the panel price
For a manufactured home front door, ask for a quote that names the exact assembly and separates product from installation. A low starting price is difficult to compare when one quote includes a storm door and another excludes the frame. Use the same specification sheet for every quote.
- Product: series, size convention, jamb option, swing, material, glass, finish, storm configuration, and included hardware.
- Delivery: freight, unloading arrangements, delivery access, and damage reporting procedure.
- Opening work: inspection, removal, disposal, and any confirmed repair or alteration.
- Installation: threshold support, fastening, weather protection, trim, finishing, and final adjustment.
- Uncertain work: concealed damage allowance, approval process for added work, and who makes the final measurement.
- Aftercare: product warranty, installation warranty, exclusions, and the person to contact if it leaks or won’t latch.
Ask whether the order is returnable after configuration or manufacture. Get the measurement responsibility and cancellation terms in writing. If a supplier is interpreting your photographs, request an explicit fit confirmation rather than a casual assurance.
Before removal day, arrange inspection of the delivered unit against the order. Check labels, dimensions, configuration, glass, finish, and visible damage. Ask how a discrepancy will be handled while your existing entrance remains usable.
For installation, obtain the instructions for the exact mounting system. The Elixir support library separates several door instructions and product documents. Choose the applicable document with the supplier rather than blending details from different assemblies.
The final installation assessment should include operation, latching, seal contact, and the installed weather details. Have the installer demonstrate maintenance and adjustment points. Keep the order, labels, instructions, and warranty together.
Resolve these questions before placing the order
Can a regular house door work?
Have the exact proposed assembly assessed against the measured opening and project requirements. The label “regular house door” is too broad to settle fit. Width, height, jamb depth, mounting, sill, swing, and exit provisions still need answers.
If it needs a larger opening or unsupported trimming, compare that complete project with a suitable manufactured housing replacement. Ask for the construction work to be priced and reviewed first. Don’t buy the panel and leave the difficult decisions until removal day.
Can I order from the dimensions on the old door?
Use the label as an identification clue and send it to the supplier. Confirm which dimensions it represents. Measurements of the panel, assembly, and opening remain separate until the manufacturer’s drawing connects them.
Do I need a storm door with the new entry?
Decide whether you want its screening, glass, or weather protection functions. Then confirm the arrangement, clearances, and main door conditions. Don’t assume a separate storm door can replace the outer part of an integrated combination unit.
What should I do when a measurement is uncertain?
Pause the final order and assign that measurement to the installer or supplier. Mark it as unknown on the worksheet. Have it checked before the purchase becomes final.
Your manufactured home front door order is ready when one named assembly matches one documented opening and installation plan. Finish choices can then follow your preferences. The fit decision should already be settled.
Found a detail that needs checking? Tell us about a correction.