

A mobile home plumbing vent manages air in the drainage system and helps protect the water seals in your traps. An open outside vent and a valve beneath a sink do different jobs. Before replacing either, separate a vent fault from a restricted drain.
Gurgling, sewer odors and slow drainage can overlap. None proves that the small device in your cabinet has failed. The useful starting point is which fixture triggers the problem, where it appears, and what recently changed.
For the relationship between incoming water, drains and vents, see the mobile home plumbing system guide. This guide focuses on identifying vent components, narrowing symptoms and making a sound repair decision.
What a mobile home plumbing vent actually does
A trap holds water between your room and the drainage system. As wastewater moves, it changes air pressure in the piping. Venting helps keep those pressure changes from pulling water out of a trap or pushing through its seal.
An open vent connects the drainage system to outside air. An air admittance valve, or AAV, admits air when pressure inside the pipe falls below room pressure. It closes again to contain sewer gas.
That difference matters during troubleshooting. An AAV is an air inlet, not an outlet for positive pressure. A valve that stays closed against pressure pushing toward your cabinet may be doing its job.
| Component | Its role | What it cannot establish |
|---|---|---|
| Water seal trap | Retains water that separates the room from drainage gases | A full trap does not rule out a leaking vent connection elsewhere. |
| Open outside vent | Provides an air connection between the drainage system and outdoors | A visible roof pipe does not prove its concealed route is intact. |
| Air admittance valve | Admits air under negative pressure and closes against outward gas flow | Its presence does not make the rest of the vent system unnecessary. |
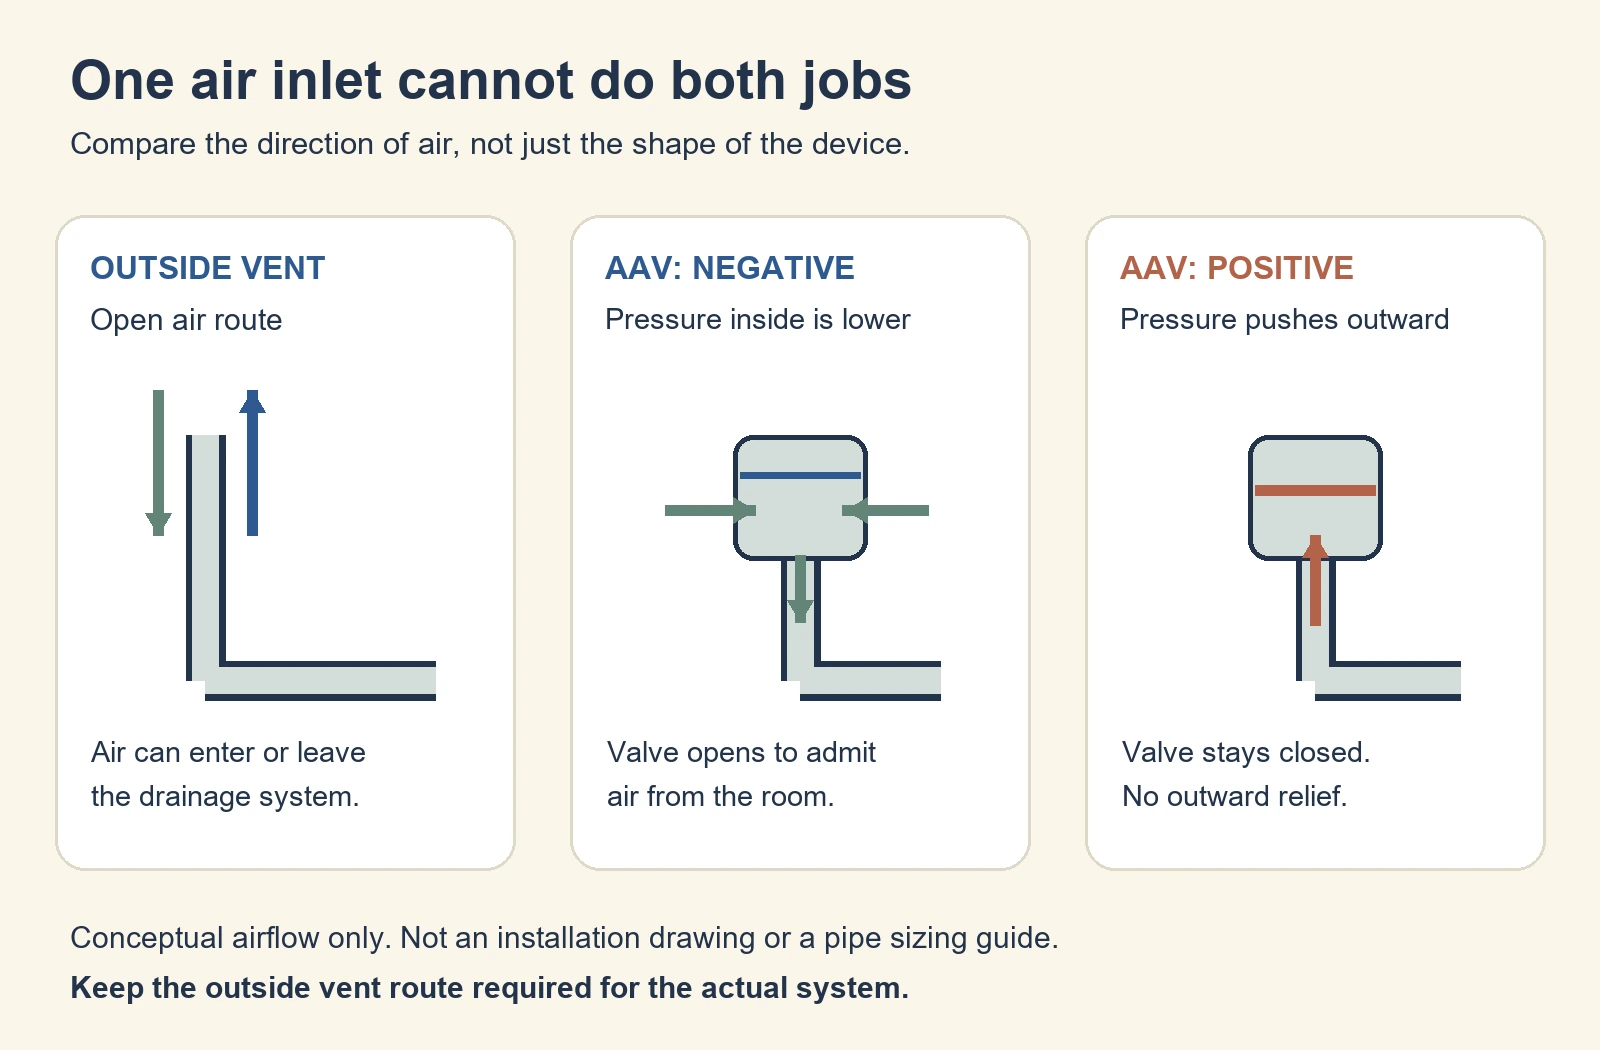
Imagine air moving toward a sink cabinet because a downstream restriction has filled a pipe with water. An AAV cannot release that air into the room. Changing valves does not remove the restriction or provide an outward air path.
This is a conceptual example, not a diagnosis of your drain. A plumber may need to examine both the drainage route and its vent connections. The sound alone cannot tell you which part needs repair.
Find the vent without assuming every roof opening is plumbing
Start with accessible cabinets and the home’s plumbing documents. Photograph the trap, the pipe leaving it and any upright branch ending in a device. Include the whole arrangement before taking closeups of markings.
A device under a sink may be described as a check vent, auto vent, mechanical vent or AAV. These casual names do not identify its operating mechanism or approval. Read the manufacturer, model, pipe markings and any listing information.
A threaded cap on a cleanout is service access, not an air valve. Don’t remove an unidentified cap to see whether a backed up drain improves. Water or sewage may be held behind it.
Outside, look from a safe ground position for pipe terminals near fixture areas. Record their locations without assuming a pipe runs straight down to the nearest sink. Hidden offsets and previous changes make that shortcut unreliable.
Plumbing vents, attic vents, bathroom exhaust outlets and furnace vents serve different systems. Never cap or alter an unidentified roof terminal. A furnace vent pipe or combustion roof jack belongs to the appliance’s venting system, outside this plumbing guide.
If you cannot identify an outside plumbing vent, have its route checked, especially after roof work. A missing visible roof pipe doesn’t prove the home was designed without outside plumbing venting. Ask the plumber and roofer to trace the existing route rather than guessing a new hole location.
For broader work coordination, use the bathroom repair planning guide. Keep the roof work connected to the plumbing work.
The person restoring a penetration needs the correct pipe arrangement and flashing detail. A new weather seal cannot correct a disconnected vent beneath it.
Read the symptom before choosing a replacement
Use the pattern below to investigate a mobile home plumbing vent complaint. These are investigation routes, not confirmed causes. Stop using affected fixtures when sewage rises, water escapes or continued use risks an overflow.
| What you observe | What needs separating | Useful information to collect |
|---|---|---|
| One sink drains slowly | Fixture or branch restriction versus a vent problem | Whether nearby fixtures work normally and whether this sink was recently altered |
| A sink gurgles when the washer empties | Shared drainage restriction, vent arrangement or both | Which fixture discharges, which makes noise and whether water rises |
| Sewer odor is strongest inside one cabinet | Valve seal, open connection, trap condition or concealed pipe leak | Device identification, visible damage and when the odor occurs |
| Several fixtures back up together | A shared drainage or sewer/septic problem | The affected rooms and the lowest fixture where water appears |
| Odor began after roof or cabinet work | A changed vent route, buried device or disturbed connection | Before and after photographs and the work invoice |
| Only faucet flow is weak | A water supply issue, separate from drainage air | Hot versus cold behavior and whether other faucets are affected |
For example, a washer can trigger noise in a bathroom while the washer itself seems to drain normally. Tell the plumber both locations. Naming only the noisy sink can hide the shared part of the investigation.
A second example is a slow sink that improves after someone removes its AAV. That observation changes the air path, but doesn’t prove the valve was defective. An open pipe can release pressure that a correctly functioning AAV must contain.
Don’t leave the valve off, drill holes in it or substitute a loose cap. Those changes create an opening between the drainage system and your room. They also destroy the normal conditions needed for diagnosis.
A plumbing vent won’t restore weak incoming water flow. Use the water pressure and regulator guide for a supply problem. Keeping those systems separate avoids buying a drain component for a faucet complaint.
Check accessible conditions before buying a valve
Begin with observation, not disassembly. You can give a service visit a useful head start without opening a drain or climbing onto the roof. Keep these checks within dry, safely accessible areas.
- Record the reach. Note every affected fixture and what action precedes the symptom. Include whether the problem is constant or appears only during another fixture’s discharge.
- Look for a changed installation. Note recent sink, vanity, washer, roof or drain work. A device hidden by a new cabinet panel needs attention even if it worked before the remodel.
- Clear storage away from an identified AAV. Its air openings must remain unobstructed. Don’t cover it with a bag, wrap it in insulation or pack supplies tightly around it.
- Photograph visible faults. Record a cracked housing, tilted device, separated fitting or damp joint. Avoid twisting old piping just to expose a label.
- Consider an unused fixture’s trap. If it drains normally and isn’t leaking, ordinary use replenishes its water seal. A returning odor still needs its cause investigated.
- Stop at concealed or unsafe access. Leave roof entry, hidden pipe tracing and pressure testing to the appropriate professional. Don’t open a sewage backup to gather more evidence.
Odor deserves a separate record from slow drainage. A fixture can pass water while a damaged gas seal leaks. Conversely, removing an odor does not establish that the drain can carry its normal load.
Don’t deliberately sniff a valve or enter an enclosed space to hunt sewer gas. If you suspect a high concentration, leave the building and call the fire department. Avoid ignition sources; seek medical care if suspected exposure causes symptoms.
The public health guidance on sewer gas explains why smell cannot measure exposure. A strong or persistent indoor odor warrants prompt assessment, even when a drain still works.
Match the device category before comparing heights
The current federal manufactured home construction standard distinguishes spring operated mechanical vents from gravity operated AAVs. Both are described as secondary venting. A package labeled “mobile home vent” doesn’t erase that distinction.
For spring devices, the federal rule specifies access, free airflow and a sealing function at least 6 inches above the trap arm’s top. It also limits the fixtures and drainage arrangements they may serve. Don’t transfer those provisions to every gravity AAV.
For gravity devices, the rule requires an outside terminating vent of at least 1 1/2 inches in the drain system. It also addresses accessible, ventilated attic installations and clearance above insulation. The rule separately requires following the vent manufacturer’s instructions.
Check the current federal venting provisions for these categories. They are construction requirements, not a blanket approval of an alteration to your existing home. Have the authority responsible for that work confirm its applicable requirements.
Height instructions also use different reference points. The top of a trap arm, a horizontal branch drain and the surface of insulation aren’t interchangeable measuring lines. A bare “4 inches” or “6 inches” tells you too little.
The same caution applies to maximum trap to vent distance. Old extracts and the current federal table can differ. Ask the plumber to use the applicable rule and actual pipe layout rather than a screenshot from an unidentified code edition.
This is why a photograph can help identify a concern without establishing compliance. It may hide a fitting, slope, branch connection or measurement reference. A replacement that screws into the same opening can still leave an unsuitable arrangement.
Select an AAV for the actual pipe and fixture load
Once the device has been identified and replacement is justified, compare specifications before brand names. The existing connection, permitted orientation, required airflow and accessible space all matter. A larger looking housing is not a complete selection method.
| Record this | Why it changes the decision |
|---|---|
| Exact device and mechanism | Spring and gravity devices have different requirements; appearance alone may not identify them. |
| Pipe material and connection | An ABS adapter and a PVC adapter require their corresponding pipe and joining method. |
| Fixtures served | The valve must have the appropriate drainage fixture unit rating for its application. |
| Branch versus stack use | These ratings describe different applications and cannot be swapped. |
| Height reference and orientation | The device must operate in the position required by its instructions. |
| Air entry and service access | A permanent airtight enclosure can defeat the intended installation and prevent replacement. |
A drainage fixture unit, or DFU, is a design loading measure. It is not a count of how many faucets you own. Have the connected fixtures and relevant application checked when the original arrangement is uncertain.
As one model example, Oatey 39019 includes an ABS adapter and belongs to its 160 branch, 24 stack DFU family. Its stepped adapter serves the specified 1 1/2 inch or 2 inch connections. Those figures are model specifications, not a universal mobile home vent size.
The related 39016 uses a PVC adapter. Substituting its joining instructions for ABS would be a mistake. Read the exact package and current material specific instructions, including the approved joint method.
For its AAV installations, Oatey’s guidance specifies at least 4 inches above the horizontal branch and within 15 degrees of vertical. It also specifies clearance above insulation, incoming air and future access. Those conditions belong together, rather than treating the height as the only acceptance check.
The manufacturer’s AAV selection and installation guidance explains the material, load and placement checks. Use the instructions supplied for the actual device and confirm approval for the work. No model recommendation here establishes that your original vent design is correct.
A threaded replacement may need little physical work yet still require a careful decision. If the riser is loose, the fitting is damaged or more height is needed, stop treating it as a simple swap. The pipe and its support become part of the repair.
The part compatibility guide explains the broader distinction between a store label and verified fit. Here, matching the thread is only one item on the list.
Keep the outside vent and roof weather seal separate
Don’t replace all outside venting with cabinet valves. An AAV cannot provide the same outward air path. The complete system must retain the outside venting required for its design and applicable rules.
A roof terminal has both a plumbing opening and a weather seal around its penetration. Obstructing the opening affects venting; failed flashing can admit rain. Describe which condition was found instead of asking only for a new “vent cap.”
A covered terminal after roofing needs the actual route traced. Normal drainage during a brief trial doesn’t prove a buried termination is acceptable. Ask for confirmation that the pipe reaches its intended outside termination and that the roof opening is sealed correctly.
Some permitted designs use an exterior wall termination with specific placement conditions. That isn’t permission to cut an outlet at any convenient wall location. Avoid a universal roof only rule, but leave terminal design and relocation to qualified assessment.
Likewise, don’t copy a generic roof extension height into a snowy location or a remodeled roof assembly. Have the applicable terminal, nearby openings and roof conditions checked together. The target is a functioning vent with a sound penetration detail.
If a cap is present, identify it before replacing it with a lookalike attic or RV part. The construction standard addresses removable plumbing vent caps and identification where similar caps serve roof space ventilation. A shared shape doesn’t establish a shared purpose.
What to request when a new valve doesn’t solve it
A second unsuccessful valve replacement is a reason to reassess the diagnosis. Tell the plumber what changed and what didn’t. Don’t keep buying devices while the same discharge still creates bubbles, backing up or odor.
Request separate findings for the drain path, vent path and gas seals. A restriction can interfere with air movement, while a broken vent joint can release gas without a visible water leak. Both may need attention.
For multiple affected fixtures, ask whether the shared branch, home outlet and sewer or septic connection need investigation. If a tank was recently pumped, include that date. Pumping history alone doesn’t identify the remaining cause inside the home.
Useful service notes include the device markings, affected rooms, trigger fixture, recent changes and photographs of accessible piping. Ask which finding supports the proposed repair. “Replace the vent” should become a specific component and reason.
After work, have the repaired joints, normal drainage and retained trap seals checked under the relevant fixture use. Confirm that the AAV remains accessible and supplied with air. If roof work was involved, include the termination and flashing in the completion record.
Keep the final model and instructions with the home’s records. The next mobile home plumbing vent decision will be easier with an identified device and documented route. You also gain a better baseline if the same symptom returns.
Found a detail that needs checking? Tell us about a correction.