
Mobile home plumbing and bathrooms are easier to plan when you separate three jobs: delivering water, draining it, and keeping the room dry. A dripping supply connection needs a different response from a leaking tub drain or a failed shower joint. Identify the path first, then choose the repair and replacement parts.
The bathroom fixture is only the visible end of that system. Its supply connections, drain, support, access route, and surrounding floor all matter. A replacement that fits the room can still fail to match the plumbing below it.
For a technical map of the pipes and venting, use the plumbing system guide.
Start with the right part of mobile home plumbing and bathrooms
Use the symptom to choose a starting point, rather than buying the nearest matching fixture. This table is a sorting aid, not a diagnosis. Several faults can produce the same wet patch.
| What you notice | First question | Useful next move |
|---|---|---|
| Water appears while fixtures are unused | Is a pressurized supply connection leaking? | Locate the affected supply and its safe shutoff route. |
| Water appears during draining | Is it escaping from a waste connection? | Stop using the fixture and arrange access to its drain. |
| Wetness follows shower spray | Is water escaping the enclosure or a concealed connection? | Keep the shower out of use until the path is found. |
| Several fixtures back up | Does the problem involve shared drainage or the site sewer connection? | Stop adding wastewater and call for drain service. |
| A floor feels soft or a fixture moves | Is the fixture’s support damaged? | Keep weight off the area and have the floor assessed. |
| A replacement looks almost right | Do its mounting, connections, and support requirements match? | Compare the actual specification drawing before ordering. |
Don’t reproduce a serious leak just to complete the table. Existing photographs, the timing of the last incident, and a safe visual check may be enough. Sewage, unsafe flooring, and water near electrical equipment call for professional help.
Understand the three water paths
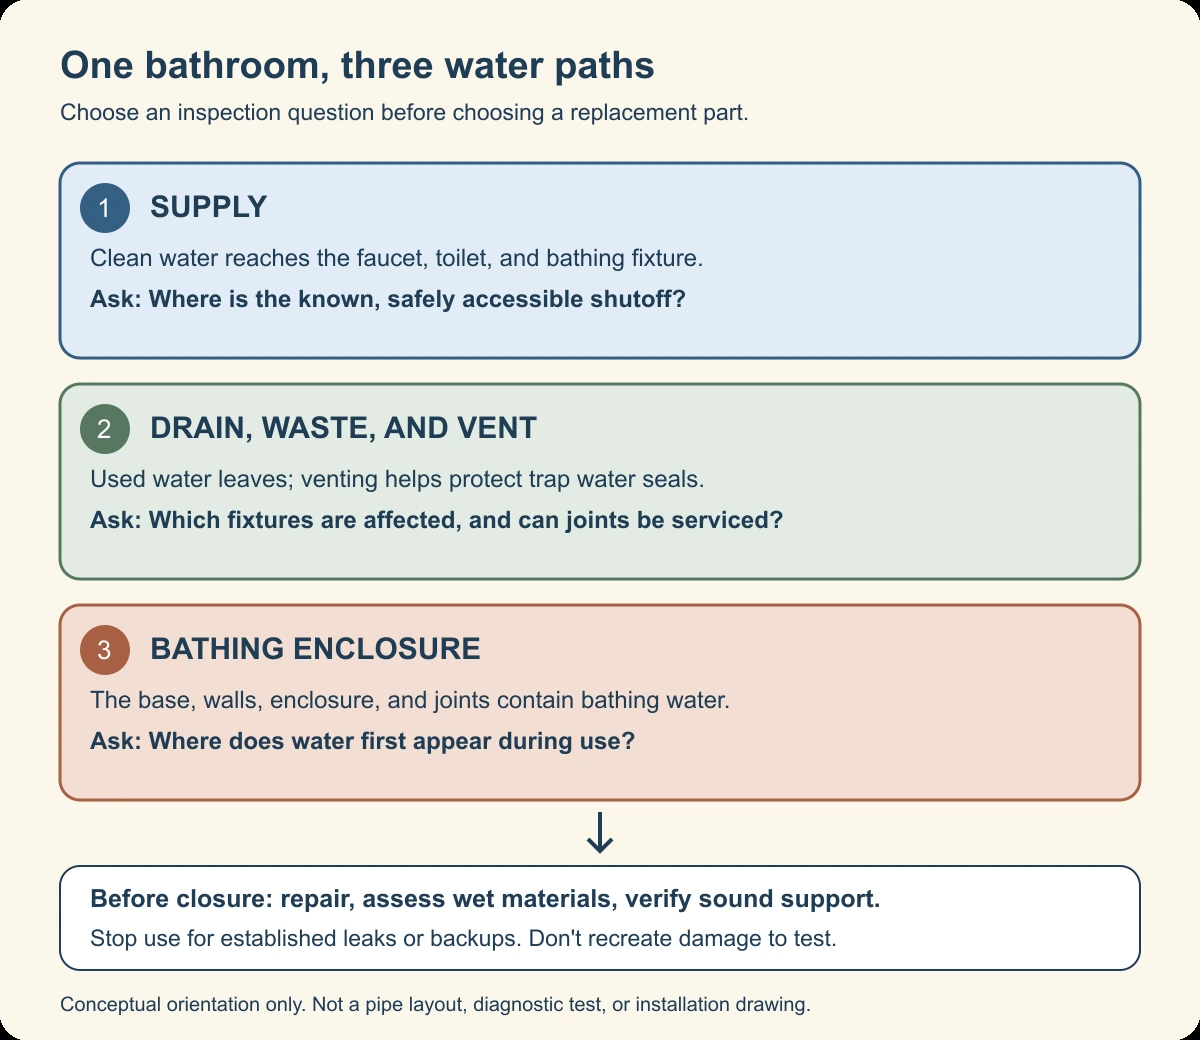
Supply brings clean water to the fixtures
The incoming supply feeds cold water outlets and the water heater. Hot water then serves the fixtures that need it. The toilet normally has a cold water supply, while the sink and bathing fixtures use both.
A supply problem can continue while nobody is using the bathroom because the line remains pressurized. That makes a known, accessible shutoff especially valuable. A dripping faucet outlet and a leaking pipe connection are separate repair tasks, even when both waste clean water.
DWV carries waste away and protects trap seals
DWV means drain, waste, and vent. Drains carry used water away, while venting helps protect the water seals in traps. The drainage and potable water systems must remain separate.
The federal drainage provisions describe trapped fixture connections and approved drain materials. They include listed ABS and PVC options. A black or white pipe alone doesn’t identify its exact material, connection method, or suitability.
A small valve beneath a sink may be an air admittance valve, rather than a water shutoff. It admits air under negative pressure and closes afterward. It isn’t a drain cleaner, and replacing it doesn’t clear a blocked waste pipe.
Keep that distinction when describing a problem to a plumber. "The sink is slow and the valve smells" is more useful than ordering a new vent without inspection. Venting changes need a verified system design, not an assumption that every roof vent is optional.
The room must keep ordinary bathing water contained
Water can escape around a shower opening, a damaged surround, or a fixture edge without a broken supply pipe. These paths belong on the same investigation list. Condensation is another possibility, but visible droplets don’t prove that a concealed leak is harmless.
Photograph where water first appears and where it eventually collects. Don’t assume the wettest spot is the source. Keep observations separate from conclusions when booking a repair.
Find the shutoff before you need it
Locate the home’s main water shutoff and any accessible fixture valves while conditions are dry. Ask the installer, park manager, or water provider if the arrangement isn’t clear. Don’t rely on another home’s valve location.
Some newer homes have an indoor main valve in a utility area. Other arrangements place it near the supply connection. The federal construction provisions address an accessible main valve or an adjacent supply valve specified in the installation instructions.
Label the confirmed valve and keep its route clear. A valve hidden behind stacked boxes isn’t practically accessible during a leak. Take a photograph that shows both the valve and enough surrounding detail to locate it.
For an active supply leak, use a known shutoff if you can reach it safely. Don’t force a seized valve or dismantle an unfamiliar one. Ask the responsible service provider to isolate the supply if necessary.
Closing the main supply does not remove wastewater already backing up. It also doesn’t establish that the water heater is safe to operate. Follow the heater’s instructions and obtain qualified help before draining it or leaving it without its required water supply.
In a rented home or a park, confirm who controls each valve. Don’t operate a shared or utility owned valve without authorization. Record the emergency contact alongside the photograph so another household member can act.
Learn what is beneath the bathroom without opening everything
In manufactured homes, plumbing often runs within or through the floor assembly. The underside covering retains insulation around that space. Site connections and some drain sections may be below that covering.
That doesn’t mean every pipe hangs openly beneath the home. An underfloor view may show only part of a route. Previous repairs can also make the actual layout differ from the original plan.
Start with existing access: the vanity interior, a removable service panel, and available home documents. Photograph labels and visible connections without pulling on the pipes. Don’t cut a floor or wall simply because a fixture sits above that location.
A useful access question has two parts: can someone see the joint, and can they service it? A narrow gap may reveal a drain but provide no room to support or reconnect it. Include that limitation when requesting a quote.
Keep access to serviceable connections in the finished design. Current manufactured home fixture provisions specifically address access to concealed slip joint connections. They don’t require a rear panel for every diverter or hardware connection, so avoid treating one access rule as universal.
Work beneath a home needs a safe space and sound support. Stay out of standing water, sewage, damaged flooring, and areas with uncertain electrical conditions. A plumber can plan access without asking you to enter those conditions first.
Match the bathroom fixture to its connections
Shopping for mobile home plumbing and bathrooms by the home label alone leaves too many questions unanswered. "Mobile home," "residential," and "universal" don’t establish fit. Use the fixture’s actual drawing, installation requirements, and visible connection details.
Our guide to regular house parts in a mobile home explains the wider compatibility checks. For bathroom work, start with the interfaces in this table. Leave hidden dimensions marked unknown until someone can verify them.
| Fixture or part | Fit information to collect | A detail easily missed |
|---|---|---|
| Bathroom faucet | Brand, model, mounting holes, deck thickness, supply connections, and drain arrangement | Matching handle spacing doesn’t establish cartridge or supply compatibility. |
| Sink or vanity | Opening dimensions, rim or mounting style, cabinet clearance, and drain position | A deeper basin changes the space available for plumbing below. |
| Toilet | Rough in, complete footprint, supply location, flange condition, and room clearance | A matching rough in doesn’t guarantee clearance for the tank or door. |
| Bathtub | Installation opening, actual unit size, drain location, floor rough arrangement, and required supports | Equal overall lengths can hide different drain heights and support systems. |
| Shower base and surround | Base drawing, compatible wall system, drain connection, opening, and enclosure requirements | Parts sold separately aren’t automatically a compatible waterproof assembly. |
| Pipe repair connection | Material markings, size system, existing fitting, and approved joining method | Similar outside diameters don’t make two plastics interchangeable. |
Faucets: identify the body before choosing the trim
A new handle or cartridge must match the installed faucet, not just its finish. Save any model marking and photograph the complete fixture. A close picture of a damaged handle alone may hide the information needed to identify it.
For a complete replacement, check the mounting pattern and available space underneath. Compare the new spout’s position with the basin as well. Supply tubes and the drain mechanism need room to work without being forced aside.
Don’t assume a lavatory faucet will replace a tub or shower control. Those assemblies have different duties and installation requirements. A surface mounted faucet and a concealed valve body also present different access problems.
Toilets: separate the tank repair from the floor connection
A toilet has several possible water paths: its supply, tank components, tank joints, and floor connection. Water near the base doesn’t identify which one failed. Photograph the tank and supply as well as the floor area.
For a replacement toilet, rough in is measured from the finished wall to the floor bolt centerline. Don’t start at the baseboard. Also compare the manufacturer’s full footprint and clearance drawing.
A moving toilet needs attention to its mounting and support, rather than stronger tightening alone. The flange is part of the floor connection, not merely a place to hide under a new bowl. Ask the installer to assess the flange and surrounding floor before treating the job as a simple fixture swap.
Tubs and showers: the drain height can change the whole job
Record the installation opening separately from the tub’s exposed rim. Then compare the replacement drawing for drain location, underside clearance, and supports. Measure before demolition whenever possible, while acknowledging what remains concealed.
Manufacturers offer different floor rough arrangements even within one product family. A drain assembly that fits beneath one tub may conflict with another. Don’t assume that equal length and width settle the plumbing question.
Also plan how the fixture will enter the room. Compare its actual dimensions with doorways and turns along the route. Removing a bathroom door may change access, but it doesn’t solve an opening or framing conflict.
A shower replacement needs a complete water containment plan. Confirm how the base, walls, enclosure, and drain are intended to work together. A bead of caulk is not a substitute for an unspecified assembly detail.
Identify the pipe before choosing a repair fitting
Read printed material markings wherever they remain visible. Save a photograph of the pipe and adjoining fitting together. Color, flexibility, or the home’s model year can suggest questions, but none proves the material.
PEX, CPVC, copper, and older supply materials do not share one joining method. Drainage materials are another category again. Keep the existing material’s identity separate from the material you hope to install.
Polybutylene transitions deserve particular care. A fitting’s stated compatibility must explicitly cover that connection. A general fitting described as suitable for PEX should not be assumed suitable for older polybutylene.
For a plumber’s material list, request the transition type and the retained pipe scope. "Replace the plumbing" could mean only visible underfloor runs or include concealed fixture supplies. Ask which existing sections and fittings will remain.
That question matters before a bathroom remodel. A new surround can cover the same old connection if the contract excludes it. Decide whether to inspect or renew those connections while access is available.
Use leak timing to give the repair a better starting point
You don’t need to identify every fitting to make a useful report. Describe what was happening when the leak appeared, which fixtures were involved, and where water was visible. Record whether the main supply was on or off.
Keep those observations factual. "Water appeared after the tub emptied" is evidence; "the trap is broken" is a conclusion. Let the inspected connection establish the repair.
| Observation | Why it helps | What it doesn’t prove |
|---|---|---|
| Wetness returns with all faucets closed | It directs attention toward continuously supplied connections and other ongoing water sources. | It doesn’t identify a specific hidden pipe. |
| A sink cabinet gets wet when the basin drains | It gives the plumber a fixture and event to inspect. | It doesn’t establish that tightening one nut is sufficient. |
| A shower leaks but the nearby sink doesn’t | It narrows the affected activity and location. | It doesn’t distinguish spray escape, supply, and drain faults by itself. |
| The washer discharge causes a tub backup | It shows that another fixture affects the bathroom’s drainage. | It doesn’t prove the septic tank needs pumping. |
| Fresh caulk hasn’t stopped the wet patch | It shows that the earlier repair hasn’t resolved the water path. | It doesn’t justify sealing every opening around the fixture. |
Don’t run repeated experiments on a bathroom already leaking into the floor. Stop use and let the repairer choose a controlled inspection. Save photographs before cleaning up if that can be done safely.
Separate a bathroom problem from a whole system problem
A single affected fixture and several affected fixtures call for different investigations. Shared symptoms can involve a common branch, the home’s drain connection, or the site disposal system. The symptom alone doesn’t tell you which boundary contains the fault.
For a septic property, slow drains, backups, odors, and unusual wet areas outside all belong in the service report. Those signs don’t establish one exact failure. A service provider needs to inspect the relevant system.
In a park, ask whether other homes are affected and report the problem promptly. Confirm who maintains the home connection and the shared infrastructure. Don’t assume responsibility follows whichever pipe is easiest to see.
For supply problems, report whether the issue affects hot water, cold water, or both. Also say whether it’s limited to one faucet. This gives the plumber a better starting point without turning an owner observation into a pressure diagnosis.
Put drying and sound support ahead of cosmetic work
Stopping the leak is the first repair milestone, not the last. The cabinet, floor assembly, insulation, and underside covering may also need attention. A dry surface doesn’t establish that concealed materials are dry.
Arrange prompt drying and damage assessment. The EPA homeowner moisture guide recommends drying wet materials within 24 to 48 hours where possible. Treat that as a reason to act promptly, not a grace period or a promise that mold cannot develop.
If water may contain sewage, stop ordinary cleanup and obtain qualified help. Don’t direct household fans across suspected contaminated materials. Tell the restoration provider what fixtures backed up and where the water traveled.
Soft flooring, loose mounting, or a dropping fixture changes the job’s scope. Keep the affected area out of use until its support is assessed. A new toilet, tub, or finish cannot make a damaged floor sound.
Before closing the assembly, agree on how the repair and drying will be verified. The contractor should also identify any insulation or underside covering that needs restoration. Avoid paying for a cosmetic finish while leaving the water path unresolved.
Build a bathroom repair plan that leaves no hidden handoff
A good plan for mobile home plumbing and bathrooms names the work between trades. The plumber may repair a joint without replacing damaged flooring. The remodeler may replace a surround without renewing the concealed supplies.
Ask for a written scope with these items separated:
- Water control: who isolates the supply or stops fixture use, and when service can resume.
- Access: which panel, cabinet, wall, floor, or underside area must be opened.
- Plumbing repair: which connections are replaced, which remain, and how compatibility is established.
- Damage work: who assesses support, removes unsuitable wet material, and completes drying.
- Fixture installation: which exact unit and support requirements apply.
- Closure and verification: who restores finishes and checks the completed assembly before concealment.
Also ask about permits and inspections before alteration work begins. Federal manufactured home construction standards are useful context, but they don’t settle every repair rule for an existing home. Confirm the requirements with the responsible state or local authority.
For a rented home, contact the owner before authorizing alterations. Keep the problem report, photographs, scope, and receipts together. That record is more useful than a folder containing only the new fixture’s receipt.
Keep a small plumbing record for the next repair
One page of accurate information can prevent several wrong purchases. Record the home’s manufacturer and identifying information, the bathroom fixture models, visible pipe markings, and shutoff locations. Add the water provider or park emergency contact.
Keep dimensions labeled by what they actually measure. For example, write "finished wall to toilet bolt center," rather than "toilet size." For a tub, distinguish the room opening from the unit dimensions on the drawing.
Store a photograph of each connection before it becomes concealed again. Include the approved access route and the repair date. Mark anything unverified as unknown rather than carrying a guessed measurement into the next order.
That record turns the next bathroom decision into a defined task: identify the failed path, establish access, verify fit, and restore the surrounding assembly. It also makes it easier to request a comparable quote without buying parts before the problem is understood.
Found a detail that needs checking? Tell us about a correction.