
A weak faucet and a slow drain need different investigations. Mobile home plumbing separates pressurized clean water from gravity drainage and the vents that manage air in those drains. Identify the affected path and how far the symptom reaches before buying a fitting or opening the belly.
The manufactured home adds a few places worth knowing: the water connection beneath or beside the home, connections between sections, and the bottom board beneath the floor. These details matter more than the word “mobile” on a package. Your home’s documents and the markings on its actual pipes are the starting point.
Use the bathroom planning guide for fixture fit, service access and the work between trades.
How mobile home plumbing moves water and air
Think of the system as three paths that meet at your fixtures. Water pressure moves the incoming supply. Gravity carries ordinary fixture waste toward the outlet, while venting protects the water seals that separate your rooms from the drainage system.
| Path | What belongs to it | Useful distinction |
|---|---|---|
| Water supply | Service connection, main shutoff, cold branches, water heater and hot branches | A pressurized line can leak while no faucet is running. |
| Drainage | Fixture outlets, traps, branch drains, section connections and main outlet | A waste connection may reveal its leak only when that fixture drains. |
| Venting | Vent piping and any approved mechanical vent devices | Airflow protects trap seals; a vent is not another freshwater connection. |
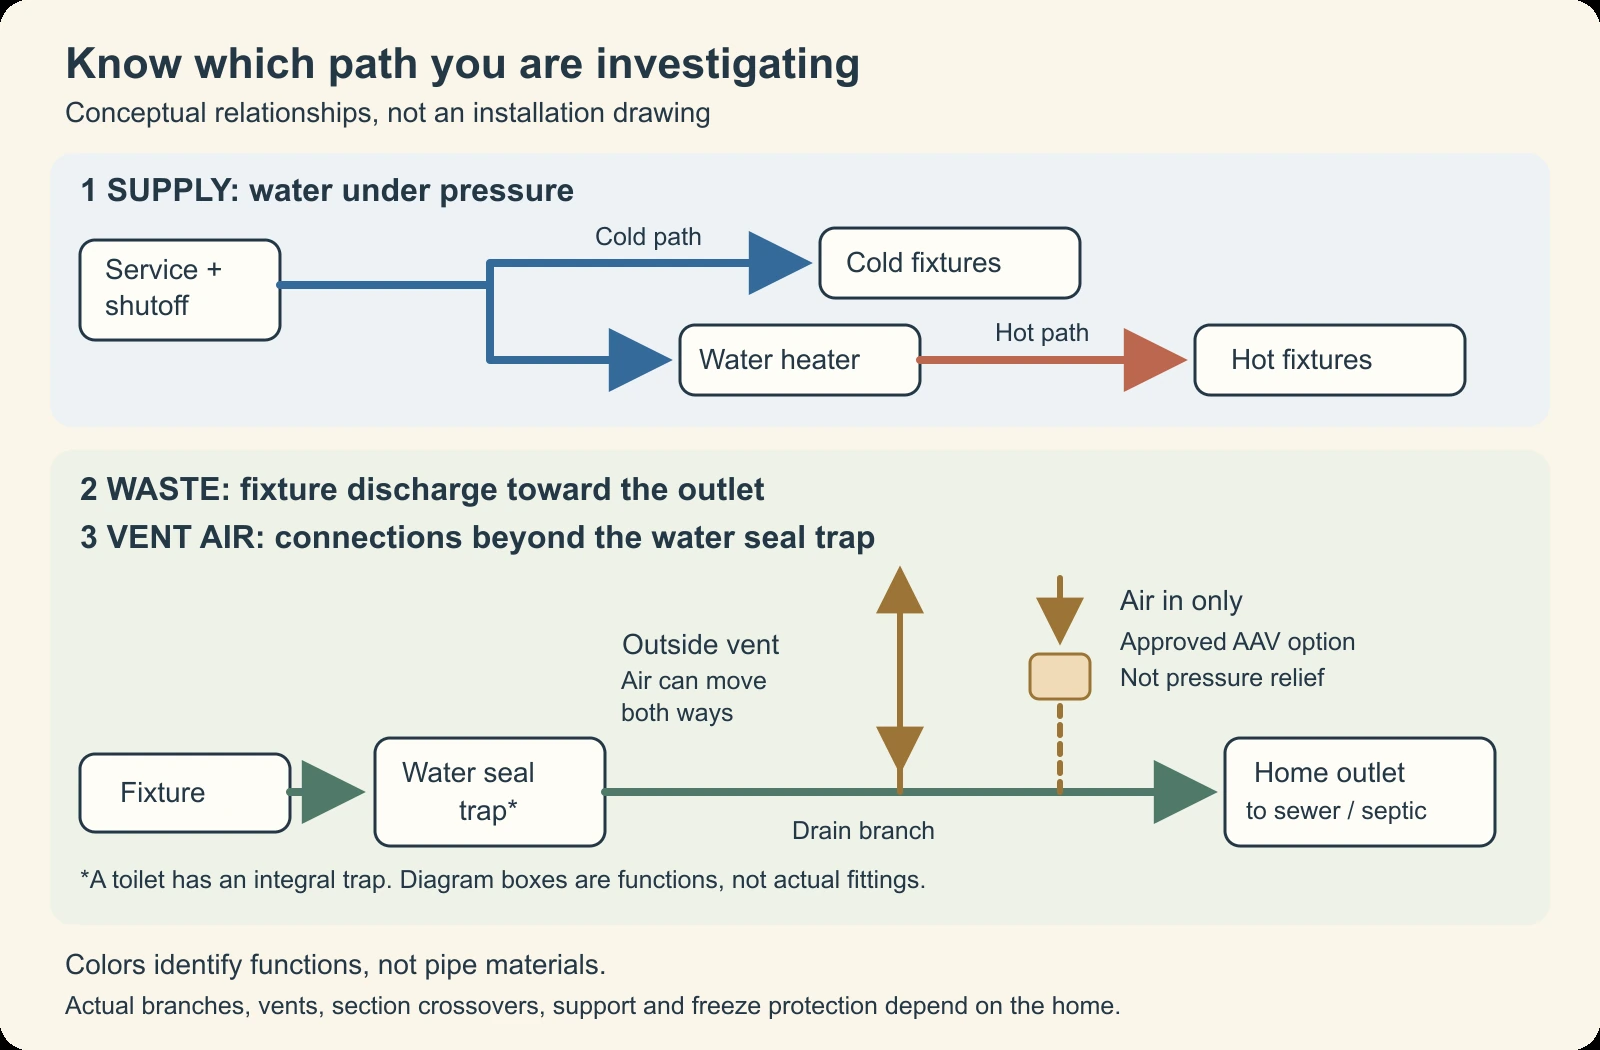
DWV means drain, waste and vent. Those functions work together, but their piping stays separate from the drinking water supply. A small pipe beneath the home could also serve an appliance or another system, so location alone doesn’t identify its purpose.
The schematic shows relationships, not a route to copy. A real plan may use different branches, fixture groups, vent arrangements and section connections. Trace the actual home rather than assuming the kitchen and bathroom share the shortest visible route.
Follow the supply from the shutoff to the fixture
The outside service supplies the home’s inlet. An accessible main shutoff lets you isolate the home; individual fixture stops, when present, isolate a smaller area. Locate and label the correct water valve before a leak makes access urgent.
For installation, the federal model standard requires an identified accessible shutoff between the supply and inlet. It also addresses pressure reduction when the local supply exceeds 80 psi. That threshold is a design requirement, not a recommended setting for every faucet or appliance.
A cold branch feeds the water heater, which supplies the hot branches. Losing hot water throughout the home points you toward that shared path. Losing only the hot side of one faucet narrows the investigation, but doesn’t prove which component failed.
Supply pressure and usable flow are related, but they aren’t the same observation. A faucet that delivers little water could have a restriction at that fixture. If several fixtures weaken together, a shared restriction or supply problem deserves attention before you replace their individual parts.
Record what happens with one fixture running, then with another normal demand added. Don’t change regulator settings to compensate for an unexplained problem. Give the plumber the pattern, including whether both hot and cold are affected.
A useful supply map has five labels: the main shutoff, water heater, outside faucets, branch areas and any section crossover. Add photos of valve labels and pipe printing. You don’t need to cut a line to make that record.
Understand drains, traps and cleanout access
Wastewater leaves the sink, tub, shower or appliance and joins larger drainage piping. A trap retains water that helps block sewer gas. A toilet incorporates its trap into the fixture, so the curved pipe beneath a sink isn’t a pattern to reproduce everywhere.
Drain piping needs the proper fall, alignment and support. Replacing a leaking joint without addressing a displaced or unsupported run can leave the underlying problem in place. Ask for the pipe supports to be assessed when the repair area is opened.
Materials and fittings must suit the drainage system. A pressure fitting that happens to join two pipes isn’t automatically the correct drainage fitting. Direction changes and the ability to clean the run also belong in the repair plan.
Don’t assume a manufactured home has no cleanouts. The construction standard requires them in specified circumstances, including where the system cannot be cleaned through fixtures, drains or vents. Whether a particular home’s layout needs another access point requires inspection.
A cleanout is service access, not a harmless cap to loosen during a backup. Wastewater may be held behind it. Tell the drain service which fixtures are affected and where accessible cleanout covers are located, without opening a backed up line yourself.
One slow sink and several backing up fixtures are different situations. The first can involve that fixture or its nearby branch. The second calls for attention to shared drainage and the sewer or septic connection, rather than repeatedly treating each sink.
What the vents do, including valves under sinks
Draining water changes air pressure inside the piping. The vent arrangement helps protect trap seals against siphonage and back pressure. That is why a drainage investigation sometimes includes a roof vent or a device beneath a sink.
An air admittance valve, or AAV, opens to admit air when negative pressure develops. It closes to help contain sewer gas. It doesn’t release positive pressure into your cabinet, and removing it permanently is not a repair.
The current federal construction standard treats mechanical vents as a secondary vent system. It distinguishes spring operated and gravity operated devices, with requirements for the applicable arrangement. A generic “auto vent” description doesn’t establish that two replacement devices have the same approval or installation rules.
Check the device identification before ordering a replacement. Its permitted position, airflow, access, capacity and compatibility matter. Don’t box it into an airtight enclosure or bury it behind a permanent cabinet panel.
Gurgling is a clue, not a diagnosis of a failed AAV. A partially obstructed drain can also affect pressure and drainage behavior. Oatey’s explanation of AAV operation distinguishes incoming air from positive pressure and warns against replacing a valve for every slow drain.
Describe which fixture triggers the noise and which fixture makes it. “The tub gurgles when the washer empties” is more useful than “the vent is bad.” Leave roof access, hidden vent tracing and changes to the vent design to the appropriate professional.
Where the pipes are, and why the belly matters
Some piping is visible in cabinets or service compartments. Other runs are within the floor assembly or below the home. A photograph of another floor plan cannot tell you exactly where yours travels.
The bottom board, often called belly wrap, is beneath the floor assembly. It is different from the skirting around the perimeter and the ground cover on the soil. Opening the skirting does not mean you have opened the floor cavity.
Water can collect above the bottom board without immediately reaching the ground. A dry patch of soil therefore doesn’t clear the plumbing of a suspected leak. A new sag or bulge deserves assessment, but doesn’t identify the source by itself.
Water can also enter the floor assembly from a spill, a failed tub seal, outside leakage or condensation. The manufactured housing moisture guide illustrates these different paths. Its older building science examples explain the mechanism; they aren’t a current repair specification for your home.
Keep out from beneath a heavy bulge or unsafe floor. Don’t blindly slit the membrane to search for a pipe. An access plan must account for what is above the cut, the water involved and how the floor assembly will be restored.
Ask the repairer to include inspection of affected insulation and flooring, drying or replacement as needed, and durable bottom board restoration. A pipe connection can be watertight while the surrounding floor cavity remains wet. Treat those as separate completion checks.
Crossovers connect sections, not interchangeable systems
A home with plumbing in more than one section may need connections between those sections. A supply crossover joins the water distribution. A drainage crossover joins waste piping; it has different materials, support and slope needs.
The large flexible heating or cooling duct between sections is another crossover altogether. Calling everything a “crossover” can send a service visit toward the wrong component. Describe what the connection carries, where it sits and which side of the home is affected.
The federal installation standards separately address water supply crossovers and freeze protection. Drainage crossovers have their own assembly and support provisions. Neither establishes one universal route beneath every marriage line.
For example, suppose fixtures on one section lose water while the other section still works. That pattern makes the connection and shared branch to the affected section worth checking. It does not prove the crossover failed, and it doesn’t justify moving a pipe before its purpose is confirmed.
Use the home’s installation manual or manufacturer information to establish the intended arrangement. A previous repair may have changed it. Compare the documents with the existing condition rather than treating either an old sketch or a loose exposed pipe as the final answer.
Identify the material before choosing any fitting
Mobile home plumbing can contain several materials, especially after repairs. Read the printed material, size and standard markings on each pipe being joined. Photograph the complete printing and the existing joint while access is available.
| What you find | What to record | What not to assume |
|---|---|---|
| Flexible supply tubing | Material printing, nominal size, maker and fitting system | Gray means polybutylene, or red and blue prove the whole system is PEX. |
| Rigid plastic supply pipe | Exact material and approval markings, plus the joint type | PVC and CPVC are interchangeable because their names look similar. |
| Plastic drain or vent pipe | ABS or PVC identification, size, fitting pattern and application | A supply fitting, cement or transition method suits the drain. |
| Metal supply piping | Material, size, condition and connection to adjoining materials | A visually similar thread or adapter establishes compatibility. |
PEX and polybutylene, often abbreviated PB, are different materials. Color alone cannot establish a fitting choice. An accessible section of newer tubing also cannot identify the concealed run that it joins.
A PB transition is a specific connection, not an ordinary PEX connection with a different label. For example, the current SharkBite Max PB adapter specifies a PB end and a separate end for listed compatible materials. That model example illustrates the need to check both sides; it isn’t a recommendation for an unidentified pipe.
The same discipline applies to nominal size and outside diameter. A number on a package isn’t permission to combine different sizing systems. Our guide to mobile home and ordinary house part compatibility explains why a broad store category cannot replace exact specifications.
Collecting these details is useful even when a plumber will supply the parts. It avoids a quote based on a guess about the material. If the printing is missing or unreadable, have the pipe identified before deciding how to connect it.
Use the symptom’s reach to choose the next step
For mobile home plumbing problems, start with the smallest affected area, then look for shared paths. The table gives investigation routes, not confirmed causes. Don’t continue running fixtures to reproduce a problem when water is escaping or sewage is backing up.
| Observed pattern | First area to distinguish | Useful next action |
|---|---|---|
| One faucet has weak flow | Fixture restriction versus its local supply | Record hot and cold behavior and whether nearby fixtures work normally. |
| The whole home loses water | Outside service versus the home’s main supply | Ask the utility or park about an outage and identify the home’s shutoff. |
| Only hot water is affected throughout | The shared hot water path | Report heater status and symptoms without opening energized or gas equipment. |
| One drain is slow | Fixture or branch drainage | Identify when it began and whether another fixture triggers gurgling. |
| Several fixtures back up | Shared drain and sewer or septic connection | Stop adding wastewater and arrange drainage service. |
| New belly sag or unexplained dampness | Supply, waste, spill or another moisture source | Arrange safe tracing and assess the floor cavity, not just the ground below. |
| Water stops after a freeze | Exposed inlet, branch or crossover | Check the extent from accessible fixtures and seek help for hidden frozen sections. |
For a possible supply leak, a meter observation can add evidence if your home has its own readable meter. Compare readings during a period when no water is being used, including automatic uses. A change suggests water is moving somewhere; it doesn’t locate the leak.
A shared park meter won’t isolate your home. Likewise, a quiet meter doesn’t eliminate a drain leak or an intermittent leak between observations. Keep the result attached to its limits rather than treating it as a complete plumbing test.
For an active supply leak, close the identified accessible water shutoff if you can do so safely. Don’t force an unknown valve or enter water near electrical equipment. If sewage is escaping, stop water use and keep people away from the affected area.
Freeze protection needs a complete route
Look beyond the pipe directly below the kitchen. The service connection, valves, exposed sections and crossovers can all matter. A protected interior branch won’t compensate for an exposed inlet elsewhere.
Use the home’s instructions and the exact heating cable instructions where a cable is part of the system. The installation standard requires a cable listed and certified for its intended purpose. Pipe material, insulation arrangement and installation conditions must match that product’s instructions.
PEX is not freeze proof. Replacing an older supply with PEX doesn’t remove the need for protection. Nor does perimeter skirting establish that every water connection is protected from the local conditions.
If water stops during freezing weather, compare affected fixtures before assuming the entire system is frozen. Never use a torch or other open flame to thaw a pipe. An inaccessible frozen section calls for a plumber, particularly when you cannot observe the pipe for leakage as it thaws.
Make the repair scope clear before work begins
Federal manufactured housing construction and installation standards explain important system requirements. They don’t, by themselves, settle which permits and repair rules apply to an existing home today. Check with your local authority and, where relevant, the state manufactured housing program.
Give the contractor your home’s manufacturer, model and available installation documents. Include the symptom pattern, pipe photos and any prior repair records. Ask whether they work on manufactured homes and will include the underfloor access and restoration.
A useful written scope separates diagnosis, plumbing work, required testing, wet material assessment and closure of the access area. Clarify who handles floor damage and any sewer or septic work beyond the home. Those boundaries can otherwise disappear behind a single “fix leak” description.
When work is complete, ask what was repaired, what material remains and how the result was checked. Keep photos before the cavity is closed. Add the final valve, branch or crossover information to your system map so the next repair starts with better information.
Found a detail that needs checking? Tell us about a correction.