

Successful mobile home underbelly repair restores a sound closure beneath the floor after the cause of damage is addressed. A dry tear with strong surrounding material may need a local patch. A wet bulge, crumbling edge or missing section needs a different scope before anyone tapes it shut.
Judge the repair by what remains around the opening, not just the hole’s size. The patch needs a dependable connection to the existing assembly. It also needs to protect restored insulation without hiding an unresolved leak.
Identify the damaged layer before buying repair material
The belly closure is attached beneath the home’s floor assembly. It may be flexible fabric or an older rigid material. Insulation and some utilities can occupy the space above it, although their arrangement varies.
A ground vapor retarder lies on the soil below the home. Skirting encloses the perimeter, while the foundation carries and restrains the home. Repairing any one of these does not automatically repair the others.
Ask anyone quoting the work to name the layer they mean. A proposal for a new “vapor barrier” could describe ground plastic, belly fabric or both. Get the location and function written down before comparing prices.
The broader foundation and underfloor component guide explains these relationships. Here, the task is restoring the bottom closure without overlooking the conditions above it.
Black material isn’t a complete identification
Photograph an intact area, its texture and any visible product markings from a safe location. A flexible woven sheet and a stiff deteriorated board need different repair approaches. Color alone cannot establish composition, vapor behavior or adhesive compatibility.
If records identify the home manufacturer, ask about the original floor enclosure and approved repair materials. Existing repairs may differ from factory construction. Show the contractor both the damaged area and a sound reference area.
Don’t peel an intact section apart merely to identify it. A qualified repairer can assess concealed layers when controlled access is necessary. That investigation should be part of the scope, rather than an accidental consequence of buying tape.
What the visible damage can and cannot tell you
An open seam after plumbing work may be a closure repair left unfinished. A sag beneath a bathroom could contain water, fallen insulation or other debris. Neither location proves the cause.
Begin with observations from the perimeter or an existing safe access point. Note the room above, nearby fixtures, recent repairs and when the change appeared. Photograph the same location from a wider view so another person can find it.
Keep out if there is standing water, suspect sewage, exposed wiring, damaged supports or inadequate working clearance. A camera does not establish that crawling underneath is safe. Arrange the appropriate inspection before entering or disturbing material.
| Observation | Question the inspection must resolve | Why closure alone may fail |
|---|---|---|
| Fresh cut with dry, intact edges | Was service work completed, tested and left accessible? | A patch can conceal an unfinished connection or needed access point. |
| Heavy sag, bulge or dripping | What is inside, and where did the moisture originate? | Sealing the outside can retain the original problem. |
| Insulation on the ground | How much is missing, and why did the closure fail? | New fabric does not replace lost thermal protection. |
| Several old patches pulling away | Is the remaining substrate strong and compatible? | Another adhesive layer still depends on the same weak material. |
| Gnawing, nesting or droppings | Is there active pest access and contamination above the closure? | A visible patch cannot complete pest removal or cleanup. |
| Soft floor above an opening | Are the subfloor and framing damaged? | Belly fabric cannot carry out a structural floor repair. |
Do not puncture a bulge to see what drains out. Hidden wiring, plumbing and contaminated water may be involved. Let the repairer plan controlled access and containment after identifying the hazards.
If water appears after fixture use, start with a plumbing assessment. If it follows cooling operation, include the duct and condensate system in the investigation. A tear and a moisture source can coexist.
Choose the right scale for mobile home underbelly repair
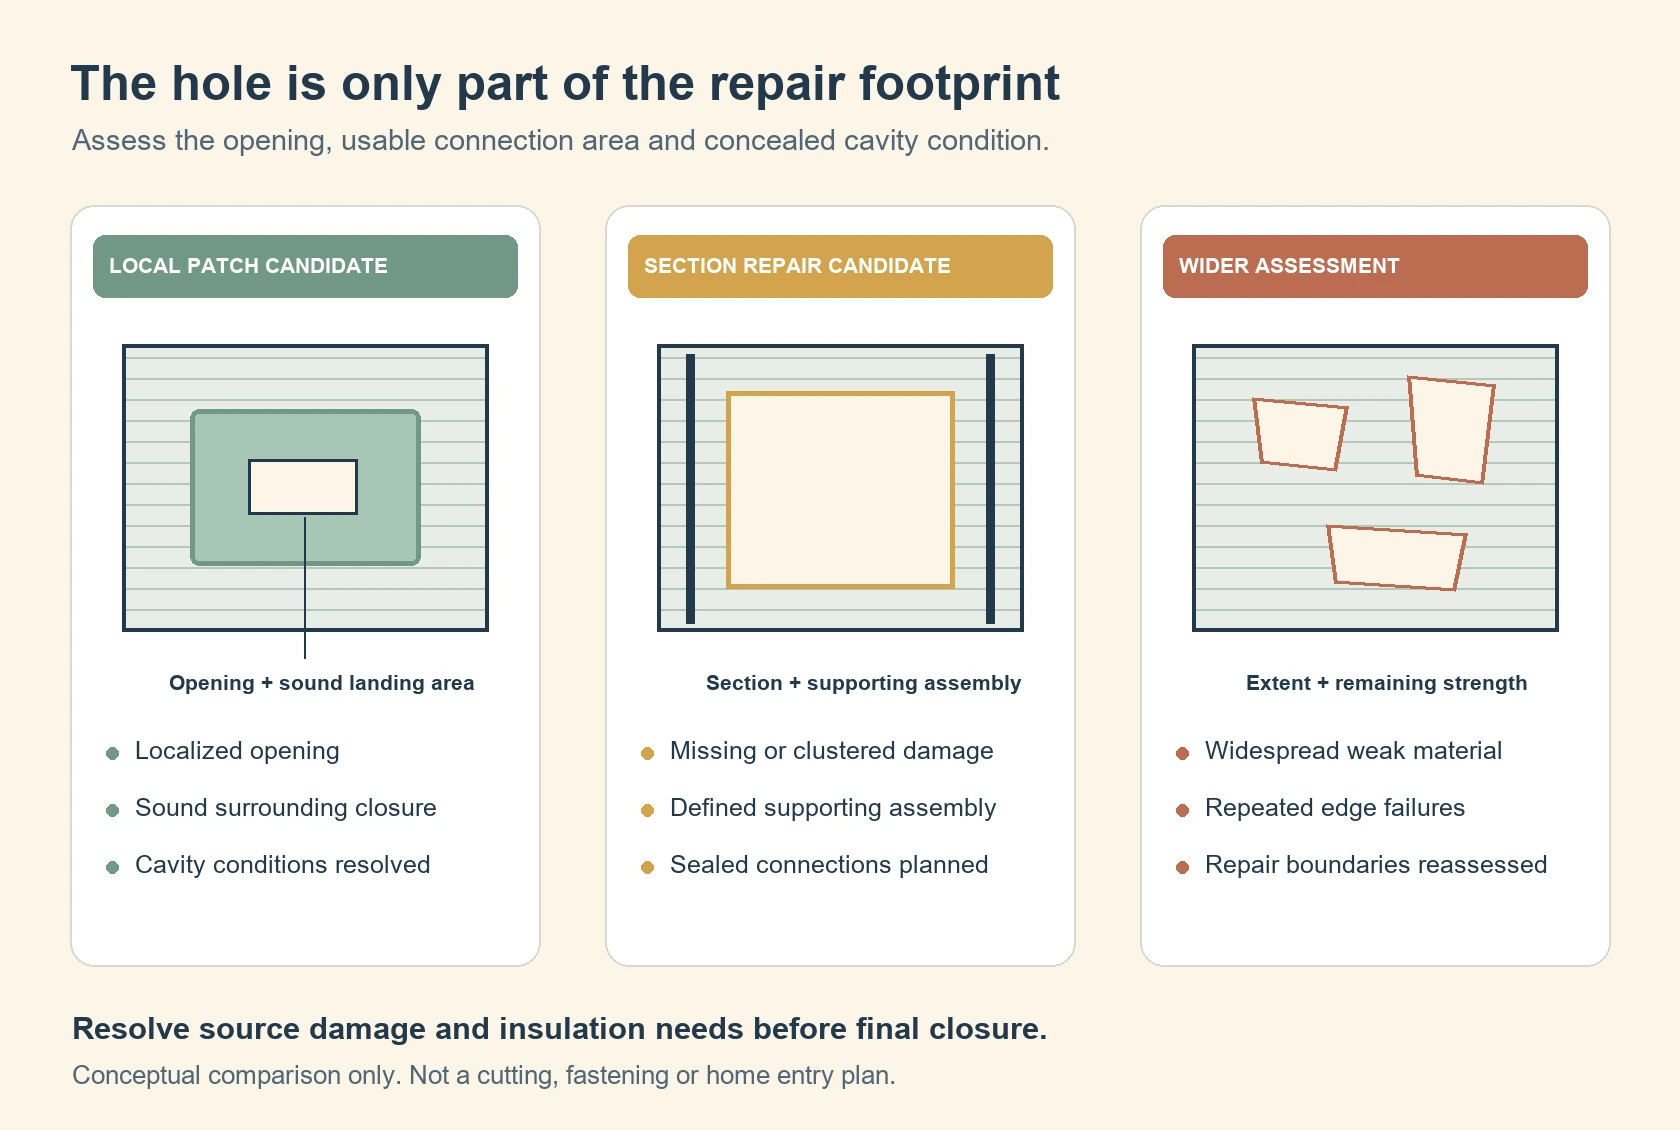
There is no dependable universal hole size that separates a tape repair from replacement. The material around the opening, the load it retains and accessible support matter too. A small hole in failing material can require more work than a larger clean opening.
Think of the repair footprint as three areas: the visible opening, the sound material needed for connection, and any concealed damage. All three belong in the estimate. Measuring only the opening understates the job.
A local patch needs a sound landing area
A patch is a reasonable candidate when damage is localized and the surrounding closure remains usable. The cavity must be assessed, necessary source repairs completed and displaced insulation addressed. The selected method must suit that particular flexible or rigid substrate.
Request a photograph showing the intact material around the proposed patch. If the edge tears during preparation, the repair boundary must move outward. Repeatedly enlarging a patch without reassessing the remaining closure is a reason to revisit the scope.
A section repair needs defined support
When a piece is missing or several nearby tears overlap, replacing one section may make more sense. The new section needs an attachment plan and sealed connections to retained material. It should not depend on a loose fringe carrying the restored insulation.
Ask where that section starts and ends, and what sound assembly supports it. “Replace the bad area” leaves both questions unanswered. Require a change process if inspection reveals deterioration beyond those boundaries.
Broad deterioration calls for a wider assessment
Extensive missing closure, widespread crumbling material or repeated attachment failure can make isolated patching impractical. The repairer should assess the entire affected floor enclosure. That does not mean every old belly automatically needs complete replacement.
Full replacement also exposes more utilities and insulation. Require a plan for protecting both, plus a record of conditions discovered. Any structural repairs need their own qualified scope before the closure conceals them again.
Resolve moisture and contamination before closing the cavity
A closure repair has two separate moisture questions: has the source stopped, and are affected materials ready to be enclosed? A repaired pipe answers only the first. Ask how the cavity, subfloor and insulation will be evaluated afterward.
Water can arrive from plumbing, drainage problems or condensation on cold surfaces. Timing and location help guide inspection, but they do not replace diagnosis. The contractor should identify the actual source instead of labeling all wet material “ground moisture.”
Do not accept “it will dry inside the new wrap” as the drying plan. Ask which materials can remain, what must be removed and how readiness will be documented. There is no universal waiting period that proves every cavity is dry.
EPA’s water damage guidance distinguishes salvageable surfaces from damaged porous materials. Wet or mold contaminated insulation may require removal. Suspected sewage or other contamination calls for appropriate remediation expertise.
A mold spray does not replace source correction or a material assessment. Likewise, dry looking belly fabric does not establish that wood or insulation above it is dry. Request the inspection findings behind the proposed closeout decision.
Keep pest work separate from patch adhesion
Where rodents have entered, address their access routes and contaminated material before sealing the cavity. Avoid sweeping or vacuuming dry droppings or nesting debris. Those actions can put contaminated particles into the air.
Have the cleanup method and protective measures selected for the actual conditions. Heavy infestation or inaccessible contamination needs experienced help. Repairing the belly and perimeter gaps can be part of exclusion, but fabric alone is no guarantee against future entry.
Match the patch system to the existing bottom closure
Choose the material and attachment method together. A roll of fabric does not specify how it should connect to your home. A strong adhesive claim does not establish compatibility with a dusty, brittle or coated substrate.
Have the supplier or repairer identify the intended substrate in writing. Check the actual product instructions for surface preparation, application conditions, overlap and support. Where an instruction is missing, ask the manufacturer rather than borrowing a rule from a different tape.
Flexible fabric repairs
Some manufactured housing repair systems use adhesive backed woven material. Others combine patch material, compatible sealant and mechanical attachment. The preparation and permitted uses can differ even when the finished patches look similar.
The published soft bottom patch specification describes one professional weatherization method. Its patch laps at least 3 inches over surrounding material and uses sealant plus outward clinch staples. That is a defined method, not a universal instruction for every adhesive tape.
In that specification, the 3 inches describes overlap beyond the opening. It does not mean adding only 3 inches to the opening’s total width. Keep the chosen system’s measurement language intact when ordering or reviewing a proposal.
Surface preparation must remove material that prevents adhesion without destroying the retained closure. If cleaning reveals a weak or disintegrating edge, reassess the patch boundary. Covering loose residue with more tape does not create a sound substrate.
Do not improvise heat gun, solvent or spray adhesive use beneath the home. Follow the selected product’s handling requirements and the site’s safety conditions. A technique shown for another product may introduce a different fire or exposure hazard.
Rigid bottom board repairs
A stiff board needs a patch that remains supported and resists bending or pulling away. The rigid repair specification treats material, support and fasteners as separate requirements. An adhesive tape chosen for flexible polyethylene should not be assumed suitable.
Ask how the repairer will bridge the opening, retain the patch and seal its perimeter. Fastener type and support must match the actual assembly. This guide does not provide a blind fastening pattern through concealed utilities.
Replacement fabric and improvised substitutes
Purpose made bottom closure material has a defined manufactured housing application. Ordinary ground plastic, a shipping tarp and wall housewrap are not automatically equivalent. Their appearance or water resistance alone cannot establish suitable strength, attachment or vapor performance.
Don’t add another impermeable sheet simply because it sounds more protective. The floor assembly, climate and existing layers matter. Have the proposed material and any change in vapor behavior reviewed for that home.
The soft bottom replacement specification separately addresses section coverage, seams, rigid supports and attachment. Its replacement seam overlap differs from its companion patch detail. That difference is another reason not to treat every belly repair as the same tape job.
Arrange the work so utilities and insulation stay protected
Before removal, the crew should locate the affected water lines, drains, wiring, ducts and other equipment. Photograph their arrangement where access permits. A blade or fastener must never enter an unseen cavity on the assumption that it is empty.
Do not disconnect a drain, duct or water line just to make hanging fabric easier. Any necessary disconnection and reconnection belongs in the appropriate trade’s scope. The restored system needs checking before the enclosure hides it.
Belly repair should not alter piers, anchors or structural members. If supports obstruct access, stop and obtain a suitable work plan. Raising the home or moving a support is not an incidental step in patching fabric.
Complete duct work before final enclosure
A patch in the belly cannot seal a leaking duct above it. Ask whether affected ducts need repair, sealing or insulation before the new closure is finished. The ductwork guide explains those distinct faults.
Keep intentional appliance air supplies and exhaust paths identified and functional. An unfamiliar opening is not permission to seal it. The appropriate technician should resolve that uncertainty before the closure crew continues.
Restore insulation deliberately
Missing insulation needs a specified replacement, not a handful pushed into the hole. Record the affected area and the proposed material, coverage and installed thickness. Insulation should not be left compressed, displaced or spilling through a seam.
Pipe protection depends on its position within the home’s thermal arrangement. Do not assume every pipe belongs below newly installed insulation. Use the mobile home insulation guide when the job changes more than a small disturbed area.
Additional blown insulation also places demands on its retaining closure. The repairer needs to assess support before adding material. A fabric repair price should say whether it includes restoring the original insulation or a separate upgrade.
Get a repair scope that can be checked afterward
For mobile home underbelly repair, a useful estimate identifies more than a roll size and labor charge. Ask for the affected locations, planned boundaries and the reason for patching or replacement. Keep separate allowances for concealed findings.
The following record is an owner review aid, not an installation specification. Fill it with the contractor before work begins. Then use the same locations for the completion photographs.
| Scope item | What to record | Completion evidence to request |
|---|---|---|
| Damage boundary | Room above, nearby fixed reference and affected section | Wide photograph locating each completed repair |
| Cause | Confirmed source, responsible trade and unresolved questions | Source repair record and relevant system checks |
| Cavity condition | Wet, damaged or contaminated material to assess or remove | Findings and readiness record before closure |
| Retained material | Existing closure type and proposed sound connection area | Preparation photograph showing usable surrounding material |
| Repair assembly | Patch or replacement product, method and attachment basis | Product identification and photographs of sealed connections |
| Insulation | Area restored and material specification, or explicit exclusion | Photograph before covering and installed insulation record |
| Future access | Any service location needing a suitable reusable access detail | Location and method recorded for the next trade visit |
Price differences often reflect different scopes: one contractor may include insulation, disposal and source investigation while another quotes fabric alone. Low clearance and concealed conditions also affect the work involved. Compare those items before deciding that two totals describe the same repair.
Agree on how additional work will be approved. For example, discovering unsound flooring should trigger photographs and a separate proposal. It should not quietly disappear behind a new sheet.
Inspect the finished closure and preserve the repair record
Ask for a view of each repaired location and its surrounding connections. A close photograph of smooth black fabric cannot show whether a neighboring seam remains open. Compare the work with the agreed boundaries.
Look for sealed patch edges, closed service cuts and material retained without obvious pulling or unsupported loose sections. Ask about any new sag, unsealed penetration or insulation visible through a gap. These observations flag questions; they do not certify concealed work.
Obtain the before closure photographs before approving a finished job. Those images should show source repairs, restored insulation and the actual attachment approach where visible. Keep product names and instructions with the invoice.
Confirm that removed skirting and access panels were restored without blocking required openings. Ground sheeting disturbed by the crew should also be addressed within the agreed scope. Neither task should be assumed included because the invoice says “underbelly.”
After the next relevant rain or normal equipment cycle, watch for a return of the original symptom from a safe location. Report new dripping, odor or sagging promptly. Don’t interpret a warmer floor alone as proof that the original moisture problem is solved.
Keep the record for later plumbers, electricians and HVAC technicians. Tell them where repaired sections and reusable access points are located. Make restoration of any new service opening part of their work order.
Mobile home underbelly repair is complete when the source problem, cavity condition, insulation and closure have all been addressed within the agreed scope. A patch can be small and still be thorough. A large new sheet can still leave the essential repair unfinished.
Found a detail that needs checking? Tell us about a correction.