
The right insulation for mobile home repairs depends on the cavity, its condition and the home’s climate. Start by locating missing insulation, air leaks and moisture problems. Then choose a compatible assembly that protects plumbing, preserves ventilation and remains accessible for repairs.
A thicker material alone cannot solve every comfort problem. A disconnected duct can waste conditioned air while a plumbing leak ruins fresh insulation. Treat the roof, walls and floor as connected parts of one plan.
Separate the five jobs before choosing a material
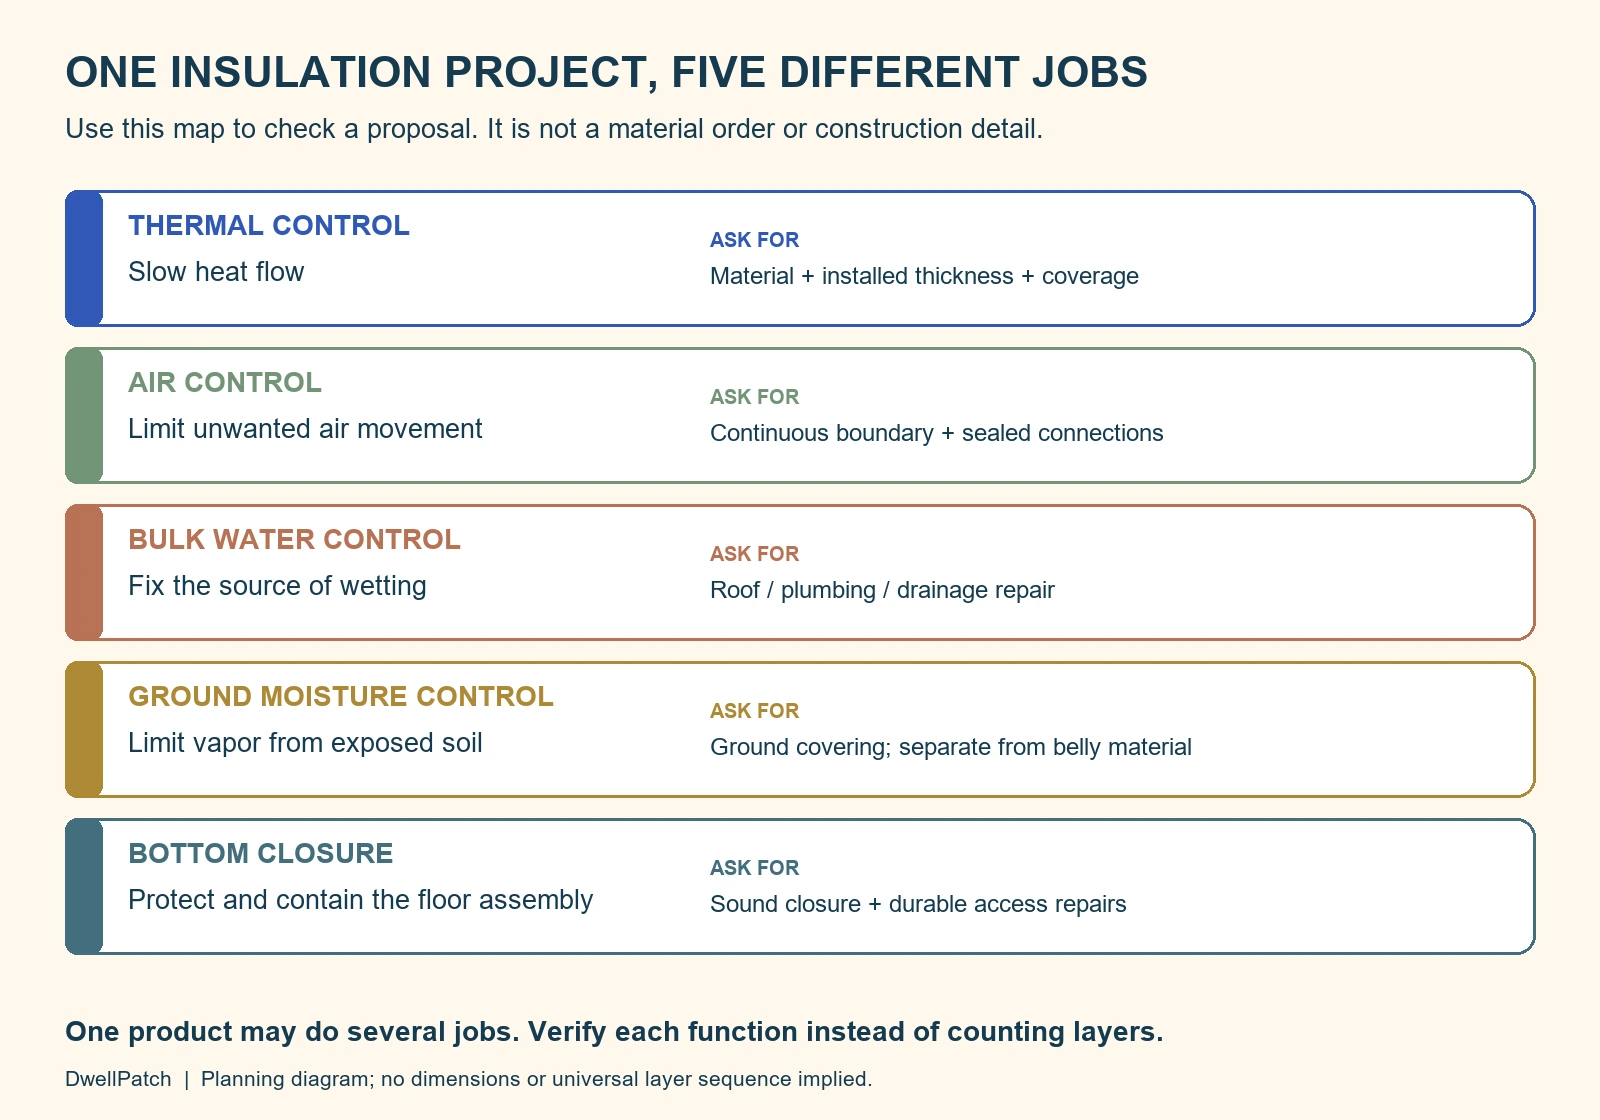
Several products under a manufactured home can look like overlapping layers. Their jobs differ, even when one product performs more than one function. Ask what each proposed layer is supposed to do.
| Job | What it addresses | Question to put on the work order |
|---|---|---|
| Thermal insulation | Heat moving through the building enclosure | What material, installed thickness and thermal performance are specified? |
| Air control | Unwanted air moving through gaps and connections | Where is the continuous air boundary, including its edges? |
| Bulk water control | Roof leaks, plumbing leaks and water entering below | What caused the water, and who confirms the repair? |
| Ground moisture control | Water vapor rising from exposed soil | Is the ground covering complete and appropriate for this foundation? |
| Bottom closure | Protection and containment of the floor assembly | Will the belly material support the insulation and close every access opening? |
The ground covering lies on the soil. Belly fabric or bottom board closes the underside of the home above it. Replacing one doesn’t automatically restore the other.
Likewise, fiberglass insulation isn’t a substitute for sealing an air leak. A reflective surface needs the correct air space to deliver its claimed radiant performance. A proposal that calls everything a “vapor barrier” needs a clearer drawing and description.
Use the diagram as a conversation guide, not a construction detail. It deliberately shows separate functions without prescribing a material order for your home.
Record the comfort problem without guessing its cause
Write down which rooms feel uncomfortable and when. Note wind, sunshine, rain and whether the heating or cooling equipment is running. Photograph visible damage from a safe, accessible location.
A cold strip beside an exterior wall deserves a different investigation from weak airflow in one bedroom. Neither observation proves that all the insulation needs replacement. A useful assessment connects the symptom to an actual defect.
| Observation | Investigation to request | Decision to avoid making yet |
|---|---|---|
| Floors feel cold near damaged belly fabric | Check insulation coverage, closure condition, air leakage and nearby pipes | Buying batts before inspecting the entire affected area |
| One room gets little conditioned air | Check duct connections, restrictions and airflow | Assuming extra wall insulation will correct delivery |
| Comfort changes sharply during wind | Locate unwanted air paths at the enclosure and duct system | Adding insulation without addressing connected gaps |
| Wet material or a returning stain | Find the water source and assess concealed damage | Covering it with another layer |
| Hot ceiling during sunny weather | Assess the roof assembly, existing insulation and solar exposure | Choosing a coating as an equivalent replacement for cavity insulation |
These are investigation routes, not diagnoses. More than one defect can occur in the same area. Record the evidence for each proposed repair separately.
Include accessible door and window seals in the survey. Our door seal guide explains how to distinguish the gap and profile before replacing weatherstripping. That small repair may belong alongside a larger insulation project.
Have the home assessed before opening intact assemblies
Choose an energy professional familiar with manufactured homes and their shallow cavities. Ask for an inspection that covers insulation, air leakage, ducts, moisture, ventilation and combustion equipment. Request a prioritized explanation rather than a material recommendation alone.
A blower door test measures air leakage under controlled pressure. Duct testing investigates a different system. Ask the assessor to explain which test supports each recommendation and what the result cannot establish.
An infrared image can help locate a temperature pattern. It doesn’t, by itself, identify the material, prove a leak or measure every cavity’s insulation value. Ask how the image was checked against conditions and direct observations.
Do not pull apart sound siding or drill exploratory ceiling holes just to collect measurements. Roof access, concealed wiring and weak surfaces can turn inspection into a repair project. Let the assessment establish a safe access method.
Before substantial air sealing, have combustion safety and ventilation needs assessed. Sealing can change pressure relationships and indoor air quality. The home still needs its intended ventilation and combustion air routes.
Choose an R value for the actual assembly
R value describes resistance to heat flow. Higher values indicate greater resistance under the specified conditions. The number on a package assumes the product is installed as directed.
Do not choose insulation for mobile home cavities from a universal “best R value” list. Climate, available depth, existing material, framing, moisture control and access all matter. The specified result must fit the assembly without blocking another function.
The federal manufactured home thermal protection standard uses an overall heat transmission calculation and thermal zones. Its whole home value is not the same measurement as a batt’s R value. Those manufacturing provisions aren’t a complete retrofit specification for an existing home.
Ask the professional to identify the requirements that apply to your alteration locally. Also ask which recommendations exceed those requirements and why. A climate chart for conventional construction doesn’t automatically approve a manufactured home retrofit.
Keep product performance separate from assembly performance. Framing, gaps and poorly fitted edges affect the completed enclosure. A high label value doesn’t excuse unfilled sections.
For batts, verify the exact product’s installed thickness and cavity fit. For blown material, use its coverage and density instructions. Don’t multiply a generic value per inch and treat the result as a verified installed rating.
Existing insulation needs a condition assessment too. Dry, intact material may be retained when the design allows it. Age alone isn’t a sound reason to strip every cavity.
Compare insulation types by where they can work
There is no single best insulation for every manufactured home surface. Compare the installation method, moisture behavior and service consequences as well as thermal performance. The same material may be suitable in one assembly and unsuitable in another.
Fiberglass batts and blankets
Batts can suit accessible cavities where they can be fitted and supported correctly. The installer needs the actual cavity depth, width and length. Pipes, wires and framing interruptions need careful fitting rather than a blanket pushed across them.
A compressed or gapped installation doesn’t provide the intended result. Faced and unfaced products also serve different assembly designs. Don’t select a facing simply because the paper seems convenient to staple.
Blown insulation
Blown material can reach cavities that are difficult to fill with batts. It needs an appropriate access strategy and a sound enclosure. Equipment settings, coverage and installation conditions belong to the specified product and method.
Ask how the crew will verify distant corners and divided cavities. A large bag count doesn’t prove that every area received material. Insulation escaping through a hidden tear is a closure problem, not useful extra coverage.
Rigid foam boards
Rigid boards can provide insulation within a designed assembly. Their edges, fasteners, coverings and transitions need details. A board attached under joists isn’t automatically a complete replacement for the original floor assembly.
Ask how the proposal handles fire protection, moisture drying and future pipe access. If exterior wall thickness changes, ask about windows, doors, siding attachment and roof edges. Those details can determine whether the upgrade is practical.
Spray foam
Spray foam can provide insulation and, in suitable applications, air control. Open cell and closed cell products aren’t interchangeable specifications. Product approval, substrate condition, installed thickness and required protective coverings matter.
Before accepting foam around services, ask how a future leak or damaged component will be found and repaired. Request a written ventilation, isolation and occupancy plan for installation. A generic promise that you can return after a fixed number of hours isn’t enough.
Reflective products and coatings
Reflective systems address radiant heat transfer and depend on their tested installation conditions. Check whether an advertised value includes an adjacent air space. That system value doesn’t belong to the thin sheet alone.
A reflective roof coating may address solar heat gain on a compatible roof. It doesn’t establish the thermal resistance of an insulated roof cavity. Compare those proposals as different measures with different purposes.
Plan underfloor insulation around ducts and plumbing
The belly area can contain insulation, ducts, plumbing and wiring. Its original shape may extend below the joists. An installer must understand that layout before changing where the thermal boundary sits.
The current manufactured housing belly insulation work specification calls for preparation before filling. Its checks include leaks, pests, electrical hazards, closure strength and completed air and duct sealing. Plumbing must remain within the thermal boundary or receive appropriate insulation.
That is why “put it tightly against the floor” isn’t a universal instruction. A new arrangement can leave a pipe outside the protected space. Have the professional show the pipe and duct positions on the proposed detail.
Fix plumbing problems before closing the assembly. The plumbing system guide helps identify supply, drain and vent routes. If a supply leak needs work, our water line repair planning guide explains the information to collect.
Specify who restores the belly after every trade finishes. A plumber’s access opening and an insulation crew’s access opening both need a durable closure. Include those repairs in the scope rather than leaving them as an informal handoff.
Keep ground water management separate from the thermal work. Standing water, sewage and damaged wiring require attention before anyone crawls underneath. Don’t enter an unsafe or unstable space to save an inspection visit.
Insulated skirting is another assembly decision. It doesn’t by itself replace missing floor insulation or turn the crawlspace into a conditioned enclosure. Never block existing vents as a shortcut to an unvented conversion.
Coordinate ceiling and wall work with existing repairs
Roof and ceiling
Find roof leaks and assess ceiling strength before adding insulation weight. The ceiling preparation checklist covers lights, flues, exhaust ducts and plumbing vents. Each needs its appropriate clearance, termination or protective detail.
Roof ventilation depends on the actual construction. Some manufactured roof designs have specific exceptions to general venting provisions. Don’t fill a ventilation path or create new vents from a generic diagram.
Ask how the crew will reach the cavity and restore the weather seal. Exterior access, gable access and interior access have different consequences. A planned roof project may offer an opportunity, but the roofer and insulation installer need one coordinated detail.
Exterior walls
Measure and inspect representative cavities before ordering material. A shallow wall may have obstructions that limit usable space. The insulation method must preserve the wall’s moisture control and weather protection.
Wall insulation doesn’t always require removing the interior finish. Some documented methods use exterior access where the construction allows it. That doesn’t make blind injection appropriate for every wall.
Adding exterior insulation changes more than cavity performance. Windows and doors need compatible flashing and trim transitions. Check the window leak investigation guide if stains appear around an opening before you cover that area.
A proposal to add interior plastic everywhere should explain the existing vapor control layers and climate. More impermeable layers aren’t automatically better. Ask the designer how the assembly manages moisture and retains an appropriate drying path.
Compare bids for insulation for mobile home repairs
Give each contractor the same record. Divide the home into roof, wall and floor areas, then mark known defects within each. “Insulate the whole trailer” is too vague to compare accurately.
| Record | What to write down |
|---|---|
| Location and existing condition | Room or underside section, accessible photos, existing material and known gaps |
| Prerequisite repairs | Leak source, pest damage, duct repair or unsafe service condition; responsible trade |
| Proposed thermal work | Exact material, area, installed thickness, target performance and installation method |
| Other assembly functions | Air boundary, moisture control, bottom closure and intended ventilation |
| Access and restoration | Where openings will be made, how finishes will be restored and future service locations |
| Acceptance evidence | Before and after photos, product records, coverage documentation and agreed test results |
Compare repair, insulation and finish costs separately. Ask whether disposal, pest cleanup, access restoration and testing are included. A cheaper quote may simply leave another trade’s work outside the price.
For a hypothetical comparison, one bid might include only filling a floor cavity. Another might also repair a duct and restore damaged belly fabric. Those are different scopes even if both promise the same insulation value.
Have both contractors identify exclusions before comparing totals. If they disagree about the assembly, ask for the supporting detail. Don’t choose between competing guesses by counting material layers.
When the budget is limited, prioritize verified defects and coordinate work that shares access. Ask the assessor which repair has to precede another. Avoid buying materials for a later phase before its cavity design is settled.
Households needing help can contact their state or local weatherization provider. Eligibility, scheduling and available services need a local check. Ask about assessment before paying for work you hope a program will cover.
Verify the work before the cavities disappear
Arrange inspection points before the crew starts. Photos should identify the section, not just show a close view of insulation. Ask for evidence of repairs and coverage before the final closure hides them.
Confirm that insulation is continuous where specified, without visible gaps or unwanted compression. Check that required vents, service access and heat clearances remain available. Have the responsible professional verify concealed or hazardous details.
Keep the exact product information and installation record. For blown material, request coverage area, installed and settled thickness, thermal value and bags used. Record roof, wall and floor work separately rather than combining their R values.
Review any agreed air leakage, duct or safety tests with the person who performed them. A test result needs its conditions and interpretation. New insulation doesn’t excuse an unresolved combustion or ventilation issue.
Afterward, keep a simple comfort and moisture log. Compare similar weather and thermostat settings where possible. Utility bills also reflect rates, weather and occupancy, so one lower bill doesn’t measure the insulation’s savings by itself.
Your completed plan for insulation for mobile home repairs should answer three practical questions. What defect was corrected, what assembly was installed, and what evidence confirms the result? Those answers are more useful than a promise to add the thickest material available.
Found a detail that needs checking? Tell us about a correction.