
Mobile home water line repair starts with stopping the water, finding the actual failure, and identifying both sides of the repair. Replace damaged pipe or a failed connection with a system approved for those materials. Then check the repair, correct its cause, and restore the insulation and belly covering.
A coupling that stops today’s drip may leave tomorrow’s problem untouched. A frozen branch, an unsupported connection, and several failing pipes need different responses. Use the sequence below to decide what belongs in the repair before buying parts.
Mobile home water line repair: the first decisions
If water is spraying, shut off the home’s supply from a safe location. Don’t spend time identifying a fitting while water fills the floor cavity. Contact the utility or property manager if the working shutoff is outside your control.
Keep out of standing water near electrical equipment, damaged wiring, or a water heater connection. Have the electrical hazard made safe before entering. Don’t crawl beneath a sagging floor, disturbed supports, sewage, or a belly membrane holding water above you.
Before cutting anything, answer these four questions:
- Where does fresh water first appear? Find the source rather than assuming the lowest wet spot is the leak.
- What material and size are present? Read markings and measure the pipe; appearance alone cannot establish compatibility.
- Can the damaged section be bounded by sound pipe? A repair needs usable connection points on both sides.
- What caused the failure? Address freezing, strain, poor preparation, or wider deterioration as part of the job.
Keep a photograph of the whole area and close pictures of the markings and connection. Include a ruler for context, but take actual measurements separately. This evidence helps a plumber or supplier assess a specific assembly.
Trace the water before opening more of the belly
Start with accessible indoor locations above the wet area: cabinets, fixture stops, the water heater compartment, and laundry connections. Follow visible moisture upward and along the pipe. Water running down a supply tube can make a sound connection below look guilty.
Dry accessible surfaces if that can be done safely. Look for the first new bead, spray, or wet track during an appropriate supervised check. Avoid pulling or twisting an old line just to improve your view.
| Observation | Question to resolve | Repair consequence |
|---|---|---|
| Water appears without any fixture being used | Is a pressurized supply joint or tube leaking? | Locate and isolate that supply section. |
| Wetness follows a sink or tub draining | Is the drain, overflow, or fixture seal responsible? | A water supply coupling won’t fix that path. |
| Water tracks down from a cabinet | Is a stop, supply connector, or faucet connection leaking above? | Inspect above the floor before removing pipe below. |
| Several cold surfaces are damp | Could condensation be contributing? | Find the moisture source before replacing intact pipe. |
| Leak follows a freeze | Are there additional damaged sections or fittings? | Inspect the affected route, not just the first split. |
These are diagnostic clues, not proof. Two faults can occur together. A supply leak and a damaged drain can both wet the same floor cavity.
A meter check can help investigate an unexplained loss when there is no visible emergency. Compare readings during a period with all water use stopped, including automatic equipment. EPA describes a two hour meter comparison; movement suggests water use or a leak, but doesn’t locate it.
Skip that waiting period when water is visibly escaping. Shut the supply off. A shared meter, well system, or automatic refill also changes how useful the observation is.
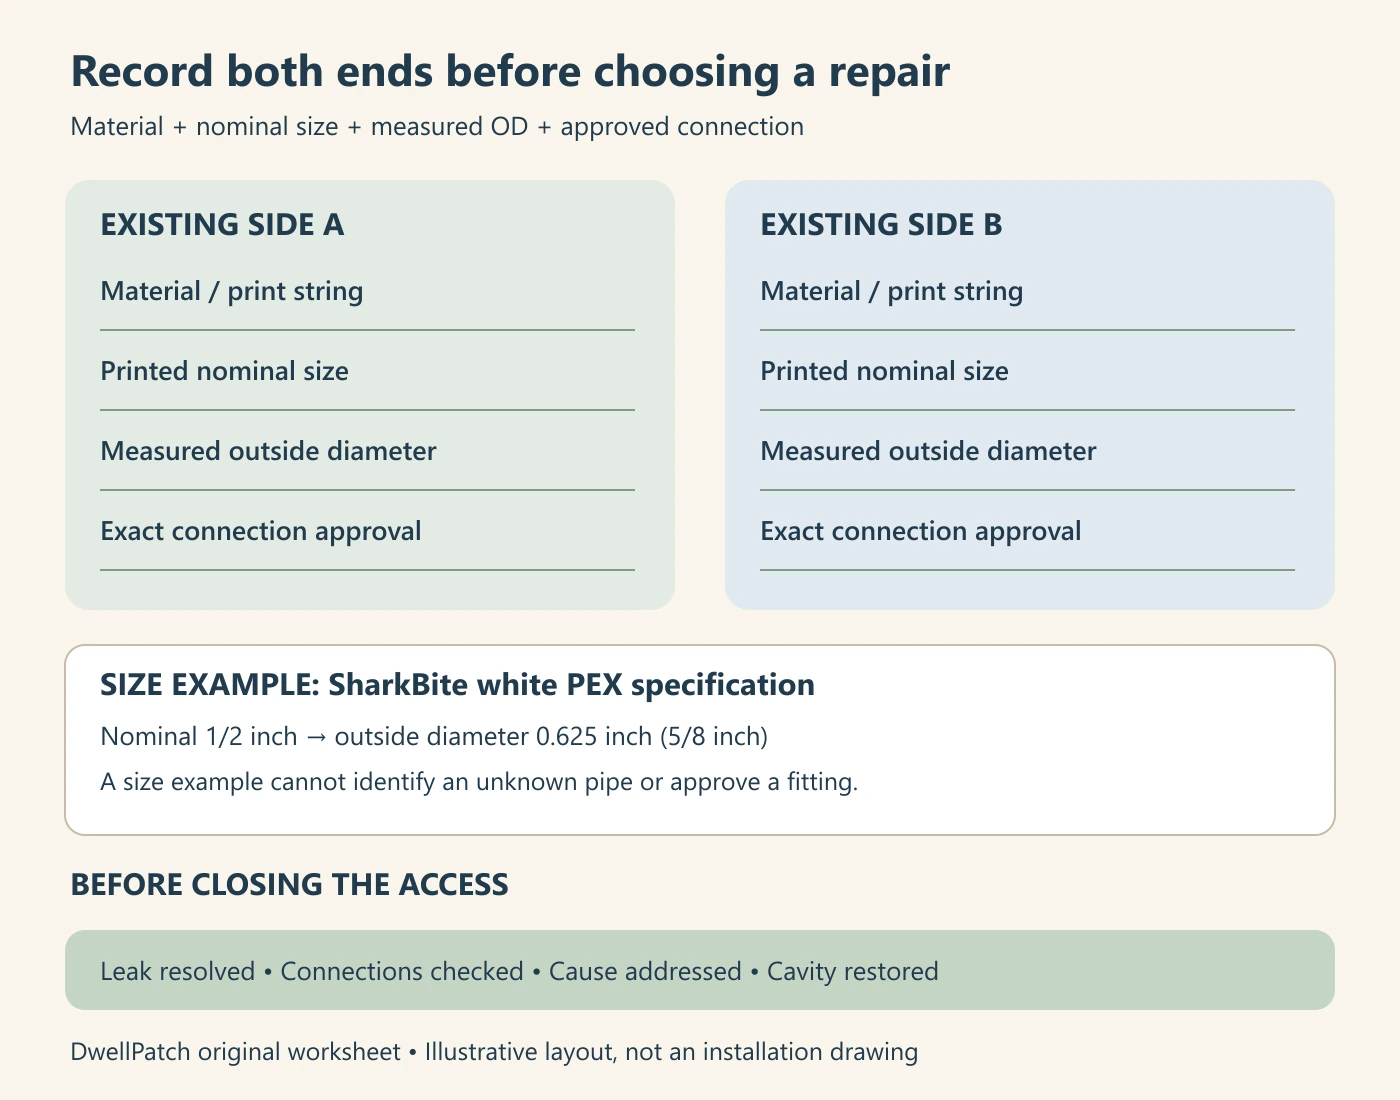
Record the pipe, outside diameter, and connection separately
Mobile homes can contain several pipe materials, especially after earlier repairs. Identify the existing tube on each side of the damaged area. A newer section by the water heater doesn’t identify the piping elsewhere.
Look for readable material names, manufacturer information, size, and standards in the printed line. Photograph the whole print string. If the markings are missing or unreadable, have the material identified before selecting a connection.
Gray, black, white, red, or blue is an observation, not a complete specification. Flexibility also isn’t enough to call a tube PEX. The compatibility checks for replacement parts apply here: the exact connection matters more than the home’s label.
| Record | Existing side A | Existing side B |
|---|---|---|
| Material and readable print string | Copy exactly; photograph it. | Check independently. |
| Printed nominal size | Keep the units and sizing system. | Don’t infer from side A. |
| Measured outside diameter | Measure a clean, undamaged section. | Record separately from nominal size. |
| Existing connection method | Crimp, clamp, expansion, solvent weld, thread, or another identified system. | Record the actual assembly. |
| New connection approval | Manufacturer explicitly permits this material and size. | Check the other end’s approval too. |
| Location and service | Hot or cold; exposed, concealed, or buried. | Record access and installation restrictions. |
Nominal size is a size designation. Outside diameter is a physical measurement across the tube. Neither should be casually renamed inside diameter, because wall thickness affects the bore.
For example, SharkBite’s white PEX specification lists nominal 1/2 inch tubing with a 0.625 inch outside diameter. That is 5/8 inch OD, not a direction to buy a nominal 5/8 inch fitting. Its nominal 3/4 inch tubing has a 0.875 inch, or 7/8 inch, OD.
Those examples explain the distinction; they aren’t a universal pipe identification chart. Another sizing system can use the same nominal label differently. Confirm the exact product’s dimension table and material approval before matching a measured tube to a fitting.
A ruler helps spot a major mismatch; a suitable caliper gives a clearer outside measurement. Measure an undamaged straight section rather than a crushed end, fitting body, or ring. A correct diameter still cannot prove that an unidentified material is approved.
Choose a repair scope that matches the damage
Think of repair scope in three levels: one connection, one branch or section, and the wider distribution system. The useful question is what verified defect each level resolves. Price alone doesn’t answer that question.
| Condition found | Reasonable scope to assess | What must also be checked |
|---|---|---|
| One damaged connection with sound, identified adjacent pipe | Replace that connection and any damaged tube ends. | Preparation, support, alignment, and the original cause. |
| A damaged run with too little usable pipe near the leak | Replace the section to sound, accessible connection points. | Route, permitted connections, movement, and insulation. |
| Several failures on one branch | Assess replacement of that branch. | Whether the same cause affects other branches. |
| Repeated failures across different locations or uncertain mixed repairs | Have a plumber assess the distribution system. | Materials remaining, failure history, sizing, and a replacement plan. |
| Wet or weakened floor materials | Plumbing repair plus building damage assessment. | Drying, affected insulation, and safe restoration. |
A localized repair stops a defined defect. It doesn’t certify the remaining pipe. Keep that distinction clear if the immediate job is all the budget allows.
For confirmed polybutylene, discuss the remaining system and a replacement plan with the plumber, even if one transition resolves the immediate leak. Don’t treat an ordinary PEX connection as a PB repair. Nor should a successful short repair be presented as proof that every hidden branch is sound.
Ask for separate descriptions of immediate water restoration and broader replacement work. That makes two quotes easier to compare. It also prevents a limited repair from being mistaken for a complete repipe.
Select the connection system before cutting
Mobile home water line repair does not have one universal fitting. The pipe, fitting, joining components, tool, and installation method must work together. Check the exact instructions before deciding where to cut.
PEX connections
A crimp ring, a stainless clamp, and an expansion ring belong to different joining methods. Don’t combine them because they look similar or share a nominal size. Confirm the tubing and fitting approvals, the required ring, and the tool’s inspection procedure.
If the chosen system uses a gauge, use it as instructed after making the connection. An attractive ring isn’t proof of a correct joint. Leave room to operate the tool squarely and inspect the result.
Push connections and material transitions
Check every pipe material listed for the exact fitting. A transition is an approval for specific ends, not permission to connect any two tubes that fit inside. Follow the maker’s requirements for insertion, pipe support, and any required internal stiffener.
The ordinary SharkBite Max UR008A coupling illustrates this limit. Its approved material list includes PEX, copper, CPVC, PE RT, and specified HDPE SDR 9 pipe; it does not include polybutylene. A PB connection requires a fitting specifically intended for PB.
For an approved Max installation, the manufacturer’s preparation and insertion instructions require a square, clean, sound pipe end and a marked insertion depth. Use the depth for that fitting generation and size. Don’t transfer a mark from a different connector.
CPVC, copper, and threaded connections
CPVC solvent cement must be suitable for the actual system. Cure requirements depend on the specified cement and conditions, so don’t restore pressure using a remembered waiting time. For aged FlowGuard Gold CPVC, its maker specifies a fine tooth saw or wheel cutter instead of a ratchet cutter.
That material specific cutting instruction takes precedence over generic advice to use plastic pipe shears. Inspect the cut and surrounding pipe for damage. A cracked or distorted end isn’t a usable connection surface.
Have copper soldering in a confined belly handled by someone equipped for the fire risk and the surrounding materials. For threaded or fixture connections, identify what forms the seal. Adding tape to a connection that seals with a washer, cone, or compression component doesn’t replace that component.
Plan and carry out the localized repair
The following sequence organizes a confirmed supply repair. The chosen manufacturer’s instructions still determine the exact cut, preparation, assembly, and test. Stop if you can’t meet those instructions in the available space.
1. Isolate and relieve pressure
Close the working upstream shutoff and open an appropriate faucet to relieve line pressure. Confirm that flow stops before cutting. If it continues, resolve the isolation problem first.
Follow the water heater’s shutdown instructions if the work can drain or interrupt its supply. An electric storage heater must not be energized with an empty tank. Restore its power only after the tank is filled and air is purged as its manual requires.
2. Establish sound connection points
Expose enough of the route to inspect both ends and make the selected joints. Protect the open ends from soil, insulation fibers, and dirty water. Keep discarded pipe and fittings available for identification until the job is documented.
Don’t choose the shortest possible cut simply to save pipe. You need undamaged tube, full engagement, and working clearance. If removing the failed connection leaves too little sound pipe, extend the repair to the next suitable point.
3. Work out the replacement assembly
Measure the actual space and account for the fittings’ required engagement. A replacement piece isn’t automatically the length of the removed gap. Connection stops, insertion allowances, and whether the existing ends can move affect assembly.
Sketch the intended connection order before making the second cut. Ordinary stopped couplings may not slide along the pipe like a designated slip repair fitting. Don’t force rigid ends apart or bend the branch sharply to make an unsuitable assembly fit.
4. Prepare and join using one approved method
Use a suitable cutter, inspect both ends, and follow the specified preparation. Keep joining surfaces clean and protect them from damage. Assemble each connection with the correct components and tool.
Don’t add a hose clamp, adhesive, or sealant to compensate for an incompatible joint. If the specified method can’t be completed correctly, change the repair plan. More hardware doesn’t establish approval.
5. Support the repair and remove the cause
Restore approved supports and allow the movement the tubing instructions require. A fitting shouldn’t carry a hanging valve or hold a strained branch in position. Keep the repair from rubbing against sharp edges.
After a freeze related failure, assess the exposed route and missing insulation before closing up. Replacement PEX isn’t a substitute for freeze protection. Don’t use an open flame to thaw a pipe or improvise a heat cable installation.
Test, restore service, then close the access
Keep the repaired area visible for inspection. Have any required pressure test performed under the applicable code and the installed system’s instructions. Don’t choose a test pressure from the highest rating printed on one new fitting.
A mixed system may contain components with different limits. A manufacturer’s test for its own PEX system isn’t automatically suitable for old PB, CPVC, fixtures, or appliances still connected. Test medium, isolation, pressure, duration, and acceptance criteria must suit the whole tested section.
Don’t improvise a compressed air test. Ask the plumber to record the applicable procedure and result. A quick check for visible drips during normal service doesn’t replace a required test.
For service restoration, follow the equipment and piping instructions, open the supply in a controlled way, and purge trapped air. Inspect every new joint and nearby disturbed connection. Check both static conditions and the repaired branch while it supplies water.
If a joint leaks, shut the water off and relieve pressure before correcting it. Don’t squeeze a crimp again, overtighten an unidentified fitting, or keep pushing a damaged tube as a generic remedy. Diagnose why that specific connection failed.
Record the date, location, material, fitting model, and repair photographs. Include the pressure test record when one is required. Mark abandoned piping clearly so the next repair doesn’t confuse it with the active line.
Restore the belly as part of the plumbing job
Stopping the leak doesn’t dry the floor cavity or replace missing insulation. Inspect affected materials and arrange drying promptly. EPA advises drying wet areas and materials within 24 to 48 hours to help prevent mold growth.
That is a response target, not a promise that hidden wet materials are safe after two days. Contaminated water, extensive mold, or weakened building materials require a suitable cleanup and repair assessment. Don’t close the membrane over an unresolved moisture problem.
The DOE manufactured home belly job aid puts plumbing repairs before insulation work. It also calls for securing repair material and sealing seams and edges. Restore the assembly using appropriate belly materials rather than leaving an open flap beneath the repaired line.
Confirm who owns each part of that work before accepting a plumbing quote. Pipe repair, wet insulation removal, drying, floor assessment, and belly closure may be separate tasks. Ask for the repaired area to remain inspectable until the plumbing and moisture checks are complete.
What to send a plumber or parts supplier
A useful mobile home water line repair request names the defect and supplies evidence. Send the location, whether it is hot or cold, a readable pipe marking, the measured OD, and wide and close photographs. Say whether the water can be shut off and whether the belly or floor is wet.
Ask which exact existing materials the proposed repair will connect, where its sound endpoints are, and what test is included. For wider replacement, ask which old branches and service sections remain. A defined scope is more useful than a promise to replace “all the bad pipe.”
Before the access is closed, confirm four things: the intended leak is resolved, the installed connections were checked, the cause was addressed, and the affected cavity is ready for restoration. That is a completed repair plan rather than a dry fitting surrounded by unfinished damage.
Found a detail that needs checking? Tell us about a correction.