
Your mobile home water shut off valve belongs on the incoming supply before water branches to the fixtures. Look near the water riser underneath or beside the home, then check the inlet and utility area. A valve beside the water heater may control only the heater, so confirm what stops before relying on it.
If a pipe is spraying now, close a known working home main if you can reach it safely. If that valve is missing, stuck or still passing water, call park maintenance or your water provider for upstream isolation. Stay out of standing water near electrical equipment, and don’t crawl beneath an actively flooding home.
Where to look for a mobile home water shut off valve
Start with the supply route rather than the nearest handle. The useful question is: where does water enter this particular home, and which valve sits before the first branch?
There isn’t one reliable location for every manufactured home. Original installation, climate, utility service and later plumbing changes can all affect what you find. Use this search order on a dry day, when you have time to identify the equipment.
- Check the home records. Look for the installation manual, inspection report, utility connection drawing and previous plumbing invoices. Ask management to identify your lot’s isolation point if you rent the site.
- Look around the exterior supply connection. Check accessible valve boxes, a service riser or a labeled connection beside the home. Confirm the lot number before assuming a nearby box belongs to you.
- Look through the designated skirting access. From a safe opening, locate the incoming line and follow it toward the home inlet. Don’t remove insulation, cut the bottom covering or disturb electrical heat cable just to chase a pipe.
- Inspect the accessible interior inlet area. A utility closet, cabinet or water heater compartment may contain a home main or another valve. Trace its position relative to the branches instead of deciding by room alone.
- Ask for a professional location check. If the line disappears, the box is flooded or several homes share the service, stop guessing. Have the responsible operator identify and label the correct control.
Federal manufactured home installation standards call for an identified, accessible shutoff between the supply and inlet. They place its riser underneath or adjacent to the home and specify a full flow gate valve, ball valve or equivalent. See the installation requirements for the water connection.
That provision gives you a useful search route. It doesn’t prove an older or altered installation has the expected valve, or decide who must pay for repairs. The applicable installation instructions, local authority and park agreement still matter.
Identify the valve by its function
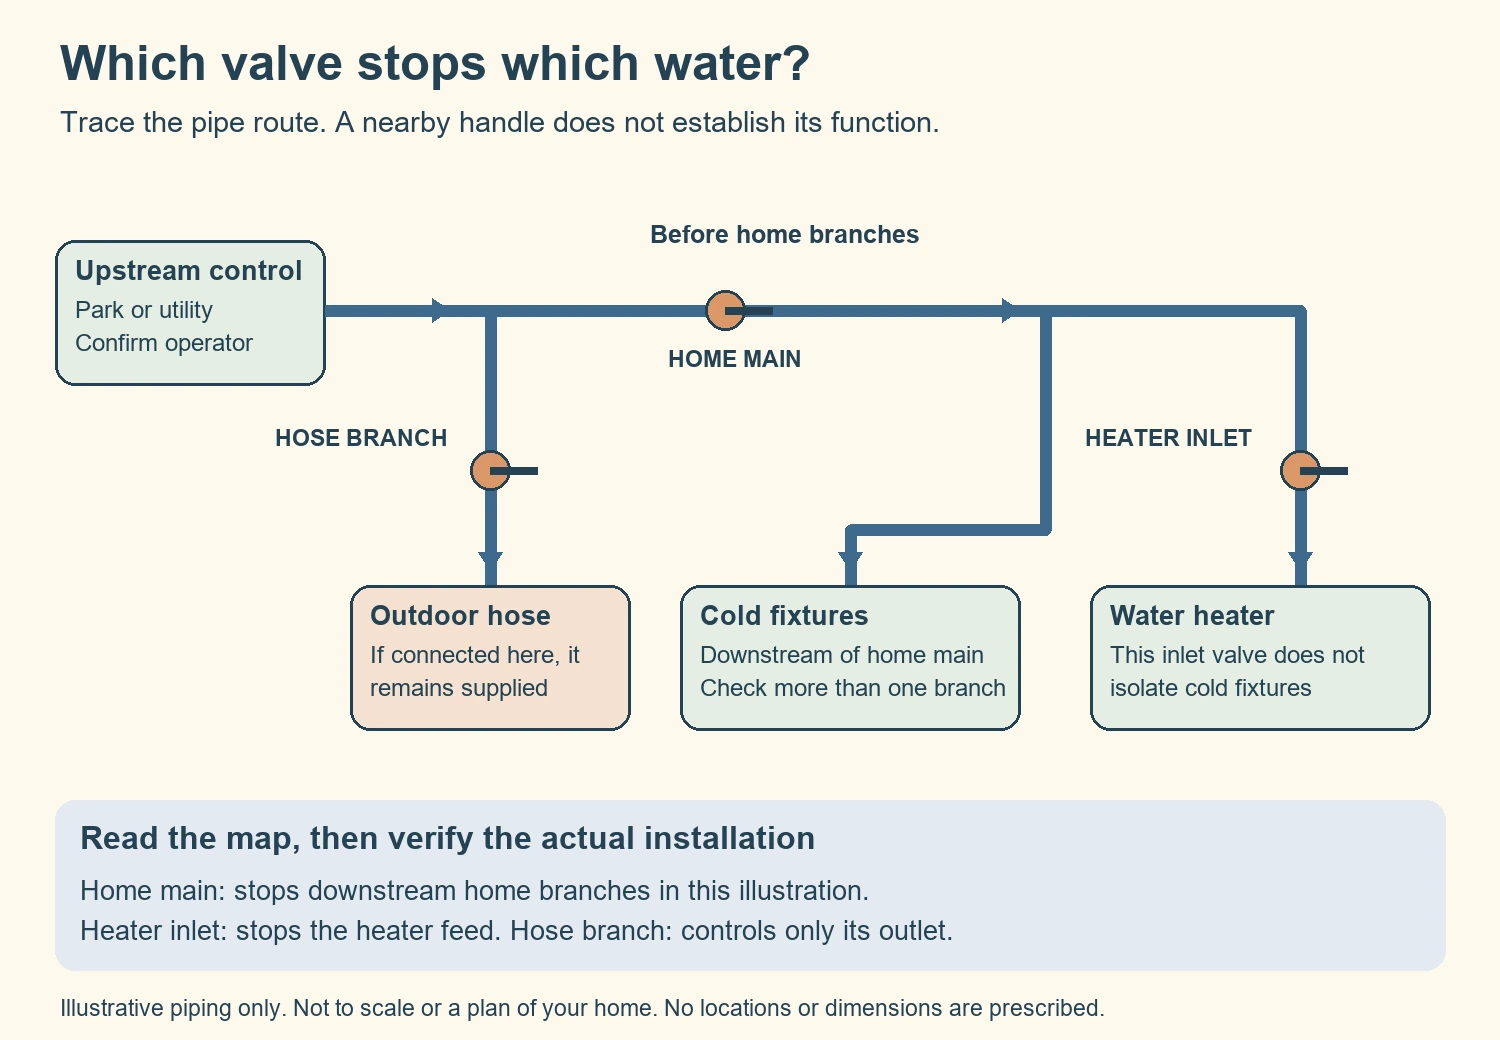
A handle tells you how a valve operates. Its position in the piping tells you what it controls. Two identical ball valves can isolate completely different parts of a home.
| Control | What it normally isolates | What to verify |
|---|---|---|
| Home main | The home’s distribution piping downstream of that point | It is before the branches you need to isolate |
| Fixture stop | A sink, toilet or another individual connection | It closes the leaking supply; a faucet may have separate hot and cold feeds |
| Water heater inlet valve | The incoming cold supply to the heater | Cold fixtures elsewhere may remain supplied |
| Hose faucet or hose branch valve | An outdoor outlet or its branch | It may have no control over the home’s indoor supply |
| Lot, meter or park service valve | The downstream service connected to it | Which home or homes it serves and who may operate it |
Don’t use a pressure regulator, backflow device or heater relief valve as a substitute shutoff. These components have other jobs. A lever on a relief valve is especially unsuitable for identifying or stopping the main supply.
The heater valve and home main can be close together
Imagine a cold line entering a utility compartment and reaching a tee. One branch supplies cold fixtures; the other passes through a valve into the heater. Closing that heater valve leaves the first branch pressurized.
This is an illustrative layout, not a drawing of every manufactured home. It explains why “the valve near the water heater” is an incomplete instruction. You need to establish which side of the first branch the valve occupies.
A hose outlet can give a misleading result
An outside faucet can branch off before a home main. In that arrangement, the hose still runs after the indoor supply is isolated. A different installation may put the hose downstream.
Record which arrangement you have after tracing or professionally confirming it. Don’t reopen a successfully isolated indoor supply just because a separately supplied hose outlet still works.
How to close it and confirm that water stops
Test an accessible, sound valve when someone can help and the upstream operator is available. Don’t begin a practice test on a heavily corroded, cracked or visibly leaking assembly. A planned inspection is easier to manage than discovering a broken handle during a flood.
A conventional lever ball valve generally closes with a quarter turn. The handle lies across the pipe when closed and along it when open. A conventional wheel valve usually closes clockwise, but markings and the valve’s instructions take priority.
Use ordinary hand pressure and move the control slowly. If it won’t turn easily, stop; don’t add pliers, a longer lever or body weight. Twisting the attached pipe can turn a difficult valve into an uncontrolled leak.
After closing, open a downstream cold faucet where you can observe the flow. Initial water can be trapped in the piping. A stream that weakens and stops differs from a continuing supply that never settles.
Check another cold fixture on a different branch before treating the whole home as isolated. American Water’s shutoff testing instructions likewise call for checking sinks and other fixtures. They also caution against forcing a resistant valve.
A closed handle alone doesn’t establish isolation. If flow continues, possible explanations include a passing valve, a mistaken branch valve or another supply path. Stop the repair until the correct upstream control is closed and the work area is depressurized.
Don’t loosen a connection to see whether pressure remains. Verify through an appropriate downstream outlet before disassembly. When the result is uncertain, have a plumber establish isolation.
Protect the water heater during work
Closing the main is different from draining a heater. If the work may drain the tank, shut down its energy supply using its manual before draining. Never energize an electric storage heater until it is full and air has been purged as instructed.
Stored hot water also creates a scalding risk. Don’t use the heater’s drain or relief valve as a casual pressure check. If the heater itself is leaking, its separate shutdown procedure belongs alongside the water isolation work.
When the valve is stuck, leaking or missing
A mobile home water shut off valve can fail in two distinct ways: it can leak outward, or it can fail to stop water internally. Replacing a handle won’t necessarily fix either problem. First identify the failure and secure working isolation upstream.
| What you observe | What it means for the next step |
|---|---|
| The handle won’t move with gentle hand pressure | Stop operating it; arrange upstream isolation and valve assessment |
| The handle moves, but downstream flow continues | Verify the piping route and valve closure before any pipe is cut |
| Water appears around the handle stem | The valve needs assessment; don’t blindly tighten an unknown assembly |
| A connection or valve body leaks | Keep clear of spray and get the supply isolated before repair |
| The valve box is full of water or mud | Identify the cause and safe access; don’t reach blindly into submerged equipment |
| No individual home valve can be found | Ask the park or provider how this service is isolated before scheduling replacement |
For a park home, explain exactly what you need: “Please identify the valve that isolates only this lot.” Ask whether maintenance must operate it, whether other residents lose water and when service can be restored. Save the response with your home records.
Don’t assume a water meter key grants permission to operate every meter or curb valve. Utility policies and valve designs vary. For example, Seattle permits customer operation of certain top shutoff meters while reserving older types for its crews.
Your own provider’s procedure controls. Check it before an emergency and save its water service number. A buried or shared valve that you’ve never identified isn’t a reliable backup plan.
Choose a replacement by pipe and connection
The phrase “mobile home valve” isn’t a complete specification. Match the actual line, the valve function, both end connections and the conditions around the installation. Our guide to mobile home and regular house parts explains why a familiar label doesn’t establish compatibility.
For a home main, preserve the required flow and line sizing. Don’t downsize a service simply because a smaller valve is available. A half inch fixture connection and the home’s incoming connection aren’t interchangeable assignments.
Read the pipe before selecting the valve
Photograph readable material markings and both sides of the old valve. Record nominal size, measured outside diameter, connection style and any transition to a different material. The pipes on opposite sides may differ after a previous repair.
Color alone is weak identification. A gray line may prompt investigation of polybutylene, but it doesn’t prove the material or fitting compatibility. If the writing is missing and the connection isn’t identifiable, let the installer establish the pipe system.
For old polybutylene, the transition must be expressly intended for that material. A standard push valve doesn’t become a PB fitting because the tubing appears to enter it. A dedicated transition also doesn’t establish the condition of the rest of the old piping.
Two half inch valves can have different ends
Consider two documented examples: SharkBite Max UR22222 has two half inch push connections. UR22182 has a half inch push connection and a half inch female NPT end. A package suffix doesn’t turn the threaded end into another push socket.
The current Max ball valve sheet lists PEX, copper, CPVC, PE RT and specified HDPE SDR9 compatibility. HDPE requires the maker’s specified stiffener; PB isn’t included in that valve’s material list. For these half inch push ends, the listed insertion depth is one inch.
These are configuration examples, not universal replacements or a shopping recommendation. NPT, compression, flare and hose connections require their own matching interfaces. Don’t force together parts merely because both packages say half inch.
Use the current document for the exact valve and the actual pipe. Maximum fitting ratings aren’t target household pressure settings. The whole assembly, pipe limitations and applicable water supply requirements still govern.
Allow room to install and use it
Measure the available straight, sound pipe and the handle’s operating space. Include insertion or engagement at both ends, access for tools and support for the completed assembly. A valve that fits physically can still be unusable if its handle hits a joist.
Don’t calculate the cut by laying a packaged valve over the old assembly. Overall valve length isn’t automatically the gap between pipe ends. Different models also have different insertion arrangements, including dedicated slip fittings.
Keep the main identifiable and reachable after insulation or enclosure work. A technical fitting approval for concealed use doesn’t make an inaccessible main control a useful emergency installation.
What a safe replacement plan includes
Replacing the main means working at the boundary of your water supply. You cannot isolate the valve being removed by closing that same valve. A working upstream control and permission to use it must come first.
Before the appointment or repair, settle these five points:
- Who controls the upstream supply? Confirm the park, provider or property owner can stop and restore it. Arrange any required service interruption before opening the line.
- Is the piping sound enough? Include enough replacement material to reach a sound connection. Cracked, heavily corroded or damaged pipe changes the job’s scope.
- Which exact joint method applies? Have instructions for the actual push, crimp, expansion, solvent or threaded system. Don’t substitute one method’s preparation for another’s.
- What else will the work affect? Account for heater shutdown, pipe supports, freeze protection and any electrical bonding affected by a metal pipe alteration.
- How will the work be checked? Plan a controlled restoration, leak inspection and closure test before insulation or access panels are restored.
For a compatible push connection, preparation includes square cuts, clean round pipe, removal of burrs and a marked insertion depth. Follow the exact Max installation instructions if that is the chosen system. Don’t rely on a click or a quick tug as the only evidence of full insertion.
Those instructions also address electrical continuity when adding a fitting to copper pipe. If the alteration affects bonding, have a qualified person assess it. Treat that as part of the replacement plan, rather than assuming every water pipe is only a plumbing component.
Keep heat cable and insulation decisions separate from the valve purchase. Use only a cable listed for its intended application and follow its exact routing and insulation instructions. Don’t cross cable runs unless that exact product expressly permits it.
Never improvise a wrap around a valve or place an unsuitable cable in standing water. A replacement valve can change the assembly’s shape, so check the cable instructions again before restoring its protection.
Once connections are complete, restore water slowly under the installer’s control. Inspect the valve body, both joints and disturbed piping, then verify the new main stops the intended fixtures. Follow the applicable system test requirements before covering the work.
Get a quote that names the valve, materials, upstream coordination and related repairs. A low valve price doesn’t describe a flooded access box, damaged supply pipe or shared park shutdown. There isn’t a reliable universal installed price for all those conditions.
Make an isolation record you can use later
Finding the valve once isn’t enough if nobody else can locate it. Make a short record after its identity and operation are confirmed. Use directions that a visitor or maintenance worker can follow without knowing the home’s plumbing.
- Location: Name the access panel, cabinet or labeled box; add a clear photograph.
- Function: Write which fixtures stopped and whether an outside hose outlet stayed supplied.
- Operation: Record the marked open and closed positions for this valve.
- Backup: Name the upstream operator, contact number and access procedure.
- Condition: Note the test date and any stiffness, leakage or repair request.
For example, “behind the removable panel beside the rear utility door” is more useful than “under the trailer.” Add the lot number and a photo showing the surrounding area. Store a copy somewhere reachable during a leak.
Keep the route clear and use the valve maker’s maintenance guidance. Recheck access after skirting, storage or landscaping changes. Don’t adopt a fixed exercise schedule that ignores the valve’s condition or the manufacturer’s instructions.
A dependable mobile home water shut off valve is one you can identify, reach and verify. If any of those pieces is missing, arrange the correction while the plumbing is dry. That gives the next repair a known starting point.
Found a detail that needs checking? Tell us about a correction.