

A mobile home kitchen faucet can come from a regular residential range when its mounting, connections, and working clearances match. Measure the sink and cabinet before choosing a finish. A faucet that fits the holes can still have a handle that hits the backsplash or a spray hose that catches underneath.
The useful buying question is specific: can this exact faucet mount securely, connect correctly, reach the basin, and move freely in this kitchen? Build that answer from the product drawing and your measurements. The words “mobile home compatible” cannot supply the missing dimensions.
Choose a mobile home kitchen faucet by fit first
Start with the installed sink, even if the home originally came with a basic plastic faucet. Previous owners may have replaced the sink, countertop, shutoffs, or supply tubing. The year on the home’s label cannot identify those later changes.
Keep the selection process in this order: mounting surface, water connections, working space, then features and finish. This avoids buying an attractive faucet and discovering that the cabinet needs a different plumbing arrangement. Our guide to matching ordinary parts to a manufactured home explains the broader compatibility principle.
You do not need to replace everything simply because a faucet drips. Record the existing model and symptom first. A documented cartridge or hose repair may preserve a faucet that otherwise fits well.
A buying record that exposes missing information
| Check | Your kitchen | Candidate document |
|---|---|---|
| Mounting openings | Count, diameter, and center locations | Required holes and permitted configuration |
| Cover plate | Outer edges of unused holes and available flat surface | Plate footprint, gasket, and approved mounting arrangement |
| Mounting thickness | Actual thickness at the mounting hole | Permitted deck thickness and required hardware |
| Water supplies | Hot and cold outlet type, size, position, and condition | Faucet connection type and supply reach |
| Space above | Backsplash, window, shelf, and basin geometry | Overall height, spout reach, and handle movement |
| Space below | Sink bowl, drain, shelves, and stored items | Mounting access and hose travel requirements |
Mark an unknown as unknown. A nearly complete worksheet is more useful than a guessed adapter size. Send the gaps, photographs, and model number to the manufacturer or a plumbing supplier before ordering.
Count actual holes and measure their centers
The number of handles does not tell you the number of sink openings. A broad base can hide unused holes. A separate sprayer may occupy another opening well away from the faucet body.
Look underneath with a light and photograph the mounting area. Do not loosen supply connections just to count openings. If the bowl or hardware blocks the view, treat the hole layout as unconfirmed until it can be checked safely.
Moen’s kitchen configuration guide shows why one, two, three, and four hole layouts need different arrangements. It also distinguishes a faucet’s required openings from accessory openings. Use the actual model specification to confirm your proposed combination.
Eight inches can describe the spacing, not the plate
Measure from the center of one mounting hole to the center of the next relevant hole. Record all locations on a simple sketch. Do not measure only the visible outside edges of the old faucet base.
For a hypothetical three hole arrangement, the outside centers might be 8 inches apart. The holes still have width beyond those centers. A cover plate must suit the complete opening layout and sit on the proper gasket surface.
That is why a plate’s total length and a faucet’s mounting centers are different measurements. An attractive plate can be long enough on paper yet land partly on a curved sink ledge. Photograph that ledge as well as recording the numbers.
Changing from two handles to one
A single handle faucet may be a suitable upgrade when the documented mounting configuration matches. The spare holes need an appropriate cover plate, individual covers, or approved accessories. Confirm that the chosen faucet actually includes the plate shown in the advertisement.
A separate sprayer opening also needs a plan if the replacement has an integrated spray wand. Do not assume the old sprayer hose connects to a different faucet. Treat accessories as model specific unless their documentation establishes compatibility.
Keep any existing required dishwasher air gap or other plumbing device in the planning sketch. An apparently spare opening may already serve it. Changing that arrangement is a separate plumbing decision.
Check the deck and the mounting hardware underneath
The deck is the surface through which the faucet mounts. It might be the sink’s metal ledge or the countertop beside an undermount bowl. Measure at the actual mounting position rather than using the countertop’s advertised thickness.
Inspect both sides of the surface. A sound looking top can conceal a damaged underside, an obstructing sink channel, or an uneven bearing area. Photograph the location where the replacement bracket or nut must sit.
Maximum deck thickness is a limit for that model and its specified hardware. It does not say that every thinner sink needs the same support method. Use only the manufacturer’s appropriate bracket or mounting arrangement.
Plan tool access before choosing a large faucet body. Can the mounting hardware pass between the bowl and cabinet wall? Can someone reach it for installation and later service?
If the deck is cracked, soft, badly corroded, or flexes significantly around the existing faucet, resolve that condition first. More tightening is not a substitute for a suitable mounting surface. A replacement that depends on improvised support deserves professional assessment.
Match the water connections, not the appearance of the hose
Make two separate records: the connection on the new faucet and the outlet already supplying the kitchen. Include the fitting type as well as its nominal size. Two nuts with similar diameters do not establish a compatible joint.
For example, a 3/8 inch compression connection and a 1/2 inch pipe thread connection are different interfaces. The number printed for the pipe coming through the cabinet also does not identify the valve’s outlet. Read labels, specifications, or an accurately identified fitting.
The faucet manufacturer’s supply connection explanation distinguishes flexible compression supplies from IPS connections. It makes adapter selection depend on both ends. That is more useful than buying a bag of reducers marked with approximately the right sizes.
Separate a supply mismatch from a pipe alteration
An older setup may have a connector permanently attached to its shutoff. Another may have a rigid connection directly below the faucet. Neither observation tells you which replacement valve or transition the existing pipe accepts.
Identify the tubing before changing that part of the system. Our water line repair and material guide covers material and transition questions. Do not choose fittings from tubing color alone.
A leaking, damaged, or ineffective shutoff changes the job. Arrange dependable water isolation and the necessary valve work before removing the working faucet. If that requires altering unidentified pipe, have a qualified plumber specify the connection.
Supply length means a usable route
Measure the route to each shutoff, including the approach to its outlet. A straight diagonal measurement can miss the space needed for a relaxed bend. The hot and cold routes may be different lengths.
Check whether the faucet has integral supplies or needs separately selected connectors. Do not assume every attached hose is meant to be removed or extended. Confirm the permitted arrangement with the exact instructions.
Connector makers publish different end combinations for different applications. Choose the specified faucet supply arrangement without stretching, crimping, or trapping it against the cabinet. Keep the supply route separate from the moving spray hose.
Give the spray hose a working space
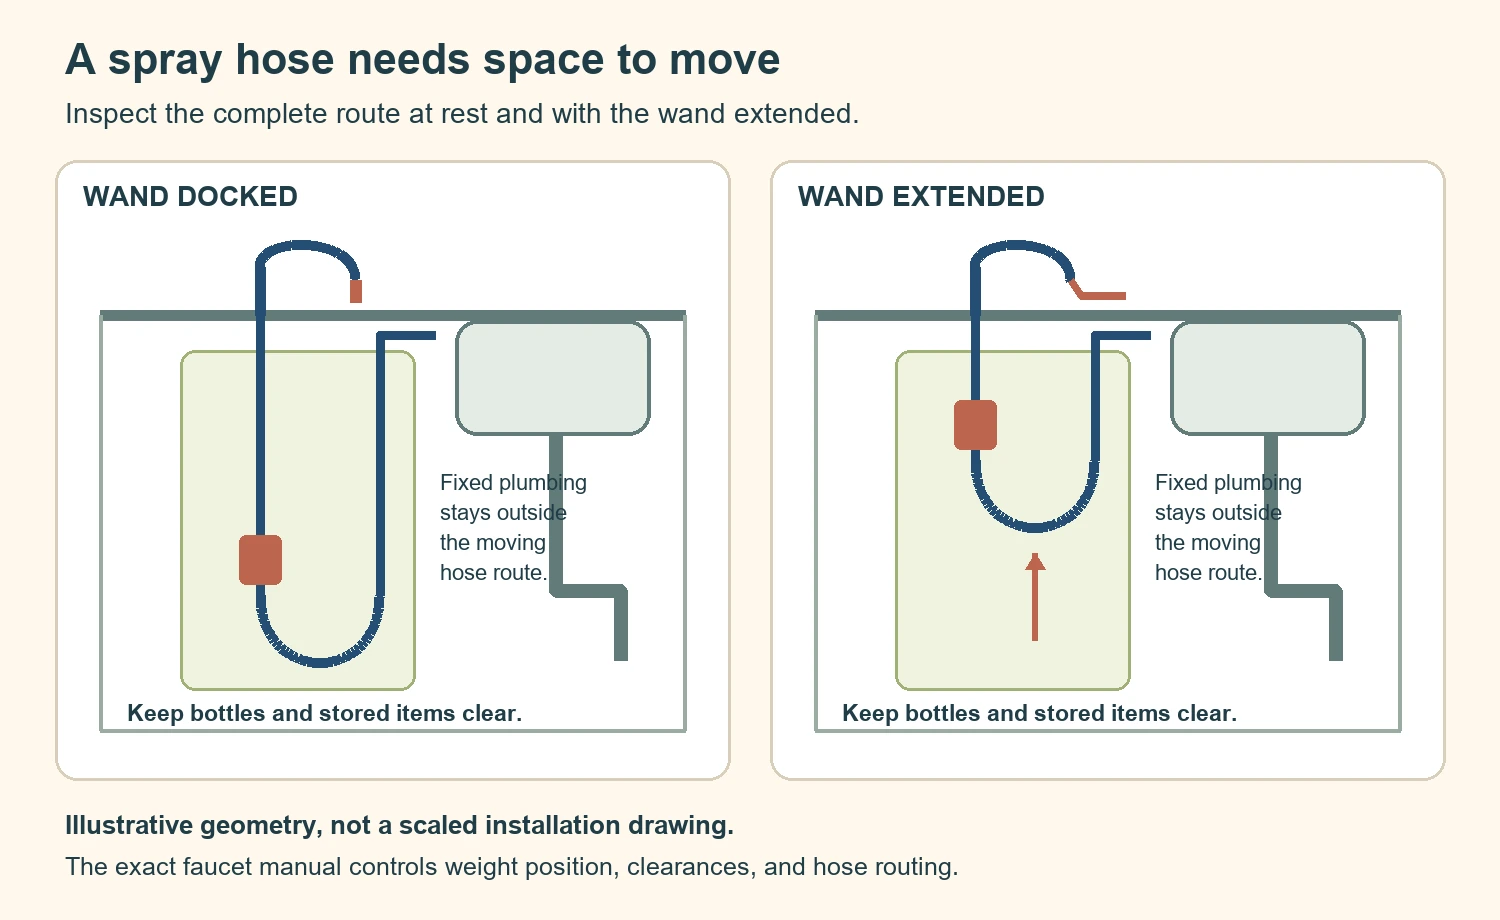
A retracting spray wand needs room below the sink as well as above it. Inspect the cabinet with its normal storage and equipment in place. A clear cabinet during installation can become an obstructed cabinet after the cleaning bottles return.
Trace where the hose would descend, curve, and travel as the wand extends. Note the drain trap, disposal if fitted, filter equipment, shelves, and shutoff handles. These are different obstacles from loose stored objects.
Do not tie the moving hose to a supply tube or reroute it around the drain without checking the instructions. The weight location and connection arrangement belong to the specific faucet. A stronger weight is not a general solution to poor retraction.
Read clearance diagrams as complete movement checks
The Adler instructions discussed below recommend an 8 by 8 inch clear travel area. This is a model example, not a universal cabinet size rule. A square marked on the cabinet floor alone does not establish that the whole hose route clears the bowl and plumbing.
Check the intended path at rest and with the wand extended. The hose must move through its usable travel without catching. Confirm that the weight can return freely and cannot collide with stored containers.
A fixed shelf across the needed route may make a different faucet style more practical. A simpler model can be the better purchase when the cabinet cannot provide the documented clearance. Do not modify cabinet structure or plumbing solely to rescue an unsuitable faucet choice without assessing the work.
Check spout reach, handle sweep, and the window
Spout height and spout reach answer different questions. Height describes vertical space; reach describes how far the outlet projects from its reference point. A taller faucet does not necessarily send the stream farther into the bowl.
Use the product’s dimension drawing and its stated reference points. Compare the outlet position with the usable bowl, not just the drain. In a double bowl sink, check the swivel path toward both sides.
Try a simple paper plan before ordering. Mark the faucet mounting center and trace the bowl’s rear and front edges. Plot the candidate’s stated reach from that same center.
This is a geometry check, not a splash test. Actual spray behavior also depends on the outlet angle, flow, bowl shape, and what you are washing. Avoid a purchase that already places the docked outlet over a ledge or unhelpfully close to the rear wall.
Check the handle through its full range
Leave room for your hand as well as the lever. Check the hot, cold, and full flow positions shown for the candidate. A handle can clear the wall while remaining awkward to grasp beside it.
Also check window cranks, an opening sash, shelves, and overhead trim. Use the highest part of the faucet when assessing vertical clearance. If the handle side matters, confirm the model permits the intended orientation.
A pull out wand may suit a different working position from a downward facing spray head. Compare both with the pots, sink corners, and adjacent filling tasks you actually use. Choose the movement that fits the space rather than the taller silhouette.
A documented example: Moen Adler 87233
The chrome Adler 87233 is a conditional option for a compatible kitchen, not a universal mobile home kitchen faucet. We have not tested it. Its value here is that a manufacturer drawing and installation sheet make the fit checks concrete.
The linked 87233 series specification drawing, Rev. 8/19, shows one or three hole installation, 1 1/2 inch minimum hole diameter, and 2 1/2 inch maximum deck thickness. It lists 3/8 inch compression connections.
Check the exact finish, package, and current supplied instructions before purchasing.
There is a small documentation difference worth resolving if fit is close. The drawing labels a 7 1/2 inch reach, while the current product page lists 7.55 inches. Ask the maker which drawing applies to the exact item; do not average the values or treat a close clearance as established.
The linked installation sheet, INS10205E, carries the revision code 06/20. It specifies the hose weight arrangement and recommends an 8 by 8 inch clear travel area. Its connection sequence also includes checking engagement, flushing, and checking for leaks.
This option is a poor fit when the mounting opening is too small or the cabinet cannot accommodate the moving hose. It also leaves a connection problem unresolved if your existing supply outlets do not match. A name on a compatibility filter cannot override those limits.
Compare styles against the job you need done
| Arrangement | Reason to consider it | What can rule it out |
|---|---|---|
| Fixed spout without a separate spray | A straightforward setup when a moving spray wand is unnecessary | Poor outlet reach or inconvenient access to the bowl |
| Faucet with a separate side spray | Independent spray position when a suitable opening exists | Missing accessory hole or an incompatible spray connection |
| Retracting spray wand | Flexible rinsing from the main faucet body | Obstructed hose travel, unsuitable deck, or poor handle clearance |
| Electronic or touchless model | Hands free activation when the complete documented setup suits the kitchen | Unresolved power, control box, service, or installation requirements |
Then compare serviceability. Look for an identifiable cartridge, spray head, hose, and mounting parts for the exact model. A familiar brand name alone does not prove that a particular part fits.
Read the warranty’s ownership, proof of purchase, and installation conditions before relying on it. Keep the receipt, model number, and instruction revision. These records are useful when requesting technical help, even outside a warranty claim.
Budget for the complete scope: faucet, appropriate accessories, connection work, and any necessary repair to the mounting surface. Compare quotes that include the same work. A cheap faucet with unresolved valve repairs is not a complete replacement price.
Turn your measurements into a clear order
Before buying a mobile home kitchen faucet, assemble one small record with the proposed model and your kitchen’s measurements. Include a top photograph, an underside photograph, and readable images of both supply outlets. Leave out assumptions about pipe material or fitting type.
- Confirm the hole layout, hole diameter, plate coverage, and mounting thickness.
- Confirm support hardware can seat and remain accessible underneath.
- Identify both water connection interfaces and the usable supply routes.
- Check the docked outlet, handle positions, window, and full spray hose movement.
- List extra parts by their documented purpose, then check the seller’s return terms.
Ask the supplier to resolve any mismatch before you open the plumbing. If the plan needs new shutoffs or pipe transitions, include those in the installer’s scope. The manufactured home plumbing guide can help place that work within the rest of the system.
Keep the old faucet operating until the replacement and connection plan are ready, unless an active leak requires isolation. A successful order gives you a faucet that fits the whole kitchen. It does not leave the most important adapter or clearance question for installation day.
Found a detail that needs checking? Tell us about a correction.