
A mobile home faucet replacement can stall over a connection hidden below the sink, even when the new faucet fits perfectly above it. Before removing anything, confirm that both water supplies shut off, identify the connections, and prepare the complete replacement. A drip may need a cartridge or supply hose rather than a new faucet.
This guide covers kitchen and bathroom sink faucets. Tub spouts, exposed tub faucets, and concealed shower valves have different attachments and access needs. Don’t apply a sink removal sequence to plumbing behind a shower wall.
Decide what actually needs replacing
Start with a dry cabinet and a clear view. Remove stored items, wipe existing moisture away, and find where water first appears. A puddle under a faucet doesn’t establish which part failed.
| What you notice | What to investigate | Replacement decision |
|---|---|---|
| Water keeps dripping from the outlet with the handle off | The exact faucet’s cartridge, stem, seat, or seal system | Look for a documented repair before replacing the assembly. |
| A handle spins or feels loose | Its attachment, adapter, and the stem it operates | A handle alone won’t repair a damaged valve stem. |
| Water appears at a supply hose or shutoff | The first wet joint, hose, or valve body | A new faucet won’t fix an upstream supply leak. |
| Flow is weak at this sink | Supply valve position, outlet screen, and model specific inlet restrictions | Find the restriction before buying a faucet. |
| The faucet body is cracked or required repair parts cannot be identified | Replacement fit and the condition of its support surface | A whole assembly may be the sensible repair. |
Leak timing helps separate the paths. Watch the dry supply connections with the faucet off, then during controlled use. Stop the test and isolate the water if a leak begins.
Water can travel along a hose before falling. Trace upward to the first wet point rather than replacing the part directly above the puddle. Also distinguish a pressurized supply leak from water escaping a drain during use.
For a serviceable faucet, record the brand and model before opening its valve. Find the matching exploded parts drawing and repair instructions. Similar handles can conceal different cartridges, retainers, and seals.
Don’t buy a generic mobile home faucet repair kit solely from the home’s year. The faucet may have been changed several times. A matching cartridge drawing is better evidence than a similar finish.
A tub spout is only the outlet assembly in some systems. Replacing it doesn’t renew the valve that mixes water behind the wall. A shower handle is also separate from that concealed valve.
Mobile home faucet replacement: the readiness check
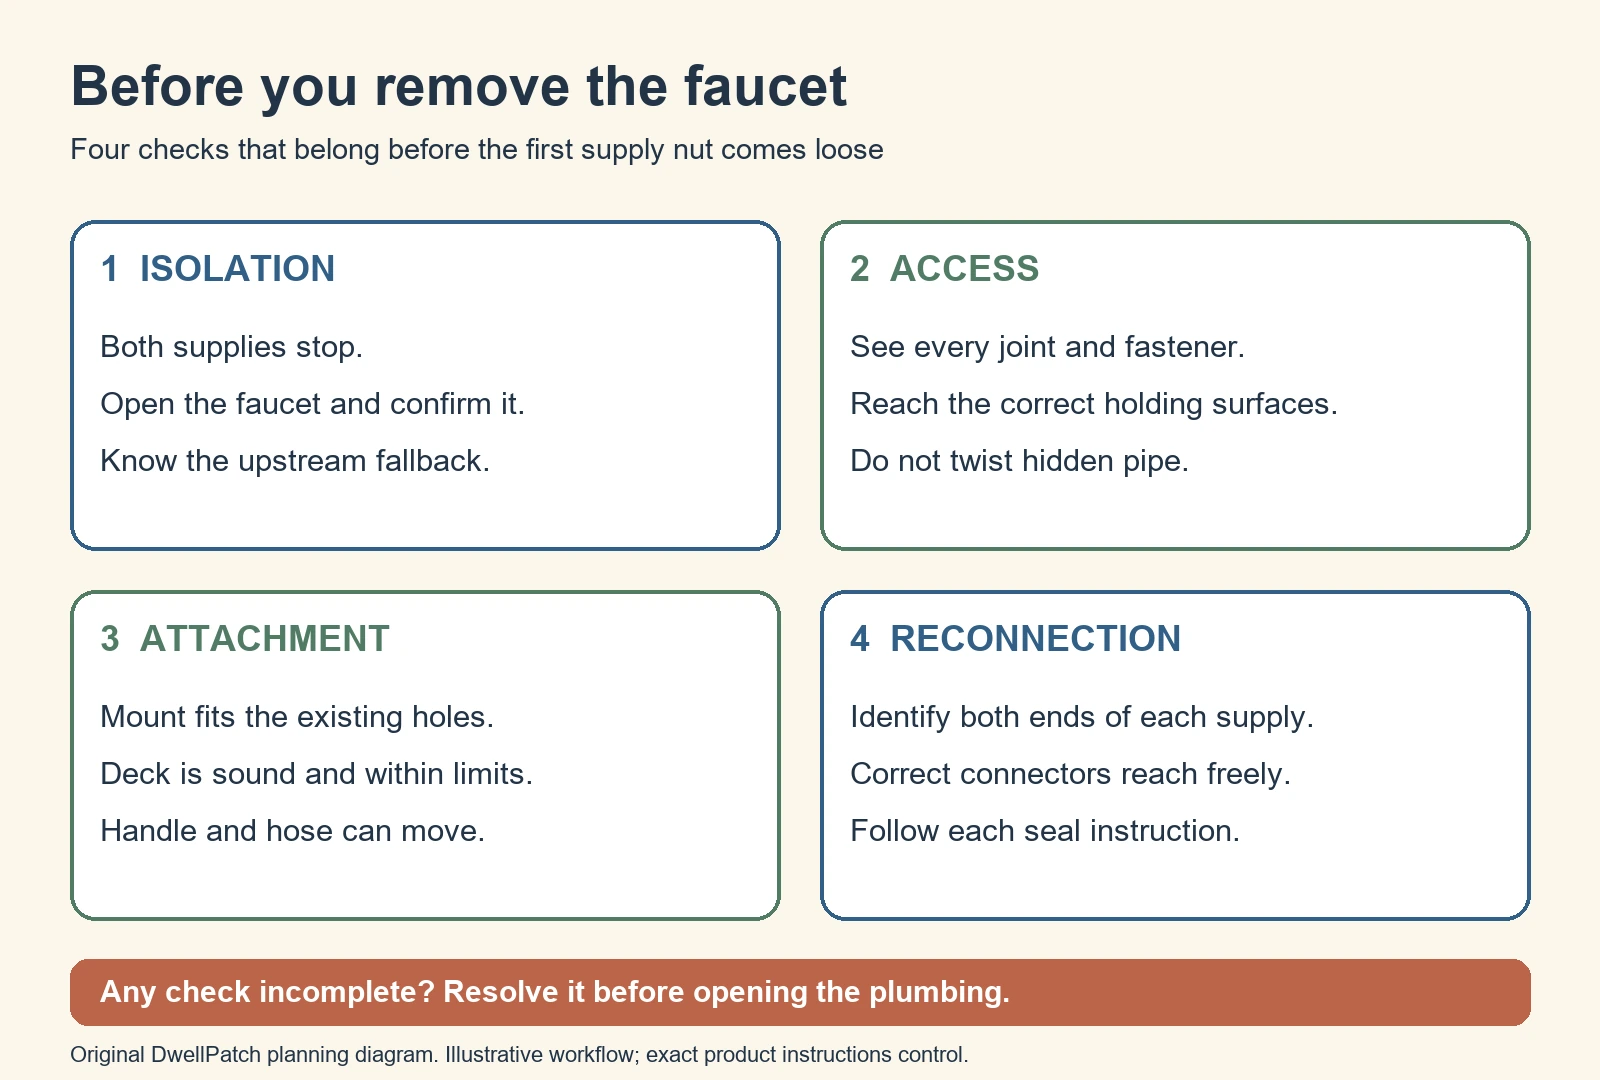
Use four gates before loosening a supply nut: isolation, access, attachment, and reconnection. Each gate answers a different question. Passing the sink hole check alone isn’t enough.
- Isolation: Can both hot and cold supplies be stopped and verified?
- Access: Can you see and reach the mounting hardware and every joint you will disturb?
- Attachment: Does the replacement mount on the existing sound sink or counter without an improvised alteration?
- Reconnection: Do the correct approved hoses or connections reach both supplies without strain?
If one gate fails, resolve it before dismantling the working installation. This is especially useful when the whole home must stay without water during the job. Photographing an inaccessible nut doesn’t make it safely reachable.
Clear a route for your hands and tools. Protect the cabinet floor with a shallow container and towels for trapped water. Move nearby plug connected equipment out of the work area only after safely disconnecting it.
Do not remove a disposal, cut a cabinet, or alter a drain just to gain space without planning that separate work. If the faucet cannot be reached without disturbing additional systems, the job has expanded. Have those changes assessed before proceeding.
Verify the shutoff before opening a joint
Locate the hot and cold fixture shutoffs and the upstream home shutoff. The upstream control is your fallback if a fixture valve won’t close or begins leaking. In a park, confirm access and any required management coordination before starting.
Close the fixture valves according to their design. Open the faucet through its hot and cold positions to release pressure and confirm isolation. Initial trapped water should subside; continuing flow means you haven’t established shutoff.
Don’t force a seized handle with pliers. Don’t treat a valve that rotates as proof that its internal seal works. Use the home and fixture shutoff guide if the control or its function is uncertain.
When local valves are missing or unreliable, a verified upstream shutoff may be necessary. Replacing a failed shutoff is a separate repair with its own pipe compatibility requirements. Don’t open the faucet connection until that isolation problem is resolved.
Keep both supplies isolated throughout removal and assembly. There may still be trapped water in the hoses after pressure is relieved. Catch it without letting it enter open fittings or nearby electrical equipment.
Map both ends of the water connection
Take a photograph of the whole cabinet and close views of each connection. Label hot and cold while the old routing is still clear. Make a separate note for each side because previous repairs may differ.
| Location | What to record | Why it matters |
|---|---|---|
| House pipe entering the cabinet | Readable material markings, visible condition, and existing valve attachment | Pipe material controls any separate valve or transition repair. |
| Fixture shutoff outlet | Exact outlet designation and the sealing surface | Nominal pipe thread and compression connections aren’t interchangeable. |
| Supply between valve and faucet | Removable connector or integral faucet hose; both end types and usable route | A factory attached hose may not be replaceable with a longer generic connector. |
| Faucet underside | Threaded shanks, mounting bracket, fasteners, and any separate spray connection | A mounting nut and a water connection do different jobs. |
A threaded nut is not enough to identify a joint. Threads may pull a washer or cone against a mating surface, rather than seal along the threads. Match the complete connection type, not just the apparent diameter.
For example, a valve labeled 1/2 inch at its inlet can have a different outlet designation. The SharkBite Max UR24946 has a 1/2 inch MIP outlet. It is not the same outlet as 3/8 inch compression.
The manufacturer’s stop specification separates those configurations. That distinction prevents buying a valve that fits the house pipe but cannot accept the chosen faucet connection. It isn’t a recommendation to replace an otherwise suitable valve.
Do not identify old plastic pipe by color alone. In particular, don’t assume a general push connector accepts polybutylene. Confirm the pipe markings and a specifically approved transition through the polybutylene fitting guide.
If a valve has an integral outlet tube, don’t cut it to imitate a removable hose. Get its exact instructions or have a plumber plan the change. A partly identified connection is a reason to pause, not a reason to force an adapter.
Prepare the replacement without opening the plumbing
Unpack the new faucet and compare its instructions with the existing installation. Check the mounting arrangement, allowable deck thickness, handle clearance, and supplied sealing parts. Confirm the supply ends and required installation tools.
Count exposed holes and measure the spacing where accessible. Check beneath a deck plate when that can be done without opening plumbing or damaging the sink. Don’t assume that a wide plate establishes the exact holes beneath it.
The mounting surface also needs inspection. A cracked sink, soft counter, or badly corroded deck may not support the replacement securely. Tightening a mounting nut harder is not a repair for a failing surface.
Check the spout over the actual bowl. Make sure the handle can move fully without hitting the backsplash or window trim. For a pull down faucet, inspect the cabinet route for its moving hose and weight.
Use a flexible tape along the intended supply route. Allow the connector to follow the bend and clearance requirements in its instructions. Don’t choose its length from a straight line between two fittings.
If the new faucet has integral supply hoses, verify their reach before installation. Don’t assume they can be removed or stretched. An extension needs explicit compatibility with the faucet connection, potable water service, and connector instructions.
A standard residential faucet can be suitable when these interfaces match. The words mobile home on the package don’t substitute for those checks. The broader replacement parts compatibility guide explains why the interface matters more than the label.
A documented kitchen example: Moen Adler 87233
The Adler 87233 illustrates why a universal swap instruction falls short. Its current maker page lists one or three mounting holes and 3/8 inch compression supply connections. Its specification drawing sets the deck and opening limits.
The linked INS10205E instructions also call for an 8 by 8 inch clear travel area for the hose and weight. A faucet that fits the deck can still work poorly if that moving assembly catches on stored bottles. Confirm the required space in the actual cabinet.
Its quick connection requires full engagement followed by a tug check. Its flushing sequence comes before the spray wand is attached. Those details belong to that documented installation, not every faucet sold for manufactured homes.
Read the 87233 installation instructions with the exact replacement in hand. Use those instructions only when they match the faucet supplied with your replacement.
Remove the old sink faucet without twisting its pipes
Once the supplies are isolated and the replacement is ready, place a container below the connections. Check the removal instructions for the old assembly if available. Some faucets have clips or quick connections that need a specific release method.
- Separate the planned water connections. Work on the accessible joints you identified, with the supply still isolated. Hold the mating fitting where its design requires support so turning the nut doesn’t turn the pipe.
- Disconnect a separate sprayer only as instructed. Release its clip or connector correctly. Don’t pull on a hose to make an unknown fitting let go.
- Remove the mounting hardware. Support the faucet above while releasing the nuts or bracket beneath. Keep water connection parts separate from mounting washers and fasteners.
- Lift the assembly clear. Guide hoses through the opening without snagging them. Remove remaining seal material gently and inspect the exposed mounting surface.
Watch the house pipe as you apply controlled force. If it turns, bows, or moves into the wall, stop. A second tool is useful only when you can safely grip the intended supporting surface.
Don’t grip plated trim as a substitute for holding a fitting. Avoid crushing plastic nuts or tubing with adjustable pliers. If corrosion prevents controlled removal, a plumber can decide how to separate the assembly without damaging its support.
Keep debris out of open water connections. Save the old identification label and take photographs of the removed parts. Those records can help resolve a mismatch without relying on memory.
Mount, connect, flush, and check the new faucet
Set the new faucet with its specified gasket or other approved deck seal. Don’t add putty or silicone automatically beneath a supplied gasket. Follow the faucet and sink material instructions.
Align the assembly before tightening its mounting hardware. Check handle travel and the spout position over the bowl again. A helper can keep the faucet steady while the underside hardware is secured.
Connect each supply to its intended hot or cold inlet. Start threaded nuts by hand and keep them aligned. Resistance at the first turn calls for inspection, not a larger wrench.
Use the tightening method for that exact connector. A plastic nut, conventional metal nut, and torque limiting connector can have different instructions. There is no safe universal extra fraction of a turn for every fitting.
Do not add thread tape to a washer, cone, or compression seal unless its specific instructions require it. More tape cannot correct a wrong fitting. Some true pipe thread joints require an approved sealant, which is a different connection.
BrassCraft’s connector guidance explains that rubber washers create the seal inside its flexible connector nuts. Match the actual instructions instead of applying a tape rule to every visible thread. That preserves the distinction between a sealing surface and a nut that holds it together.
Route the hoses clear of sharp edges and moving hardware. Fit any quick connector fully and perform the specified retention check. Place the pull down weight where the manual shows, then move the hose through its full travel.
Follow the exact flushing order before final outlet assembly. Depending on the faucet, the manual may require an aerator or spray wand to remain off temporarily. Direct the discharge into the sink and retain the small seals and screens.
Restore water in the controlled manner specified for the valves and faucet. Watch every disturbed joint immediately. If a leak appears, isolate the water again before inspecting or correcting the connection.
Check the repair in more than one operating condition
A mobile home faucet replacement isn’t finished when water first comes out of the spout. Check the cabinet with the faucet off and the supplies pressurized. Then check during hot flow, cold flow, and normal handle movement.
Use a dry paper towel around accessible joints to reveal fresh moisture. Inspect the shutoff stems as well as the hose nuts and faucet underside. Don’t place towels where they could snag a moving hose.
Operate the spray control and extend the pull down hose if fitted. Its movement should not tug the supply connections. Return the hose and check that its weight doesn’t strike plumbing or trap the line.
Run water through the sink drain while observing beneath it. That helps distinguish a separate drain leak from the new supply work. Keep access open until both the supply and drain checks are complete.
Revisit the dry cabinet later that day and after normal use. This is a practical inspection interval, not a guarantee against later leaks. Save the installation manual, model number, and a photograph of the finished connections.
If the repair doesn’t behave as expected
No flow after installation: Check that the intended supplies are open and the hoses aren’t kinked. Follow the faucet’s screen cleaning and flushing instructions. Don’t dismantle a pressurized cartridge to look for debris.
Only one temperature has poor flow: Compare hot and cold operation separately. A partly closed supply, restricted hose, or model specific inlet screen may need investigation. Whole home problems belong in the plumbing system troubleshooting guide.
A connector still leaks: Isolate it and examine the exact joint. Look for misalignment, a displaced seal, damage, or incompatible ends. Repeated tightening can make a damaged connection worse.
The faucet rocks: Check its mounting arrangement and support surface. Verify that the correct bracket and gasket are installed. Don’t use additional sealant to conceal an unresolved mechanical mounting problem.
The problem is at the house pipe: Stop treating it as a faucet swap. The water line repair guide covers the separate material and transition decisions. Leave the water isolated when the piping cannot be safely reconnected.
Before closing the cabinet after a mobile home faucet replacement, confirm that no observation remains unexplained. If a joint keeps becoming damp, keep access available and resolve the leak before returning the cabinet to service.
Found a detail that needs checking? Tell us about a correction.