

A cleared lot isn’t necessarily ready for a home. Site prep for mobile home placement means proving that the location, ground, delivery access and utility plan fit the actual home. The useful finish line is a documented handoff to the installer, rather than a pile of gravel.
Start with the receiving authority and the installation team before ordering earthwork. Ask what evidence they need, who supplies it and when they must inspect. A smooth looking pad doesn’t answer those questions.
What site prep for mobile home placement should deliver
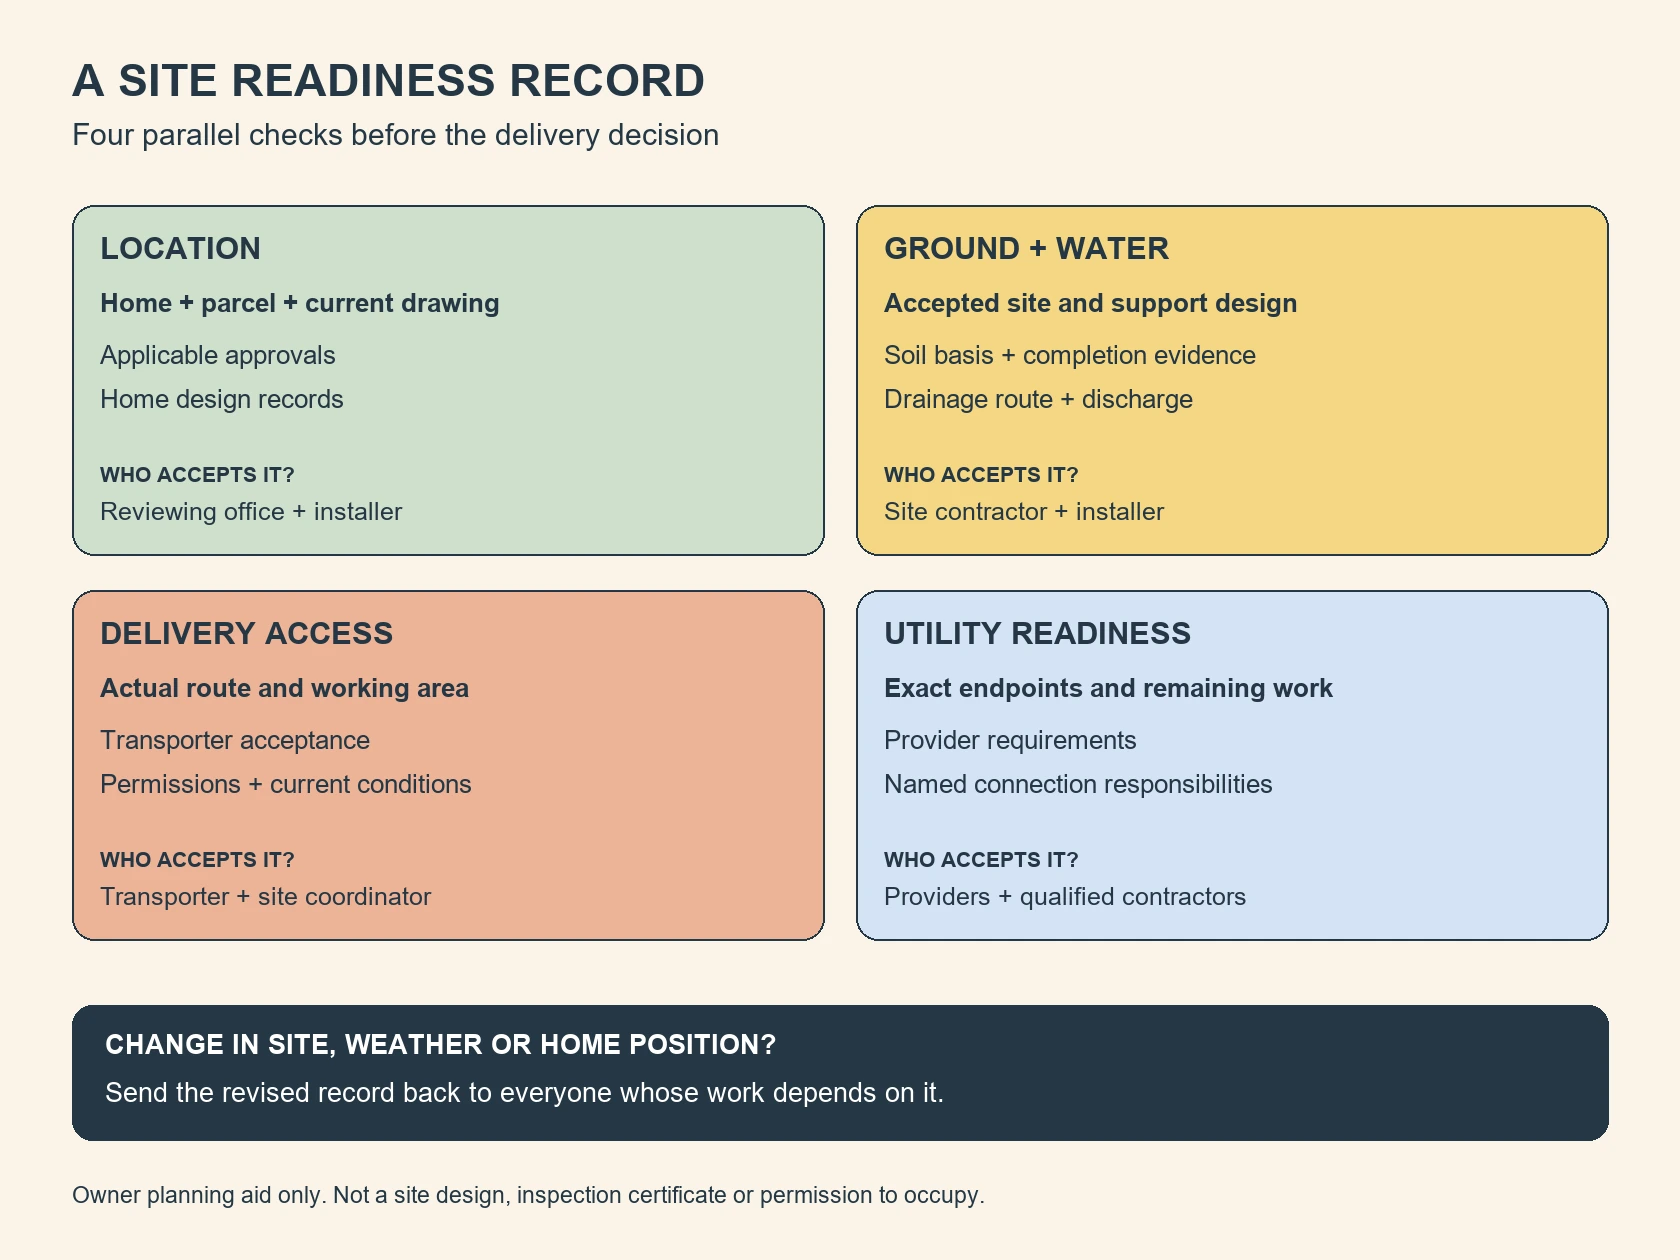
Think of site preparation as four connected work areas. Location approval establishes where the home may go. Ground preparation, delivery access and utilities then have to work with that location.
For each area, keep a named person, an accepted plan and a completion record. The table below is an owner planning tool. It isn’t a permit application or an engineering certification.
| Work area | Evidence to collect | Question before delivery |
|---|---|---|
| Location and home | Parcel information, home identity, placement drawing and required approvals | Does this approval cover this home in this position? |
| Ground and support design | Accepted soil basis, foundation documents and drainage plan | Has the installer accepted the prepared site against the intended design? |
| Delivery and working access | Transporter review, required permissions and agreed staging area | Can the actual delivery equipment reach and leave the installation area? |
| Utility readiness | Provider requirements, connection locations and assigned contractor responsibilities | What is ready now, and who completes each remaining connection? |
Delivery readiness and permission to occupy are different milestones. This guide covers preparation before arrival. For the larger relocation project, use the mobile home moving planning guide.
Confirm the exact home and the authority reviewing it
Give the receiving office the parcel identifier and the actual home information. Include its manufacturer, model, serial information and section dimensions when available. Ask which records are missing before commissioning a final site layout.
Keep the installation instructions with that file. For a new home, request the instructions supplied for its installation. A generic pad drawing from another home isn’t a substitute.
The federal Model Manufactured Home Installation Standards address initial installation of new manufactured homes. State installation programs and other applicable requirements also matter. Ask the receiving authority which rules govern a relocated or older home.
Don’t treat a used home as automatically exempt from site review. Equally, don’t assume every new home provision applies unchanged to every relocation. Record the authority’s answer for the particular home and site.
For relocation, the home’s original design zones matter too. HUD says a home should never enter a more restrictive wind, thermal or roof load zone. Have the installation team check the actual records against the destination.
That check belongs before ground work is ordered. Additional fill or a different anchor doesn’t, by itself, resolve a mismatch in the home’s design. Request an accepted resolution rather than assuming one component upgrades the whole home.
Put the whole site on one placement drawing
Use a survey or other location evidence accepted by the reviewing office. Draw the proposed home, driveway and utility locations together. Add existing structures and the areas reserved for installation work.
Ask the planning office to identify the required setbacks and any restrictions affecting the placement. These distances depend on the location and applicable rules. Don’t borrow a neighbor’s setback or a distance from an online checklist.
Include easements and the right to use any access crossing another property. Physical access and permission to use that access are separate questions. Ask who must provide written permission before work begins.
Show planned steps, landings, decks and outside equipment on the same drawing. Ask whether they change the usable placement area or require separate approval. A footprint that fits only without its required access arrangements needs another review.
Keep one current drawing rather than separate sketches in different contractors’ messages. Date each revision and identify what changed. Send revisions to everyone whose work depends on that location.
This coordination is especially useful when a home is rotated or shifted after an initial visit. Ask the transporter, installer and utility contractors to review the change. Don’t assume their earlier acceptance covers a different position.
Check flood information before setting the finished elevation
The FEMA Flood Map Service Center provides official flood hazard mapping. Use it to begin the location check. Ask the local floodplain administrator what applies to the exact parcel and proposed work.
Request the required elevation information and permit conditions before accepting a pad height. Ask which measurements and documents will establish compliance. An online map search doesn’t replace that determination.
Keep flood elevation review separate from ordinary surface drainage. A plan for rain running off the yard doesn’t establish suitability for a mapped flood hazard. Refer any required foundation changes to the installation designer and reviewing authority.
A dirt or gravel pad isn’t the entire foundation
The word pad can mean different things in a quote. It may describe a prepared earth area, aggregate surface, concrete slab or individual support component. Ask the contractor to name exactly what the quoted work includes.
A material name alone doesn’t describe the load path. The home’s support system transfers its loads into the ground. See the foundation and underbelly overview for the separate roles of supports, anchors and enclosure materials.
Before accepting a dirt pad for mobile home placement, request its relationship to the foundation design. Ask which area is prepared and where the designed supports will bear. Have the installer confirm this before delivery.
Use the same questions for a gravel pad for mobile home placement. Gravel on the surface doesn’t prove the condition of the soil below. Ask what evidence supports the proposed system rather than judging the finished color or texture.
Caliche is another material description, not a complete installation specification. If a bid proposes it, request the material and preparation requirements for this site. The appropriate reviewer must accept the completed work against those requirements.
Request the soil basis, not a guess from a photograph
Soil bearing capacity describes the ground’s ability to carry the design load. The federal standards provide several ways to establish it. Unusual conditions, organic soils and uncompacted fill need the professional determination specified there.
Ask who establishes the soil basis and which record the installer will use. If testing is required, ask what it evaluates and who accepts the result. A septic evaluation and a foundation soil assessment serve different decisions.
Photograph visible fill, stumps, wet areas and remnants of old structures from a safe position. Give those observations to the site contractor. Don’t turn a photograph, shovel test or truck tire track into your own bearing capacity finding.
For imported fill, ask what preparation, inspection and documentation the design requires. Request those records before the work becomes concealed. Don’t choose a universal fill depth or footing size from the home’s advertised width.
A frost depth, support layout or anchor design also needs the applicable site and home information. Ask the installer to identify the accepted design documents. This planning guide doesn’t provide excavation or foundation construction instructions.
Resolve where water goes before the home arrives
Drainage planning needs more than the instruction to make the lot level. Separate the home’s finished level from the ground contours directing water away. Ask the contractor to show both on the plan.
Trace water arriving from uphill, water falling near the footprint and water leaving the site. Ask where each flow will discharge. A low area just beyond the pad may still need attention.
For new installations within its scope, federal drainage rules address runoff away from the home and protection from surrounding runoff. They also recognize alternatives where physical conditions prevent the specified grading arrangement. Have the applicable design resolve those conditions instead of copying one slope everywhere.
Ask the site contractor these questions during the review:
- Where will runoff from the higher side of the lot go?
- What prevents water collecting beneath the proposed home?
- Does the driveway interrupt the intended drainage route?
- What happens at the discharge point beyond the prepared area?
- Who reviews the drainage again after utility trench restoration and final landscaping?
Where needed, have the contractor obtain approval for the proposed drainage work. Don’t dig a ditch toward another property or a road based on a generic sketch. The receiving location and any permissions belong in the actual plan.
If rainfall occurs before delivery, record visible pooling or erosion from a safe position. Send dated photographs to the contractor and installer. Ask whether the conditions change the site’s acceptance or delivery schedule.
Ground moisture control is a separate part of the assembly. A ground vapor retarder doesn’t replace drainage for liquid water. Ask who provides it and how its installation fits the foundation and enclosure work.
Don’t use skirting to conceal an unresolved wet area. The installer should explain the planned enclosure and access arrangements. Save final ground levels and drainage details with the home’s records.
Have the transporter accept the delivery path
A driveway that takes a pickup truck may not suit a home section and its delivery equipment. Arrange a route and entrance review with the transporter. Give the team the actual home and site information.
Identify narrow turns, gates, slopes, soft ground, trees, overhead lines and places where equipment must reverse. Ask the transporter which obstacles need action. Don’t use a universal driveway width as a promise of access.
Include the final movement from the entrance to the installation position. Ask where the sections and equipment will wait and how crews will work around them. The path must remain available through the agreed delivery and installation stages.
Any overhead utility conflict belongs with the utility owner and delivery team. Don’t attempt to lift wires or improvise clearance. Have the responsible parties resolve the arrangement before scheduling the move.
Ask who reviews access after substantial rain or fresh earthwork. Record who may pause delivery if the accepted conditions change. A previous visit shouldn’t become permission to proceed through a newly damaged entrance.
Protect any existing septic area from delivery traffic. Many drainfields aren’t designed for heavy vehicles or equipment. Have the septic professional and transporter coordinate the protected area on the site drawing.
Define utility readiness by connection point and responsible person
A nearby utility line doesn’t tell the installer what will be available at the home. Ask each provider or qualified contractor to identify the service location and remaining work. Include the home connection information from its installation documents.
For electrical service, ask who handles the service equipment, utility approval and final connection. A meter location alone doesn’t settle the whole arrangement. Our electrical system planning guide explains the main system distinctions without live electrical work.
For water and wastewater, ask where the site side work ends and the home connection begins. Identify the contractor responsible for connecting and testing the system. Keep these site arrangements separate from plumbing inside the home.
If the site uses a well or septic system, request the applicable approvals and existing records. The local permitting authority can help locate septic design and permit information. An existing tank doesn’t establish that the proposed home and system arrangement are accepted.
The EPA’s septic system questions explain why local requirements and site conditions matter. Ask the responsible office about the proposed home, permitted capacity and protected areas. Don’t assume a foundation soil result clears the wastewater design.
For fuel service, if needed, ask the supplier and qualified contractor about equipment location, approvals and the final connection. No site preparation checklist authorizes gas or electrical work. Keep service details within their applicable professional scopes.
Before excavation, confirm the contractor’s 811 arrangements and required response checks. Private lines may need a separate locator. Examples include lines serving a septic system or a privately owned propane tank.
Record utility readiness in specific terms. Write which work is complete, which inspections remain and which contractor accepts the next step. Avoid a single checkbox labeled utilities done.
A handoff example: an existing lot with a different home
Consider a hypothetical replacement home on a lot with an existing driveway and septic system. The owner initially describes the site as ready because a home stood there before. The new placement drawing shows a different position and utility connection locations.
Before approving the preparation quote, the owner asks the installer to review that drawing. The transporter reviews the final approach to the new position. The septic professional checks the existing records and proposed use with the permitting authority.
The owner then marks three separate questions as unresolved: access acceptance, wastewater acceptance and the home connection scope. Each gets a named contact and a requested decision. None is cleared merely because the existing equipment is visible.
This example doesn’t predict that any particular site will fail review. It shows how to turn the statement “everything is already there” into specific checks. Keep accepted existing work and remaining changes separate in the record.
Compare site preparation quotes using the same scope
Budget site prep for mobile home delivery from the actual work scope. A bid covering clearing alone cannot be compared with one including wastewater, access and foundation work. Request separate line items tied to your accepted plan.
| Quote item | Ask the bidder to define |
|---|---|
| Clearing and removal | Areas included, debris disposal and treatment of old structures or buried remnants |
| Earthwork and pad | Design basis, prepared area, material specification and required completion evidence |
| Drainage | Routes, discharge arrangement, temporary protection and final restoration responsibility |
| Foundation coordination | Included components, accepted documents and handoff to the installer |
| Access | Entrance work, permissions, temporary measures and restoration after delivery |
| Utility work | Each endpoint, connection responsibility, inspections and excluded provider charges |
| Changes and delays | Approval process for extra work, changed ground conditions and rescheduling |
Ask who coordinates the contractors when one company doesn’t provide the whole project. Put names beside the boundaries between their jobs. An excluded task needs an owner before delivery day.
Keep allowances distinct from a completed specification. Ask how an allowance changes when the accepted design becomes available. For unresolved work, request a written change process rather than assuming the initial figure covers every outcome.
Make the final site handoff specific
Close site prep for mobile home delivery with the agreed installer and transporter review. Use the latest drawing and supporting records. Have each party identify unresolved conditions within its scope.
Keep this concise record with the project:
- Identity: Home, parcel, drawing revision and installation documents reviewed.
- Accepted work: Completed items and the person accepting each within their role.
- Outstanding work: Named contractor, required approval and deadline for each remaining task.
- Changed conditions: Rain, damaged access, revised placement or other conditions requiring another review.
- Delivery decision: Who confirms arrival may proceed and how the team communicates a pause.
This is an original coordination aid, not an official release form. Required inspections and permits remain separate. Ask which approved documents the installation crew must have on site.
Once delivery is accepted, the project moves into placement, connections, inspection and completion. Keep those later responsibilities assigned too. A prepared site is the start of installation, not proof that the home is ready to occupy.
Found a detail that needs checking? Tell us about a correction.