

Moving a mobile home starts with proving that the home can be received, transported and installed at its destination. A hauling quote answers only part of that question. Confirm the destination, the home’s condition and the installation plan before anyone disconnects utilities or removes its supports.
Some moves involve one transportable section. Others require separate sections, coordinated deliveries and work to reconnect the building and its systems. Your useful starting point is a written scope that carries the project all the way to approved occupancy.
Before moving a mobile home, clear these five gates
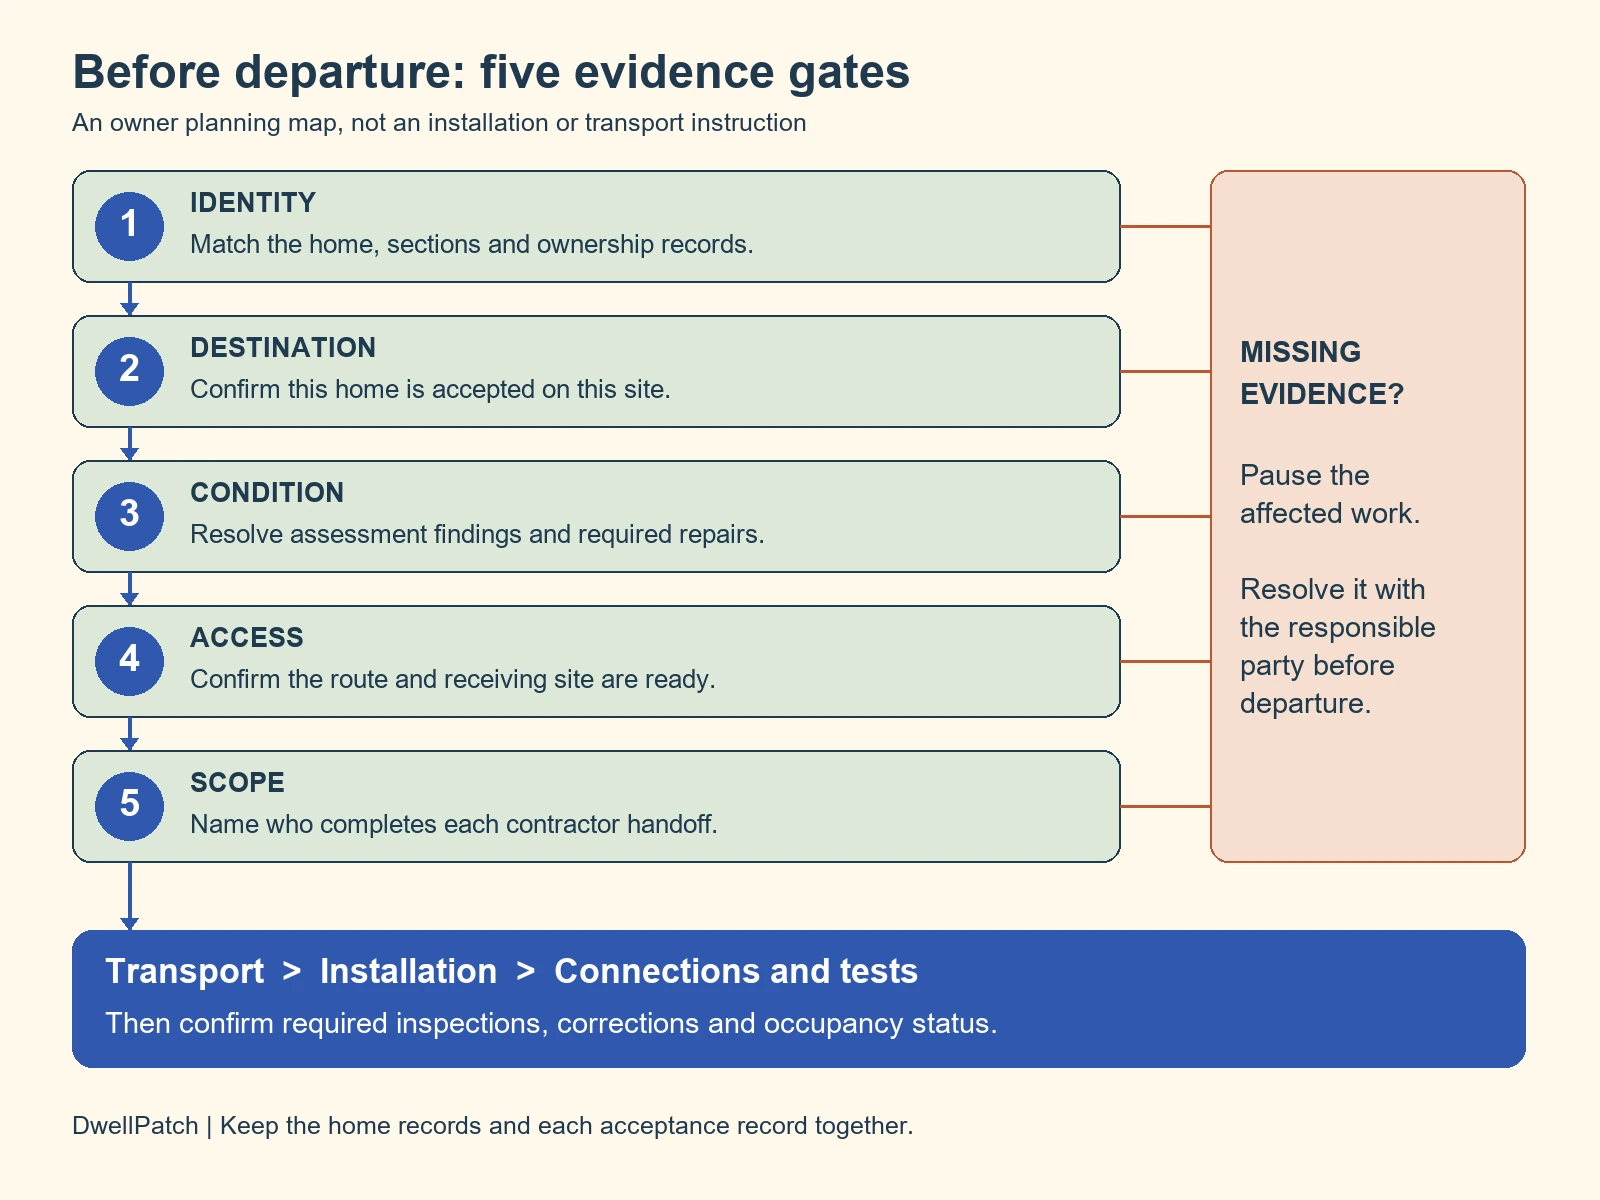
Treat each gate as a decision that needs evidence. A promise that someone will sort it out later belongs in the unresolved column. Don’t confuse an affordable trip with a complete, feasible relocation.
| Gate | Evidence to collect | Reason to pause |
|---|---|---|
| 1. Identity and authority | Home identification, ownership records and any required consent or release. | The papers describe another section, owner or address. |
| 2. Destination acceptance | Confirmation that this home can be installed on this particular site. | Land ownership or an empty lot is the only approval. |
| 3. Physical feasibility | Qualified assessment of the home, attachments and transport preparation. | The quote assumes concealed damage or missing running gear won’t matter. |
| 4. Route and receiving site | Transporter’s access review, permit plan and installer’s site readiness confirmation. | The home can reach the street but can’t enter or be placed. |
| 5. Complete scope | Named responsibility for disconnection, transport, setup, utilities and required inspections. | Everyone’s contract ends before the next person’s work begins. |
These are planning gates, not a substitute for an inspection or permit. They help you discover a missing decision while changing the plan is still possible. Keep the evidence together rather than spreading it across calls and text messages.
Identify the home before asking whether it can move
Collect the manufacturer, model, construction date, serial number and number of sections. Photograph existing identification without removing it. Match these details to the records supplied to the transporter and receiving authority.
The exterior HUD certification label and interior data plate serve different purposes. The data plate records identifying information and design zones. Its absence is a records problem to investigate, not proof that every similar looking home has the same rating.
For missing information, HUD explains label verification and data plate recovery. HUD doesn’t reissue missing certification labels. A verification letter, when records support one, doesn’t certify today’s physical condition or approve a destination.
The federal HUD Code took effect June 15, 1976. A home built before that date needs its own review under the rules applicable to that home and location. Don’t treat the date as a national permission slip or a national prohibition on relocation.
Ask the receiving office what evidence it accepts for an older home or missing records. A seller’s stated year, an exterior makeover or a replacement roof doesn’t establish construction identity. Resolve discrepancies before ordering work based on the wrong home.
Get acceptance for the actual destination
Give the planning or building office the parcel address and the home’s identifying information. Ask which office handles a used manufactured home’s relocation and installation. Also ask whether another state housing agency must review it.
Request answers to specific questions rather than asking only whether mobile homes are allowed:
- Is this home eligible for this parcel, with its documented age and design ratings?
- What site plan, setbacks, separation distances and access approvals must be shown?
- Which foundation, drainage, floodplain or elevation reviews apply here?
- What evidence is needed for water, sewer or septic and electrical service?
- Which permits and inspections lead to permission to occupy?
HUD’s homeowner relocation guidance separates transportation rules from zoning and placement. It also says a home shouldn’t enter a more restrictive wind, thermal or roof load zone than its design permits. Have the receiving authority and installer check those conditions using the home’s records.
A permanent chassis doesn’t make every destination suitable. Neither does the fact that another manufactured home once occupied the lot. Ask for current acceptance of your proposed home and site plan.
If the destination is a rented lot, keep the operator’s acceptance separate from government approvals. Each may have conditions the other doesn’t address. This guide covers the physical relocation project; resolve lease notices and permission questions with the parties responsible for them.
Have condition and transport readiness assessed together
A tidy interior can hide damage relevant to a move. Give the assessor the home’s repair history, known leaks and any previous additions. Explain that you need a relocation assessment, not just a cosmetic walkthrough.
Ask who will assess the chassis, framing, floor condition and connections between sections. The transporter must also identify what transport equipment and preparation the specific home needs. These are professional assessment tasks, not a checklist for crawling under or lifting the home yourself.
Get each finding translated into a decision: acceptable as inspected, repair before movement, further evaluation needed, or decline. Request the repair scope and who will confirm completion. A vague note saying the home is old doesn’t identify a remedy.
Concealed structural, electrical and plumbing problems may remain after flooding or wind damage. That is a reason to disclose the history and seek qualified review. It isn’t a basis for declaring a particular home safe from photographs.
Keep additions in the assessment. A porch, carport, roof addition or attached room may create a separate removal and repair project. Ask who evaluates its attachment and what weather protection remains once it is removed.
Don’t assume every component removed at departure can be reused at the new site. Ask the installer to distinguish reusable items, damaged items and site specific items. Our mobile home parts compatibility guide explains why a category label alone doesn’t establish a match.
Separate transport permission from installation approval
There can be several approval tracks: permission to remove the home, authority to transport it, and permission to install it. Utility work and occupancy may add separate steps. Write down which office controls each track.
A highway permit doesn’t approve the home’s foundation or septic service. An installation permit doesn’t establish that the transporter can use a chosen road. Keep copies with the same home identification and destination throughout.
State examples show why a national shortcut is unreliable. Texas’s ownership FAQ calls for any required DMV permit, an updated Statement of Ownership and lienholder discharge or written consent. Those are Texas instructions, not a document list for every state.
Likewise, don’t assume all transportation law prohibits any owner involvement. Texas’s permit page describes a limited owner transport provision with specific conditions. This guide still recommends a qualified manufactured home transporter; an exception doesn’t supply equipment, competence or installation authority.
Current federal model installation standards expressly address initial installation of new manufactured homes. For a used home being moved again, ask the receiving authority which relocation and installation rules apply. Don’t assume every later construction standard automatically becomes a complete retrofit requirement.
Make the transporter inspect both ends of the route
Share photographs and measurements requested by the transporter, but arrange an access review when conditions are uncertain. The review needs both the departure path and the final placement path. Street distance alone says little about either.
Point out narrow entrances, sharp turns, overhead lines, branches, slopes, gates, culverts and soft ground. Ask the transporter to identify any permissions or specialist work these obstacles require. Never move a utility line or public sign yourself to create clearance.
North Carolina’s transportation agency asks permit applicants for actual dimensions, origin, destination, requested routes and the home’s serial number. That illustrates the detail a transport plan may need. Let the transporter determine the route and check applicable road authority requirements.
At the receiving site, ask where each section will arrive, wait and be placed. Confirm which party supplies access preparation or special placement equipment. A quote for delivery to the property boundary may leave the hardest work outside its price.
Ask what happens if weather, road restrictions or an unready site interrupt the move. Identify who authorizes a delay, where the home can remain and who protects exposed sections. Put charges and responsibilities into the contract rather than assuming a free return trip.
Assign each handoff before you sign
One company may coordinate the whole move, or several contractors may divide it. Either arrangement needs clear boundaries. Use this table to ask for names and deliverables, not to assign legal duties that vary by location.
| Handoff | Name the responsible party | Ask for this confirmation |
|---|---|---|
| Owner to project coordinator | Owner, retailer or contracted coordinator. | Home records, accepted destination and complete scope. |
| Site preparation to installer | Site contractor and installation contractor. | Site ready under the accepted plan, with required work reviewed. |
| Utility disconnection to transporter | Utilities and qualified trades. | Services disconnected and made safe for the agreed removal work. |
| Transporter to installer | Named transport and installation leads. | Delivery condition, placement responsibility and weather protection. |
| Installer to utility trades | Installer, electrician, plumber and other applicable trades. | Installation ready for their connections, tests and inspections. |
| Contractors to owner | Coordinator and relevant inspectors or approving offices. | Completion records, remaining corrections and occupancy status. |
For each row, add a phone number, due date and acceptance record. Ask who pays for a failed handoff and who can approve added work. A job can be physically finished by one contractor while still being unusable by the next.
For example, imagine the transporter arrives while the receiving installer is unavailable. Who accepts the home, secures it and arranges the next visit? This hypothetical gap is worth resolving before departure.
Compare complete quotes without guessing a national price
There isn’t a useful universal price for moving a mobile home. Home condition, section count, access, route and destination work change the scope. Get written quotes based on the same information and compare what each actually includes.
Organize the budget by work package. Leave a blank amount beside unquoted work rather than treating it as zero:
- Home assessment, records recovery and required design or repair review.
- Departure permits, utility disconnection, attachment removal and site cleanup.
- Transport preparation, vehicles, permits, escorts and route related services.
- Destination access, site preparation, foundation and anchoring work.
- Section joining, weather closure, utility connections and system commissioning.
- Required access steps, enclosure, inspections, corrections and temporary accommodation.
Have each bidder mark included, excluded, allowance or separately quoted. Ask what an allowance covers and what triggers a change order. A transport price and a complete relocation price aren’t comparable until their boundaries match.
Ask who employs the people performing installation and utility work. Verify the registrations, licenses and insurance required for their actual role and jurisdiction. A company’s permission to haul doesn’t prove that it can perform every other trade.
Confirm insurance with your own insurer and the transporter’s insurer before work starts. Don’t assume your normal policy includes relocation coverage. Ask about dismantling, transit, temporary storage, reassembly, deductibles and the actual claims process.
Compare the full relocation estimate with realistic alternatives if the project is becoming uneconomic. Include repairs and the destination work you would still need. Avoid a rule that a particular mileage or birthday always makes a home worth moving or not worth moving.
Prepare the receiving site before dismantling your home
Ask the installer to confirm the accepted foundation and anchoring approach before site work starts. The soil, drainage and local conditions affect that plan. Don’t buy a generic stack of supports or anchors from an internet diagram.
Get a written list of work that must be complete before delivery. It may involve access preparation, grading, drainage, utility availability and inspections of work that will later be concealed. Ask who confirms readiness and what evidence the transporter receives.
For excavation and anchoring work, have the responsible contractor arrange the required utility locating process. Confirm private lines too. Indiana 811 explains that member utility markings don’t include every privately owned line, including some septic and propane lines.
Don’t use an old meter pedestal, capped pipe or former homesite as proof that utilities are ready. Ask the relevant utility or qualified trade to assess the existing service. Record any required upgrades before the home blocks access.
Keep site readiness separate from occupancy readiness. The site can be ready for delivery while the home still needs connections, inspections and corrections afterward. Set a housing plan that accommodates that interval.
Protect records and belongings at departure
Ask the transporter for written instructions about contents, appliances and interior preparation. Arrange separate household goods transport when needed. Don’t assume the home’s normal living load is an approved travel load.
Keep identification, permits, contracts, keys and insurance contacts with you. Photograph each room and accessible exterior surfaces before work begins. Record existing cracks, leaks and damage in a form the contractor can acknowledge.
Have qualified personnel handle utility isolation and disconnection. Agree who removes exterior equipment and attachments, and who leaves the old site safe. Turning a household valve or switch doesn’t by itself complete a relocation disconnection.
Photograph items that become accessible during approved work, without entering the lifting or work area. Ask for records of any newly discovered damage and the response. Pause the affected work when a finding changes the agreed plan.
The owner shouldn’t remove supports, anchors or connecting structure to save labor. Those actions belong within the contractor’s planned sequence. Keep people and pets out of the transport and placement area.
After arrival, finish the installation before calling it home
Record delivery condition with the receiving lead as soon as it is safe. Compare photographs and write down concerns on the actual receiving paperwork. Ask the insurer or contractor about reporting deadlines; don’t assume an undated text preserves every right.
Have the installer identify the work remaining after placement. For homes with several sections, that includes the building connections and the systems crossing between sections. A visually closed center seam doesn’t document all that work.
Request checks of the roof and exterior closure, bottom covering, affected insulation and accessible connections. Then have the responsible trades connect and test systems as required. A professional plumbing system review should account for both supply and drainage, rather than only opening a faucet.
Ask for the inspection results and correction list. Verify permission to occupy with the approving authority where required, rather than relying on the truck’s departure. Keep receipts and completion records with the home’s identification packet.
Check everyday operation after the home is released for use. Note doors that bind, new leaks, uneven comfort or changes around joined sections, then report them to the responsible contractor. Our doors and windows guide helps organize opening problems without assuming every symptom needs a replacement unit.
Moving a mobile home ends with a documented handoff to its owner. Before final payment, reconcile the written scope with completed work and agree how outstanding corrections will be handled. Preserve the accepted plans, permits, photographs and contact details for future repairs or another move.
Found a detail that needs checking? Tell us about a correction.