

Installing a manufactured home is complete when the home is supported, secured, connected, closed against weather and cleared through the applicable inspections. Delivery is one milestone within that work. Before the truck arrives, give every remaining task an owner and identify the record that will show it is finished.
Your most useful installation checklist follows the handoffs between crews. A home can look finished while a connection, inspection or approval remains unresolved. Use the sequence below to ask precise questions without taking on structural or utility work yourself.
Start with the installation instructions for this home
Gather the manufacturer’s name, model, serial numbers, installation manual and approved site documents into one project folder. Confirm that the instructions apply to the actual home and its options. A manual for a similar floor plan isn’t enough to choose its supports or connections.
For an initial installation of a new manufactured home, the federal model standards establish minimum requirements. The home comes with approved installation designs and instructions. DAPIA means Design Approval Primary Inspection Agency, the organization that reviews the manufacturer’s designs.
Ask the installer to identify the controlling manual revision and any approved alternate design. If the proposed work differs from the instructions, get the design question resolved before work proceeds. A contractor’s familiar method isn’t a substitute for an applicable approved design.
The federal installation standards describe these instructions and the process for variations. They also separate ordinary section closeup from some construction completed on site. Ask who handles that additional work and its required inspection.
Identify which installation program applies
Some states run their own qualifying installation programs. In other states, HUD administers the program. The installer licensing, inspection arrangements and required records must match the program where the home will stand.
Use HUD’s installation program resources to identify the appropriate program and credential checks. A general contractor’s license or transport business name doesn’t answer that question by itself. Record the credential holder, company, expiration information and person supervising the job.
For a relocated or older home, ask the receiving authority which installation standards and documents it accepts. Don’t assume every new home provision automatically becomes a retrofit requirement. The broader relocation planning guide covers move feasibility and transport decisions before this stage.
A manufactured home and a modular home can arrive in sections but follow different regulatory paths. Confirm the home’s identity before using an installation checklist. Avoid substituting instructions just because a contractor works on both types.
Before installing a manufactured home, map five handoffs
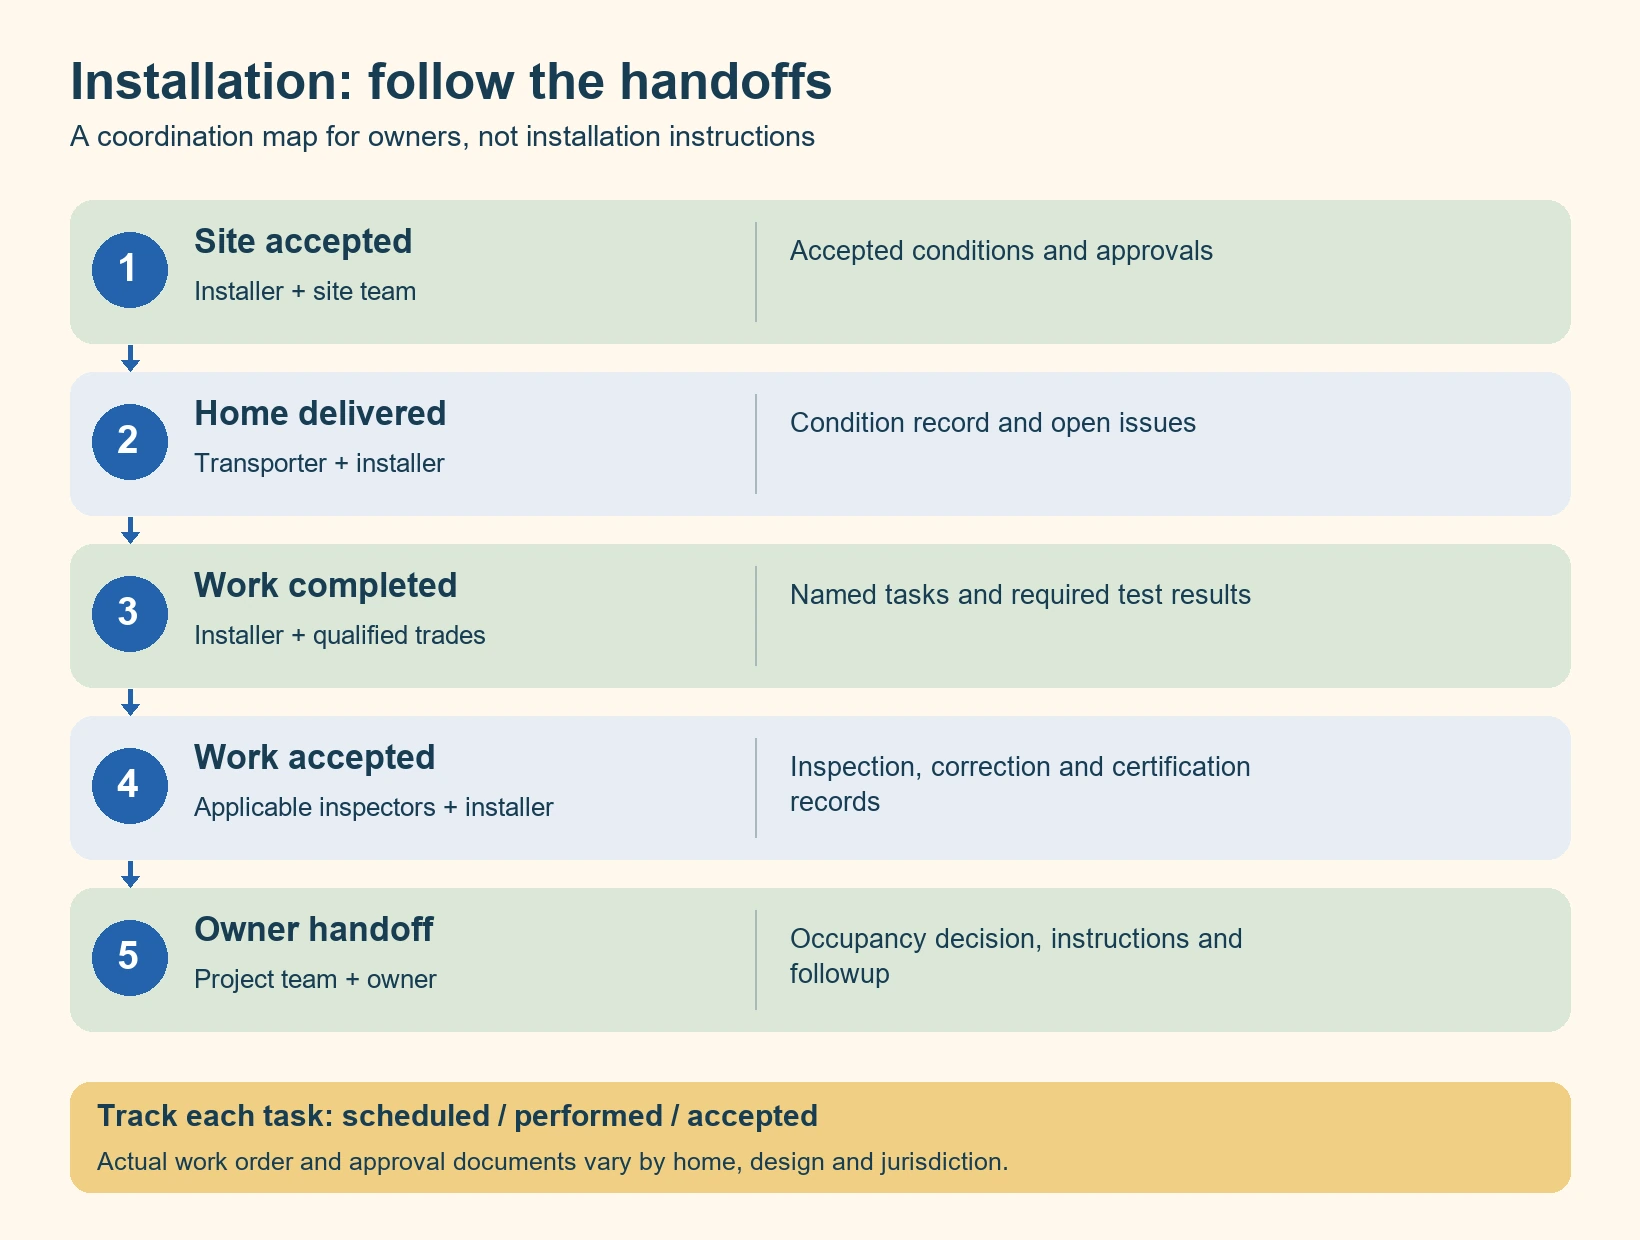
Use the following record as a coordination tool, rather than a substitute for the approved instructions. Each row needs a named person and a completion record. Some activities overlap, but covering work before the necessary inspection can create avoidable rework.
| Handoff | Question to resolve | Record to request |
|---|---|---|
| Site to delivery crew | Has the installer accepted the actual site and access conditions? | Site acceptance, relevant approvals and delivery coordination notes |
| Delivery to installer | Who takes responsibility for the sections and any observed damage? | Dated condition photos and a written issue list |
| Installation to trades | Which structural, crossover and service tasks remain? | Named task owners and inspection hold points |
| Trades to inspectors | Are required tests and inspection prerequisites complete? | Test reports, inspection results and correction records as applicable |
| Project team to owner | What establishes completion and permission to occupy? | Program certification, applicable finals, operating instructions and unresolved item list |
Put contact details beside each name. A company label such as “utilities” leaves too much unclear. Identify who makes the appointment, who attends, who pays any agreed fee and who sends you the result.
Keep separate status columns for scheduled, performed and accepted. Those words describe different events. A booked inspection cannot close a row that requires a passing result.
Accept the site, then coordinate delivery and placement
Site preparation should already address the accepted home location, soil, drainage, foundation design and equipment access. Installation begins with confirming that those conditions still match the plan. Recent rain, new trenches or stored materials can change the work area.
Ask the installer who will confirm readiness and what would delay delivery. If a problem appears, request a specific correction and a new readiness decision. Don’t ask the transport crew to solve a design mismatch on arrival.
Set a communication plan for weather delays and temporary storage. Ask who protects the sections if delivery and installation occur on different days. Temporary support and weather protection need the manufacturer’s applicable instructions.
Before arrival, arrange a safe place for the owner to stand and the crew’s preferred contact method. Keep children, pets and visitors outside the working area. Don’t enter beneath sections or approach lifting and positioning equipment for photographs.
Document visible condition from the permitted observation area. Useful photos show the whole elevation, a closer view of damage and a location reference. A photo of a crack alone may be hard to place later.
Record when a concern was noticed without guessing its cause. “Rear corner siding is creased at delivery” is more useful than assigning blame. Ask the responsible crew to inspect it and document the agreed next action.
Keep support, anchoring and section joining distinct
The support system carries the home to the ground. Anchoring provides restraint against the forces addressed by its design. Neither function can be confirmed simply because the outside of the home looks straight.
Ask the installer to show which approved drawings govern the foundation, supports and restraint. You need the document reference and completion confirmation, not a lesson in adjusting piers. Do not jack the home, move supports or tighten straps as an owner check.
The foundation and underside component guide explains the different parts. It can help you describe a concern clearly. It cannot establish whether a particular support arrangement is adequate.
For a home with multiple sections, structural joining is a separate item from visible interior trim. Ask who completes the connections and who inspects them before they are covered. A neatly covered seam isn’t evidence of concealed structural work.
Likewise, don’t diagnose support failure from one sticky door. Record where it sticks and when the symptom appeared. Ask the installer to review the symptom against the installation and the home itself.
Request the applicable leveling check as part of completion. Doors and windows should operate properly, but an owner’s opening test doesn’t replace that check. If several openings begin binding, report the pattern rather than sanding each one to hide it.
Track every system connection across the section joint
Crossovers are connections between home sections. Depending on the design, they can include water, drainage, fuel piping, electrical circuits and heating or cooling ducts. A connection to the utility outside doesn’t establish that all internal crossovers are complete.
Have the team identify each applicable system on the actual home plan. Then name the person responsible for connection, testing and correction. Use “not applicable” only after checking the design, rather than leaving an empty box.
| System | Owner’s coordination question | Closeout question |
|---|---|---|
| Water and drainage | Who completes the section connections and the site connections? | What required inspections and leak tests are documented? |
| Electrical | Who completes the service work and any section crossovers? | What approval is needed before normal use? |
| Fuel supply | Who handles the applicable connections and appliance startup? | Who confirms required tests and safe operation? |
| Heating and cooling ducts | Does this design require connections between sections? | Who checks the completed distribution system? |
| Exhaust and appliance vents | Which items arrive incomplete or need site completion? | Who confirms their required outside termination and clearance? |
Leave gas work, energized electrical work and test procedures to qualified personnel. An owner walkthrough should not involve removing electrical covers or disconnecting pipework. Ask for the result, the responsible person’s name and any unresolved limitation.
For plumbing layout questions, the manufactured home plumbing guide separates supply, drains and vents. Use the electrical system guide to distinguish the service, feeder and home circuits. Neither replaces the project’s installation documents.
If one section has weak airflow after startup, report which rooms and modes are affected. Don’t assume the new equipment needs replacement. The ductwork guide explains distribution problems that deserve a focused assessment.
Finish weather protection before calling the home complete
Exterior closeup is the work that completes exposed areas after transport and section joining. Ask which roof, wall and joint details remain open. Name the crew responsible for each area instead of treating “trim” as one finish item.
Where applicable, request confirmation of the mate line sealing and roofing or siding completion. The mate line is where home sections meet. Its concealed sealing serves a different purpose from the decorative trim you can see indoors.
Include the bottom closure in this discussion. Transportation and installation damage to that covering must be addressed through the applicable repair method. Ask the crew to document the condition before enclosing access.
Some roof systems need additional completion and inspection arrangements. Ask specifically about a hinged roof or other construction finished on site. Do not assume the standard installation appointment covers every design.
Keep skirting separate from structural support, underside repairs and required inspections. It should not hide unfinished work. Confirm the planned access openings, ventilation arrangement and any work that must remain visible for inspection.
Steps, landings and decks also need their own completion owner. Ask the local authority what access must be finished before occupancy. Any proposed structural attachment needs the applicable design review rather than a convenient connection to the home.
Book the inspection path before crews disappear
Ask for the inspection sequence early enough to preserve access to the work. Which inspections happen before concealment? Who requests them, and what must be ready when the inspector arrives?
Separate installation inspection from electrical, plumbing, septic and other applicable local inspections. A utility’s service release may also have its own process. Ask each responsible agency which result it needs rather than assuming one approval covers all work.
Under the HUD administered program, the licensed installer certifies completion after the required inspection and correction of installation defects. State programs have their own procedures and records. The installation program regulations explain that distinction.
Ask for the actual result when an inspection is finished. If corrections are required, record the issue, responsible contractor and next inspection or acceptance step. “Inspector came by” isn’t enough to establish a pass.
A private owner inspection can provide another assessment, but don’t assume it replaces a required program or permit inspection. Agree on its scope and timing. The person evaluating visible finishes may not be verifying every concealed installation detail.
Keys, an orientation appointment and permission to occupy are separate matters. Ask the local authority what document or decision establishes occupancy approval for your project. Keep that answer with the applicable final records.
Build a useful walkthrough and completion packet
Walk through the home with the agreed scope and change orders in hand. Confirm what is complete, then record each remaining issue by room or elevation. Use plain observations rather than a guessed technical diagnosis.
For example, write “hall bath door rubs at the upper latch corner and won’t close normally.” Add a dated photo and ask who will assess it. Avoid changing the latch yourself before the team has reviewed a new installation concern.
Classify the list by next action: immediate safety or weather concern, required correction, incomplete contracted task, or appearance issue. Let the qualified party determine the technical cause. Don’t allow the appearance category to swallow an unresolved water entry or support concern.
For installing a manufactured home, a useful completion packet answers four questions: what was built, who accepted it, how to operate it and who handles followup. Keep it organized by those questions.
- What was built: applicable installation manual, approved designs, accepted changes and relevant concealed work records.
- Who accepted it: installation certification, applicable inspection results, correction closure and the occupancy decision.
- How to operate it: equipment instructions, shutoff locations explained by the responsible trade and maintenance guidance.
- Who handles followup: installer, retailer and equipment service contacts, with each remaining task assigned.
Ask the team to demonstrate ordinary controls after the systems are cleared for use. Learn the thermostat, required alarm testing method and accessible water shutoff location. Avoid treating a demonstration as evidence that an unapproved system is ready.
Keep warranty and service documents as supplied. Ask the provider directly about its reporting process and deadlines. Don’t assume that taking keys starts the same warranty period for every component or contract.
Handle delays and new symptoms with a precise record
There isn’t one reliable national timeline for installing a manufactured home. A delivery date cannot predict the utility release, correction work or final approval. Ask for a schedule built around the remaining dependencies.
A useful update names the blocked task, what will unblock it and the person handling that next step. For example: “Electrical final awaits the contractor’s correction; the contractor requests another inspection after completion.” That’s more useful than another unexplained move in date.
After occupancy, report new leaks, opening problems or visible changes promptly through the provided service process. Keep the original walkthrough record for comparison. Ask the installer for any followup checks applicable to your home and site.
If you see standing water, damaged underside material or a changing seam, record the location from a safe place. Don’t crawl into an uncertain space or adjust structural components. Send the evidence to the appropriate contractor and request the next assessment.
Keep the installation folder after the punch list is closed. It gives later repair contractors the actual design and completion history. For the owner, that record is the lasting value of a carefully managed setup.
Found a detail that needs checking? Tell us about a correction.