

A bathroom faucet for mobile home sinks must match the sink holes, mounting surface, water connections, and drain arrangement. A familiar 4 inch shape only answers part of that question. Check underneath before you order, especially if the existing supply pipes connect directly to the faucet.
An ordinary residential lavatory faucet may fit your manufactured home. The useful distinction is the exact installation, rather than the housing label on the box. You need a faucet that mounts securely, connects through an approved supply arrangement, and leaves room for your hands and drain controls.
Choose a bathroom faucet for mobile home sinks by fit
Start by confirming that the listing describes a bathroom sink faucet, also called a lavatory faucet. Bathroom searches often return tub valves, shower controls, and kitchen faucets together. A shared mounting dimension does not make those fixtures interchangeable.
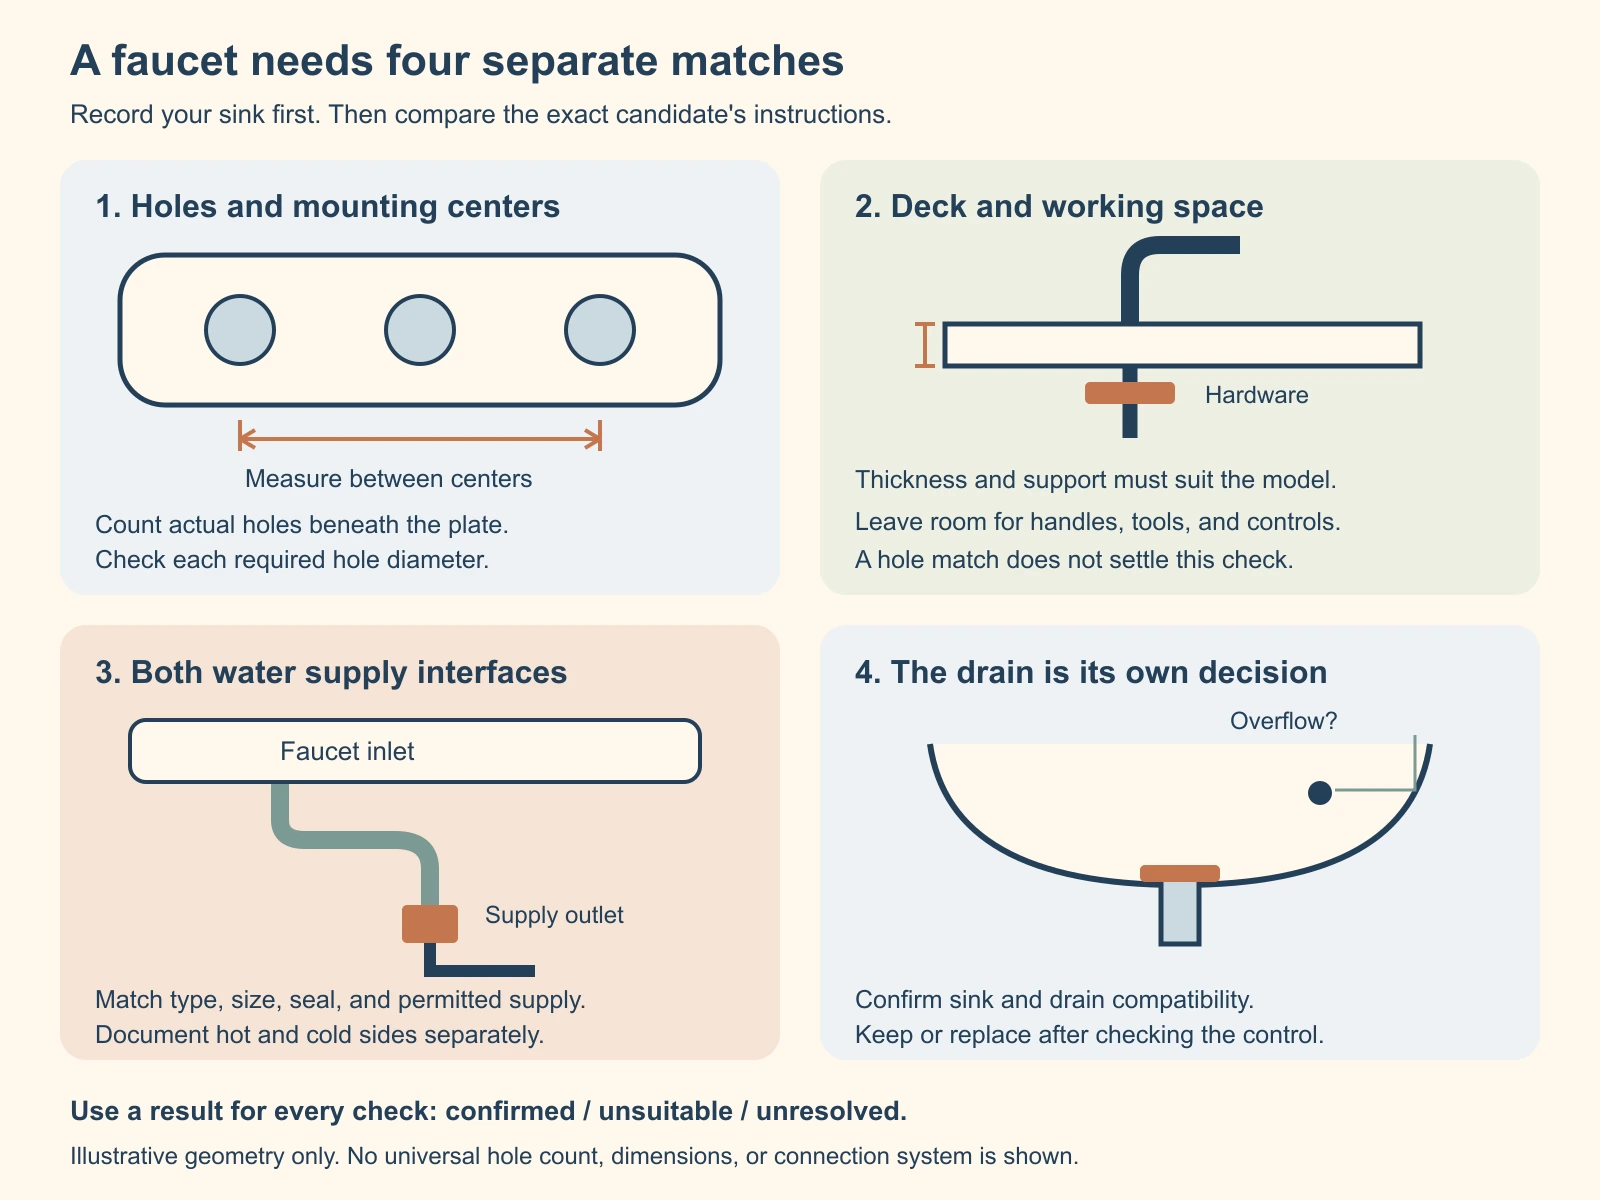
Use these four checks to narrow the choices before considering the finish:
- Mounting: Count the actual sink holes and measure their spacing, diameter, and surrounding flat surface.
- Connections: Identify both ends of the water supply arrangement. Check what the new faucet accepts, including restrictions on existing rigid risers.
- Working space: Compare spout position, handle movement, backsplash clearance, and access below the sink.
- Drain: Confirm whether you will keep the existing drain or need a compatible replacement. A drain included with a faucet still needs its own fit check.
Keep the checks separate on your notes. A faucet can pass the mounting check while failing the supply connection check. Likewise, a suitable faucet can come with a drain that doesn’t suit your sink.
Our mobile home plumbing and bathroom guide explains the wider system. This page focuses on choosing the sink fixture and identifying the work your choice creates.
Measure the holes, not the faucet’s outer width
The spread is the distance between mounting centers. On a common two handle centerset arrangement, measure from the hot side center to the cold side center. The outside edges of the handles or decorative base are different measurements.
For a 4 inch centerset faucet, those outer mounting centers are 4 inches apart. A base wider than 4 inches is therefore unsurprising. Don’t order a 6 inch faucet merely because the old body measures about 6 inches across.
Look from below using a light and a phone camera. A decorative cover plate, called an escutcheon, can hide unused holes. The visible number of handles doesn’t establish the hole count either.
| Observed layout | Possible selection route | What still needs checking |
|---|---|---|
| One faucet hole | A model designed for that hole arrangement | Hole diameter, mounting hardware, deck thickness, and any required separate control |
| Three holes with 4 inch outer centers | A compatible centerset model, or a suitable single hole model with an approved cover plate | Center hole access, plate coverage, hole sizes, and the exact manufacturer’s instructions |
| Two visible mounting holes | A fixture whose actual mounting drawing matches those holes | Whether a hidden center hole exists and whether the replacement needs it |
| Separate handles and spout with wider spacing | A widespread model within its stated adjustment range | Spacing range, connecting hoses, mounting hardware, and underside clearance |
Do not assume the third hole exists because a photograph suggests a standard sink. If the old faucet conceals it, record that detail as unknown. Confirm it before committing to a model that feeds everything through the center.
Measuring below can be awkward when nuts cover the hole edges. Record what you can actually see. Definitive measurements may require controlled removal later, after the water is isolated.
A similar looking faucet in another home doesn’t settle your measurements. Previous owners may have replaced the sink, countertop, fixture, or supply arrangement. The existing installation is your starting point.
Check hole diameter and deck thickness separately
Spacing tells you where the holes sit. Diameter tells you whether the faucet body, shanks, or hoses can pass through them. The manufacturer’s drawing should specify both.
For example, the current Delta Portwood 25770LF specification, Revision D shows three holes on 4 inch centers. Each hole is specified at 1 1/8 to 1 1/2 inches. Its standard maximum deck thickness is 1 3/16 inches.
These are limits for that model, not a mobile home sink standard. The sheet also identifies a particular thick deck extension kit. That does not establish that a generic shank extension will work.
The deck is the mounting surface that the faucet clamps against. Depending on the sink design, that surface may be the sink itself or the countertop. Photograph the underside so you can see what the mounting washer would actually contact.
Record any existing reinforcement, raised ribs, or obstruction near the holes. Don’t assume an underside lip is available for a large mounting bracket. A bracket needs the space shown in the instructions, even when the faucet fits through the top.
Thin decks can also need attention. Check for a stated minimum thickness or a specific support arrangement. Stacking improvised washers until the faucet feels tight is not a verified substitute.
If the sink deck is cracked or flexes around the old fixture, address that condition before buying a heavier replacement. Tightening harder doesn’t repair the support. Ask the sink manufacturer or installer what mounting reinforcement is permitted.
Read the water connection details before buying adapters
A faucet shank is the projecting part below the sink. It may serve as a water inlet and a mounting point. Other designs use attached supply hoses, with the final connection lower in the cabinet.
Photograph the hot and cold sides independently. Include the faucet connection, the full supply run, and any shutoff valve. One side may have been repaired differently from the other.
For each side, identify the following:
- The connection provided by the new faucet, using the exact specification wording.
- The existing supply outlet size and connection type, if identified.
- Whether the water reaches the faucet through flexible connectors or rigid tubing.
- The connector length and a route that avoids pulling it tight or forcing a sharp bend.
- Whether the faucet instructions permit the proposed connection arrangement.
Do not reduce this record to “1/2 inch adapter.” The nominal size alone leaves out the thread system, mating shape, and sealing method. A connector must suit both the faucet and the existing outlet.
Matching thread labels can still hide a restriction
The Moen Zyla 84141 specification, revised March 2024 provides a useful example. It lists 1/2 inch IPS connections for flexible hoses only. It specifically excludes rigid or semi rigid supply risers with coupling nuts, including the listed copper or PEX arrangements.
That restriction matters if your old pipes run directly to the fixture. A new faucet with a familiar thread description doesn’t automatically accept the old supply ends. Follow the instructions for the exact replacement, rather than assuming that matching labels authorize reuse.
This is an informational example, not a recommendation for every mobile home. The same sheet identifies its own hole pattern and deck limits. Those must pass separately from the supply check.
Identify unknown pipe before planning a transition
If the connection disappears into gray tubing or an unfamiliar plastic fitting, stop short of choosing an adapter from its color. Read accessible markings and document the whole assembly. Use the water line identification and repair guide for that separate decision.
A faucet purchase should not turn into an improvised transition between unidentified pipe systems. For confirmed polybutylene, our polybutylene fitting compatibility guide explains why a connector’s specific approval matters. Neither a similar diameter nor an adapter that starts threading proves the complete assembly is suitable.
Sealing instructions also belong to the connection, not the housing type. Some washer sealed connector instructions expressly prohibit thread sealant. Avoid putting tape on every threaded part by habit; obtain the correct connector instructions before assembling anything.
Make sure the spout works with the bowl
A faucet can fit every mounting hole and still be frustrating to use. The outlet may sit too close to the back wall of the bowl. A tall or long spout can also project beyond the useful washing area.
Compare the outlet position with the actual bowl, rather than choosing by total faucet height. Manufacturer drawings may show overall height, outlet height, and horizontal reach. Those measurements answer different questions.
Use a simple plan view on paper. Mark the mounting center, back inside edge of the bowl, drain position, and front inside edge. Transfer the candidate’s horizontal outlet position from its drawing.
This is a preliminary clearance check, not a splash test. Aerator angle, stream shape, bowl slope, and water delivery also affect the result. An outlet drawn above the bowl does not guarantee comfortable washing.
A calculated example of usable reach
Suppose the outlet projects 5 inches forward from its mounting center. Suppose that center sits 2 inches behind the bowl’s inside back edge. The outlet then projects 3 inches into the bowl: 5 minus 2 equals 3.
Those are hypothetical dimensions, not measurements from a particular sink. The calculation only locates the outlet horizontally. It does not prescribe a universal ideal distance or account for an angled stream.
When comparing faucets, use the same reference points every time. Measuring one candidate from its front base edge and another from its mounting center produces a misleading comparison. If the drawing leaves the reference unclear, ask the manufacturer.
Leave room for handles, a lift rod, and future service
Open the cabinet and imagine the new mounting hardware in place. Check the basin, cabinet back, shelf, and drain trap. You need a workable route for installation and later service.
Above the sink, consider the whole handle movement. A lever that looks clear while closed may hit a wall or backsplash when opened. Check a medicine cabinet door or low shelf that moves above the fixture too.
A lift rod drain has a control behind the spout. It needs space to move, and its linkage needs space below. A push button drain uses a different control arrangement, but still needs to match the sink.
The Portwood drawing cited earlier recommends 2 1/2 inches of backsplash clearance. Use the dimension arrows on that drawing to locate the measurement. Do not convert that recommendation into a rule for every faucet.
Ask how the aerator comes out and whether a special key is supplied. Check how the cartridge or stems are identified. Saving a model number now is more useful than trying to identify an unmarked fixture years later.
Treat the included drain as a separate component
Before ordering a bathroom faucet for mobile home use, decide whether the existing drain will stay. Replacing the faucet does not automatically require replacing a sound, compatible drain. If you keep it, check that the new fixture does not obstruct its control.
If you plan to use an included drain, identify the sink’s overflow arrangement. An overflow is an additional opening and passage that routes water toward the drain. The drain assembly must suit that design.
A matching finish doesn’t establish compatibility. Check the drain opening, sealing surfaces, permitted sink thickness, tailpiece, and room for any linkage. Ask the sink maker when the required drain specification isn’t clear.
Moen’s overflow drain guidance warns that an incompatible drain can leak below the sink. It does not recommend modifying its overflow drain for a sink without an overflow. Choose the correct assembly instead of plugging openings to force a fit.
A replacement drain may also put the tailpiece somewhere the existing trap cannot meet properly. Include that in the installation assessment. Do not let a bundled drain turn a straightforward faucet choice into a forced drain connection.
Use a fit worksheet before placing the order
Keep observations about your sink separate from the candidate’s specifications. This prevents a seller’s dimension from quietly becoming a measurement of your home. Write “unknown” where access or documentation is incomplete.
| Check | Existing sink or supply | Candidate specification |
|---|---|---|
| Purpose and identity | Bathroom sink; current model if known | Exact lavatory model and finish suffix |
| Mounting pattern | Hole count; outer center spacing; each hole diameter | Required count, spacing range, and hole limits |
| Mounting surface | Thickness; flat area; underside obstructions; condition | Permitted thickness and hardware footprint |
| Outlet location | Mounting center relative to bowl edges | Reach reference, outlet height, and stream angle if shown |
| Movement and access | Backsplash, cabinet, handle, and tool clearance | Movement envelope and service instructions |
| Hot supply | Outlet type, connection identity, route, and condition | Inlet type and permitted connector arrangement |
| Cold supply | Record separately; do not assume it matches the hot side | Inlet type and permitted connector arrangement |
| Drain decision | Keep or replace; overflow; opening and control arrangement | Included or separate; compatible sink and thickness limits |
Give each row a result: confirmed, unsuitable, or unresolved. Buy only after the consequential unresolved details have an answer. A product photo is a useful identification aid, but it cannot replace missing dimensions or connection instructions.
What to send a supplier or plumber
Send one clear view from above and one from beneath the faucet. Add separate connection photos and your completed measurements. Include the full candidate model number and a link to its current technical sheet.
Ask a specific question: “Does this mounting bracket clear the molded rib shown here?” Or ask which approved supply connector arrangement matches the documented existing outlet. Those questions are more useful than asking whether a faucet fits mobile homes generally.
Compare quality after the fit checks pass
Material labels describe different parts of a faucet. A metal finish does not mean the body or waterway is metal. Compare the stated body, waterway, valve, mounting hardware, and available service parts separately.
Look for a readable parts diagram and a clear warranty. Check the limits that apply to your installation and purchaser status. A lifetime label alone doesn’t tell you what labor, finish damage, or replacement parts are covered.
Compare the exact flow rating as well. WaterSense labeled bathroom sink faucets meet efficiency and performance criteria; some models have lower rated flow than others. The label does not settle mounting or supply compatibility.
If your reason for shopping is weak flow, determine whether the problem belongs to this fixture first. Compare hot and cold delivery and other fixtures. The pressure observation guide explains why replacing a faucet cannot correct every upstream supply problem.
For an otherwise sound fixture, an identified replacement cartridge or stem may be worth comparing with full replacement. Use the exact brand and model documentation. Similar handle appearance does not identify the working parts underneath.
Know what the purchase will require
A suitable bathroom faucet for mobile home installation should leave you with a documented connection plan. Include required connectors, mounting hardware, and the drain decision in the overall comparison. The lowest fixture price may exclude parts another package contains.
Before removal, establish how both supplies will be isolated. If there are no usable local stops, plan that work first. Our water shutoff identification guide explains the supply boundaries to confirm.
Arrange professional help for unidentified connections, a damaged mounting deck, or supply piping that moves when handled. Those conditions affect the job, even if the new faucet fits the holes. Keep the existing fixture operational until the replacement and connection plan are ready when practical.
Save the receipt, model label, specification sheet, and installation instructions together. Your final selection record should explain why the faucet fits this sink and this supply arrangement. That record will also make future repairs easier to identify.
Found a detail that needs checking? Tell us about a correction.