

Knowing how to replace a mobile home window starts before you loosen its screws. Confirm the replacement, mounting method and weather protection first. Then remove the old unit, inspect the exposed opening, install to the applicable instructions and test everything before covering the work.
The awkward part often hides behind the trim. A replacement can fit the hole yet have the wrong flange for the siding. A good installation plan accounts for both.
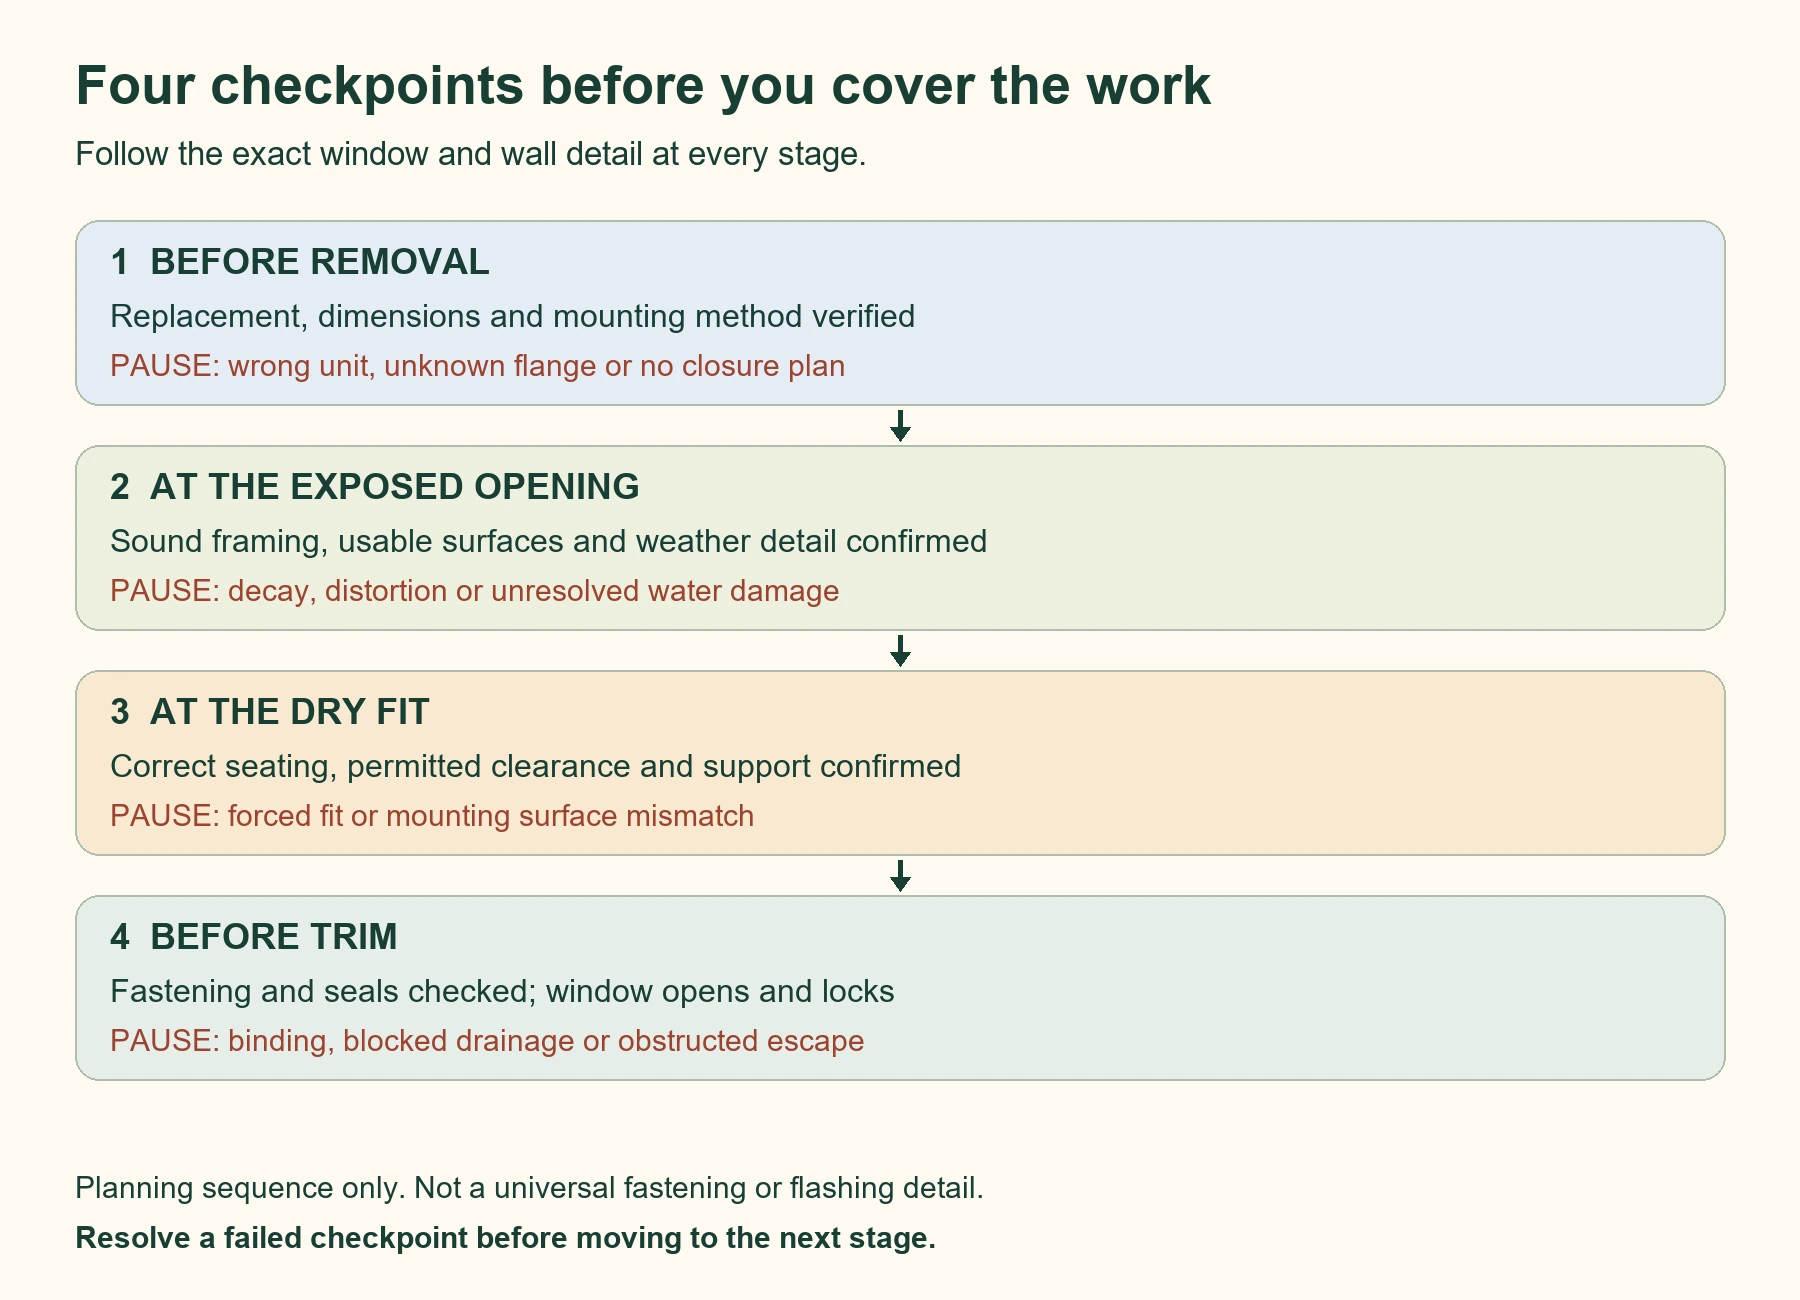
Keep the old window in place until these checks are complete
Have the actual replacement on site before removing the old window. Check its label, dimensions, operating direction, glass and mounting flange. Shipping damage or a mistaken order is easier to resolve while the house still has a window.
For a complete unit replacement, distinguish the wall opening from the existing window frame. An insert installation retains a suitable existing frame. Those are different jobs with different receiving openings.
Use the window measurement guide to record the correct boundaries. Do not subtract a standard fraction from the visible glass or assume a catalog label describes the actual frame.
Next, obtain the instructions for the exact replacement series and installation method. A document for an RV window is not a manufactured housing installation detail. A familiar brand name on an old frame does not establish which current instructions apply.
The current Lippert manufactured housing support index separates older obsolete Kinro instructions from its current vinyl documents. Identify the replacement itself before choosing a manual. Ask the supplier to confirm the applicable document when the model is unclear.
| Check | What you need to know | Reason to pause |
|---|---|---|
| Replacement identity | Actual series, frame dimensions, flange type and instructions | Only a nominal size or generic sales description is available |
| Wall interface | Where the flange mounts and which siding or trim must move | The new flange would bridge an unsuitable or uneven surface |
| Weather protection | How the opening connects to the wall’s water control layers | The plan consists only of caulking visible trim afterward |
| Anchorage | Required framing, fasteners and attachment pattern | Existing screw holes are being treated as the specification |
| Room function | Bedroom escape function, operating clearance and required glazing | A smaller opening or changed window style has not been checked |
| Work conditions | Safe access, handling help, suitable weather and a closure plan | You cannot secure and protect an unfinished opening |
Metal siding needs a specific mounting decision
Exposed screws can make an older window look simple to replace. That does not mean a new vinyl fin belongs over the same metal profile. The mounting surface and flange material matter together.
For the vinyl systems covered by Lippert’s current instructions, installing vinyl nailing fins over horizontal or vertical metal siding is prohibited. The documents identify aluminum mounting flanges for that condition. This is a specific system restriction, not a claim that every metal sided home needs the same window.
If the replacement and wall detail disagree, resolve that before removal. Do not flatten corrugated metal with screws or improvise a thick caulk bridge. A supplier or qualified installer should identify a compatible interface.
Check bedroom escape function before changing the opening
A window that matches the old exterior dimensions can still provide a different clear opening. Thicker frames and a different operating style can change usable escape space. Check the actual open position, not the glass area.
The federal manufactured home construction standards require a qualifying outside window or approved exit device in sleeping rooms without an exit door. Section 3280.106 also addresses opening height and operating device reach. Confirm the requirements for your existing home’s alteration with the responsible local authority.
Under 24 CFR 3280.404, qualifying systems need at least 20 inches clear horizontally, 24 inches vertically and 5 square feet of clear area. All three conditions apply. A nominal window label proves none of them.
Do not solve a fit problem by shrinking a bedroom opening or adding a fixed pane without that review. Opening enlargement, header changes and damaged framing also need an appropriate structural assessment. This workflow does not provide a framing alteration design.
How to replace a mobile home window in stages
Work through one opening at a time when you can. Treat removal, exposed wall inspection and installation as separate decisions. Finding damage changes the job before the new window goes in.
The sequence below explains those decisions. It does not replace the selected window’s fastening, sealing or flashing detail. Keep that document at the opening during the work.
1. Prepare the work area and installation materials
Clear furniture and curtains away from the opening. Protect the interior finishes and keep children and pets out of the work area. Arrange stable access on both sides without reaching sideways from a ladder while holding glass.
Basic measuring and inspection tools include a tape, level, square, straightedge and camera. Removal commonly needs the correct driver bit and controlled cutting or scraping tools. Glass handling calls for eye protection, suitable gloves and enough help for the unit’s size and weight.
The installation materials come from the approved detail. That may include specified fasteners, compatible sealant, flashing materials, support pieces and interior air sealing materials. A generic shopping list cannot establish their compatibility.
Check product storage, surface preparation, application temperature and cure conditions before opening the wall. Dry weather alone does not make a wet substrate ready for adhesive flashing. Keep a plan for securing and weather protecting the opening if hidden damage delays installation.
Before scraping painted surfaces in a home built before 1978, address possible lead paint. The EPA’s renovation guidance explains why disturbance creates a dust exposure problem. Resolve the hazard before demolition rather than adding a dust mask afterward.
Unknown older siding or wall material also deserves assessment before cutting. Appearance alone cannot establish whether it contains asbestos. Leave suspect material undisturbed and arrange qualified evaluation.
2. Expose the attachment without sacrificing the wall detail
Photograph the window from inside and outside. Record how the siding, exterior trim and window flange overlap. Take close views of the head, lower corners and any visible drainage openings.
Remove only the trim or siding needed to reach the attachment and restore the required weather detail. Label pieces you intend to reuse. Brittle siding, trapped trim or inaccessible fasteners can turn a small replacement into a larger exterior repair.
If siding covers the flange, access it using the applicable siding method. Do not cut a random border around the window just to expose screws. The remaining siding still needs a supported termination, movement clearance and a workable water management connection.
Stop if you cannot identify what you are cutting or what lies behind it. Blindly driving a blade through the wall can damage concealed materials. A wider opening in the siding is not automatically a better installation.
3. Support and release the old unit
Support the window before releasing its final attachments. Remove the identified fasteners while the unit remains controlled. Break the old perimeter seal carefully without using the glass as a lever.
Resistance after screw removal does not prove that more force is needed. Look for concealed fasteners, retained trim or an uncut seal. Avoid pulling on one corner until the frame bends and glass becomes unpredictable.
A cracked pane or large assembly needs a specific handling plan. Arrange appropriate professional removal when you cannot support it safely. Do not turn a routine replacement into an improvised glass demolition job.
Move the released unit to a protected location. Keep its identification labels and a record of the original opening. Do not reuse old screws merely because they came out intact.
4. Inspect the exposed opening before committing to installation
Remove old sealing material using methods suitable for the substrate and any identified hazards. The receiving surfaces need to be clean enough for the specified products. Keep sound wall layers intact rather than scraping everything down indiscriminately.
Check the sill, jambs and head for deterioration, movement, loose layers and failed attachment areas. Look at the lower corners and the path above the opening. Water damage can extend beyond the visible stain on the interior trim.
Do not cover soft framing with a new flange. A longer screw is not a repair specification for a deteriorated wall. Have the damaged assembly and water entry source assessed before the replacement conceals them.
Measure the exposed opening again. Check width, height, diagonals, sill level and the flatness of the mounting plane. Record the condition before anyone proposes shims, filler strips or a different unit.
Do not use the window frame to straighten a distorted wall. It should not carry structural loading from the opening. Resolve significant movement or framing problems independently of the window installation.
| Observation | Next action |
|---|---|
| Sound opening matches the approved unit and detail | Continue with opening preparation and dry fitting |
| Soft sill, loose framing or failed attachment surface | Pause for a proper repair assessment before fastening |
| Opening dimensions differ from the order record | Reconcile actual dimensions and required clearance with the supplier |
| Missing or damaged water control connection | Resolve a compatible restoration detail before concealing it |
| Large diagonal difference or visible wall distortion | Investigate the opening rather than forcing the frame square |
| Newly exposed suspect hazardous material | Stop disturbance and arrange assessment |
5. Prepare the water control detail and dry fit
The opening must manage rain as part of the wall assembly. Identify where water arriving above the window will go. Confirm how the specified flashing and seals connect to existing layers and where drainage must remain open.
There is no universal instruction to caulk every seam or leave every sill flange unsealed. Different systems use different details. Follow the window and flashing instructions together, and resolve any conflict before proceeding.
Dry fit the unit as the manufacturer permits. Check that the frame seats on the correct plane without being forced. Make sure the flange has the required contact and the interior projection will allow suitable trim.
Use the clearance specified for that series. Current Lippert vinyl instructions call for at least 1/8 inch at each side, head and sill. They account for paneling, shims and liners within that space; other products can have different requirements.
That example is not a universal order deduction. Do not mistake a total width allowance for an allowance at each edge. A fit that works only when the screws pull the frame sideways has failed the dry fit.
Confirm permitted support and shim locations. Follow any special requirements for wide units or projecting sills. A flange and a frame support serve different purposes, so do not assume one replaces the other.
6. Seal, position and fasten using the actual instructions
Apply the specified bedding material to the specified location. Use a product compatible with the frame, wall surface and flashing. Extra sealant does not compensate for dirt, voids or the wrong mounting plane.
For the relevant vinyl systems, Lippert’s HUD vinyl installation instructions provide the handling, flange sealing and fastening sequence. They also warn against solvents that attack vinyl and against foam tape for this installation. Those details apply to the named systems, not every replacement window.
Set the unit with appropriate help and support. Keep operating sashes and shipping clips in the condition its instructions require during installation. Do not lift a large window by its top frame alone.
Use the specified fastener type, penetration, spacing and pattern for the framing and site conditions. Old screw length is not enough to establish new anchorage. Neither trim nor siding alone substitutes for the required attachment substrate.
Drive attachments without deforming the flange or bowing the frame. Recheck position and operation at the stages permitted by the instructions. If the frame changes shape as screws tighten, resolve the cause rather than finishing the perimeter first.
7. Test the window before insulation and trim conceal the work
Remove shipping clips when directed, then operate each moving part. Open, close, latch and unlock the window from inside. Check the sash for rubbing, uneven gaps or movement that differs across its travel.
Confirm that the frame remains level, plumb and square as required. A latch that closes only when you lift or push the sash sideways is a failed check. Do not modify the latch to hide installation distortion.
For an escape window, test the intended exit operation and access to release devices. Interior returns, blinds, screens and exterior accessories must not obstruct it. Keep permanent operating and certification labels where the manufacturer requires them.
If operation fails, correct the installation before closing the wall. Some problems require removal and proper reinstallation. Lubricant and heavier latch force do not correct an opening that is squeezing the frame.
8. Complete air sealing, exterior closure and interior trim
Finish the specified interior air seal without interfering with drainage or movement. Where the window instructions allow foam, use the appropriate window and door formulation. Follow its label for filling, ventilation, protective equipment and curing.
Window and door foam is designed for the frame to opening gap. It is not structural anchorage or a substitute for the exterior flashing detail. Do not substitute general expanding gap filler or pack the space simply because it is visible.
Complete the exterior flashing, approved perimeter joints and siding restoration. Preserve the window’s weep openings and the wall assembly’s intended water exits. Do not spread sealant into tracks or moving joints.
Restore the siding with its specified movement allowances. Fit interior trim without pushing the frame inward or restricting the sash. Test operation again after each closure stage that could affect the unit.
Keep the opening accessible for any required inspection before concealment. Save progress photographs of the weather detail and attachments. Finish only after the installation checks and required approvals are complete.
What to check after the replacement
Record the model, serial or certification identifiers, installation date and instructions used. Save photographs before and after trim installation. Those records are more useful for a later service question than a photograph of the finished glass alone.
Recheck the window after the first rain that reaches that wall. Look for new dampness at the sill, lower corners and adjacent interior surfaces. Do not assume dry trim proves that every concealed layer stayed dry.
If water appears, record when and where it first shows. Avoid sealing drainage openings as a response. An installer can investigate the detail while your progress photographs still show what was covered.
Do not pressure wash the new window to imitate a professional water test. Follow any specified commissioning test and product cleaning instructions. A forceful hose test can create an exposure that does not identify the original problem.
DIY scope, installation quotes and common shortcuts
Before choosing how to replace a mobile home window, identify who will handle any work beyond a direct unit swap. That includes opening repairs and restoration of disturbed siding. Put those responsibilities in the plan before removal.
A straightforward replacement has a verified matching unit, a sound opening and an accessible installation detail. Large glass, high access, hazardous materials, damaged framing and changed openings need different skills or equipment. Decide that from the actual opening rather than a promised number of hours.
For an installation quote, ask what happens if hidden damage appears. Separate unit supply, siding access, opening repair, weather detailing, interior trim, disposal and inspection. Two prices are not comparable when one leaves those tasks unspecified.
Ask who verifies the final dimensions and who handles a unit that fails to fit. Request the proposed mounting method and the instructions it follows. For bedroom windows, ask how escape function will be preserved and checked.
A missing sash latch, broken glass or draft does not automatically require a whole unit replacement. The window repair and replacement overview helps separate those decisions. This workflow begins once complete replacement is the appropriate route.
Likewise, a residential product is not suitable merely because its dimensions seem close. Use the parts compatibility checks to organize the product and wall questions. The doors and windows planning guide keeps related opening projects in view.
If you’re still deciding how to replace a mobile home window, identify your next unresolved checkpoint. It may be the order, flange, concealed wall condition or installation detail. Settle that question before taking apart the next layer.
Found a detail that needs checking? Tell us about a correction.