
A mobile home shower kit needs to fit your bathroom, connect to its plumbing, and form a complete watertight assembly. The word “kit” doesn’t tell you which parts are included. Start with the base, matching walls, drain arrangement, and entry space before comparing finishes.
A familiar size on the box is only a starting point. Two showers with similar advertised dimensions can need different wall preparation, drain locations, and door openings. Buying the right combination matters more than finding a package labeled for mobile homes.
What does a mobile home shower kit include?
Make an itemized list for the exact package you’re considering. A wall surround can be sold as a kit without a shower base. A base and wall bundle can still leave the valve, showerhead, drain fitting, or enclosure to you.
| Package description | What to confirm | Question that prevents a second order |
|---|---|---|
| Shower wall kit | Back panel, side panels, corners, trim, and specified fastening parts | Which base and wall surface can these panels meet? |
| Base and wall bundle | Exact base and wall model numbers, drain fitting, and connection instructions | Is the pictured drain included or merely shown? |
| Shower enclosure package | Base, walls, glass or door hardware, and any separate plumbing items | Does the selected package include the enclosure shown in the photograph? |
| Shower fixture kit | Visible trim, valve body, showerhead, arm, and any required concealed parts | Is this plumbing equipment rather than the shower stall itself? |
Package options can change the answer even on one product page. For example, American Bath Factory separates a basic package from versions with hinged or sliding glass. Its listed basic contents include the pan, panels, accessories, and drain kit; the enclosure versions add different glass and hardware.
That example explains packaging, not suitability for your home. Ask for a written parts list tied to the selected option. Save the model numbers and manuals with the order confirmation.
If you’re planning several bathroom changes, use the mobile home plumbing and bathroom guide to separate the projects. Replacing a shower stall doesn’t automatically solve an old water line problem or a damaged floor.
Choose the replacement approach before choosing the finish
Keep a sound base and replace the walls
This can make sense when the base remains usable and a documented wall system can meet it correctly. Identify the base and inspect its rim, drain area, and condition first. Don’t assume new panels can bridge a damaged flange or conceal an unresolved leak.
The flange is the raised edge where the wall system meets the base. A compatible wall detail directs water back into the shower. Its shape, overlap, and installation sequence matter as much as the panel’s width.
Ask the wall manufacturer whether the proposed base is suitable. Send photographs and model information when available. An answer based only on the outside dimensions leaves the joint unresolved.
Replace the base and walls together
A documented matching system reduces uncertainty at the wall and base connection. It still needs the right alcove, floor support, drain arrangement, and plumbing. Confirm that the seller has bundled the actual matching models.
This approach is worth considering when the existing base is cracked, its identity is unknown, or its connection detail can’t be verified. Have the cause of any movement or damage assessed before choosing the replacement. A new shell isn’t a repair for the structure beneath it.
Convert a bathtub space to a shower
Treat this as a conversion when comparing quotes and parts. The tub’s drain position, surrounding finishes, valve arrangement, and exposed wall area may change. A pan that occupies a similar rectangle doesn’t prove those other details will carry over.
Ask the installer to identify what can stay and what must change. Include the drain and vent assessment, wall transition, floor condition, and entry clearance in that discussion. Don’t accept “same size as the tub” as the whole compatibility check.
Measure three spaces, not just the shower floor
Keep separate sketches for the installation space, finished shower, and delivery route. Label where every measurement begins and ends. Those sketches answer different questions and shouldn’t share one unexplained size.
The installation space
The rough opening is the unfinished space prepared for the unit. Depending on the system, its reference points may be framing faces or a specified backing surface. Compare your observations with the exact manufacturer’s drawing.
Record width at several heights and depth at both ends. Note ceiling height, soffits, windows, and nearby trim. Ask the installer to check whether the walls are straight, vertical, and square enough for the candidate system.
Don’t subtract guessed wall thicknesses from a finished measurement and call the result confirmed. Hidden layers remain unknown until identified. Mark that item “needs inspection” rather than ordering against an estimate.
The finished shower and entry
Record the standing area, threshold height, and clear entry you need. The outside footprint includes material that isn’t usable standing space. Shelves, seats, wall contours, and a door can further affect how the shower feels.
Mark a proposed larger footprint on the bathroom floor with removable tape. Check the toilet, vanity, room door, and normal walking route against it. Have required fixture clearances checked for your project rather than relying on how the tape looks.
A low threshold can help some users, but it doesn’t establish an accessible shower by itself. Consider the person’s transfer needs, clear entry, controls, seating, and support locations together. Have an appropriate installer or accessibility specialist assess those needs before ordering.
The route into the bathroom
Measure exterior and interior door openings, hall turns, stair approaches, and the space needed to turn each piece. Ask the supplier for the largest individual component dimensions and handling requirements. Carton size and unboxed component size are different facts.
A sectional unit gives you separate pieces to consider along that route. It still needs enough room for handling and assembly. Don’t assume a large back panel can bend or that a molded unit can be cut apart and rejoined.
Our replacement part compatibility guide explains why the housing label alone doesn’t settle fit. Apply the same approach here: compare drawings and actual conditions.
Build a compatibility map for the whole assembly
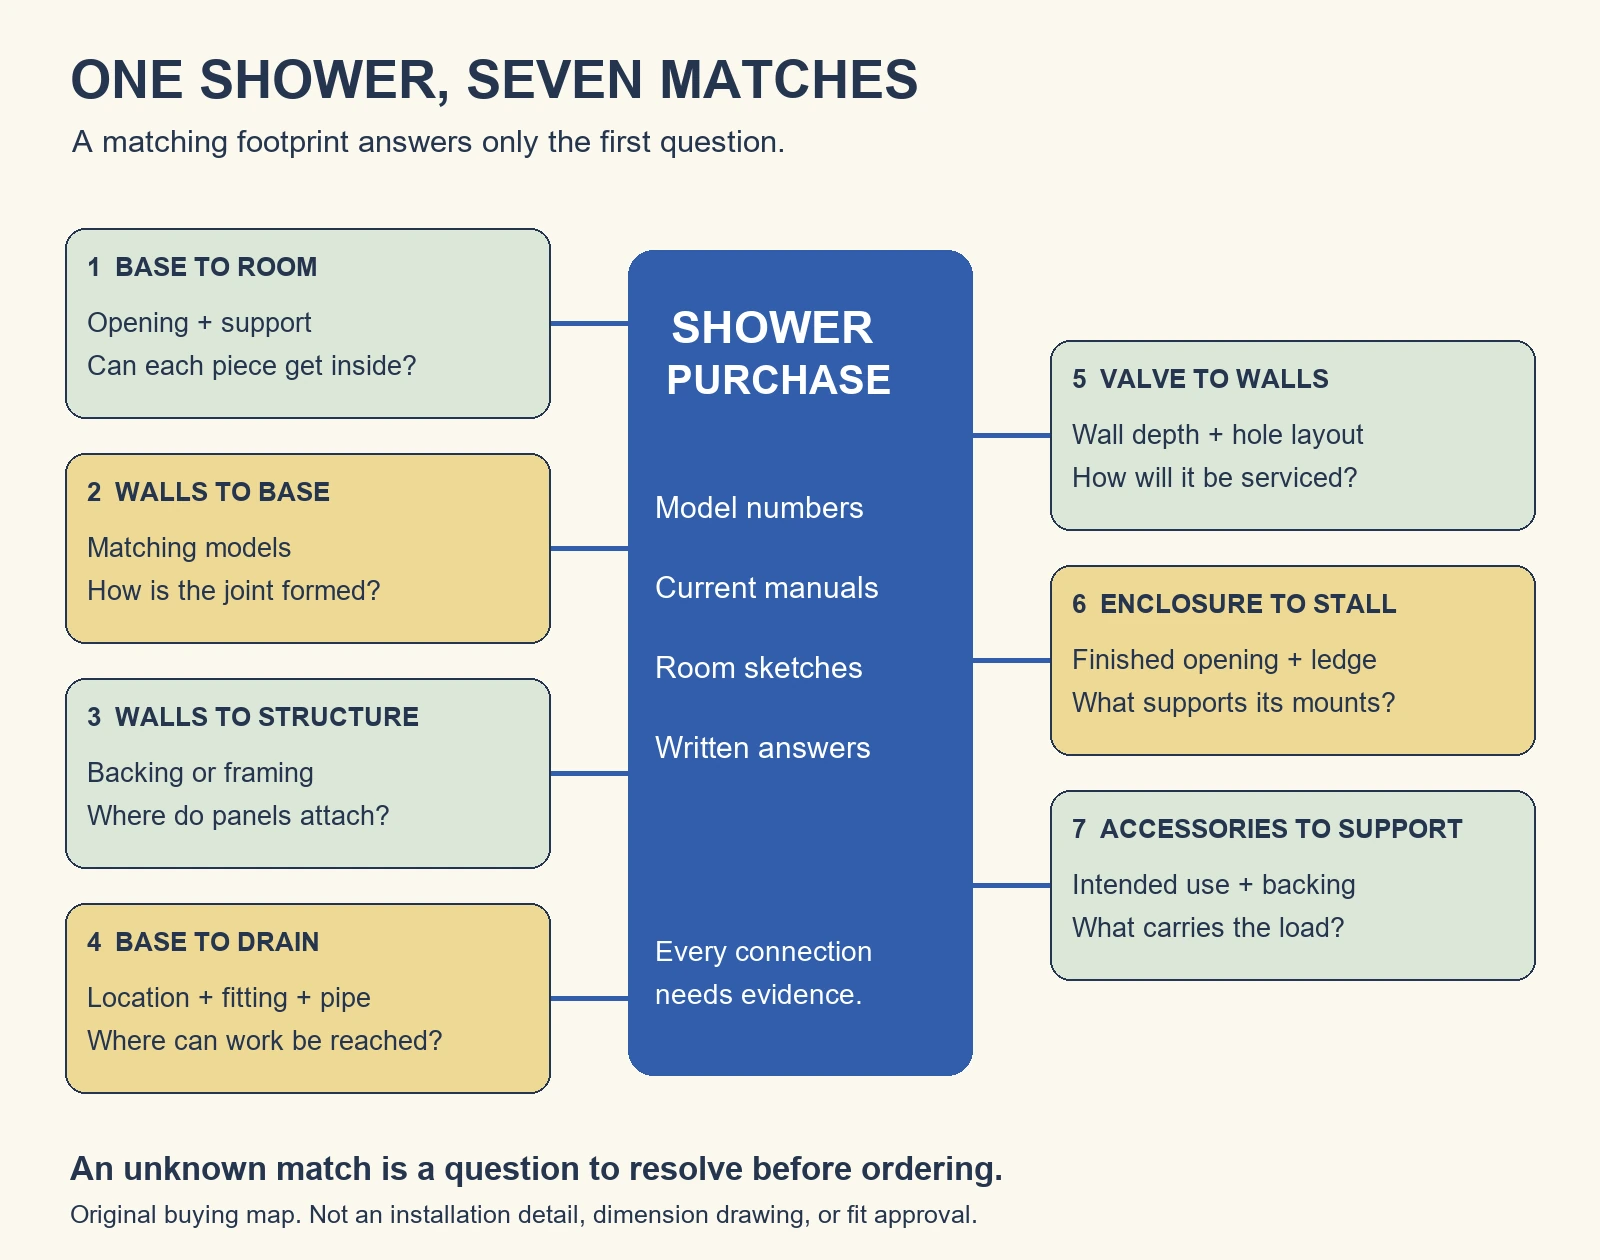
Use the worksheet below with each candidate mobile home shower kit. Give every row a confirmed answer, an excluded item, or a question assigned to someone. A blank row means you haven’t finished the comparison.
| Connection to check | Evidence to collect | Reason to pause the purchase |
|---|---|---|
| Base to room | Exact model drawing, opening measurements, support requirements, and delivery route | Only the advertised size matches |
| Walls to base | Approved model combination and the actual flange or joint detail | The seller suggests filling an unexplained mismatch with caulk |
| Walls to structure | Required backing or framing, fastening locations, and surface preparation | A panel system meant for a solid wall is being treated as a framing system |
| Base to drain | Drain center coordinates, fitting type, pipe identity, and connection access | The opening lines up but the fitting or working space is unknown |
| Valve to walls | Valve model, finished wall depth range, hole layout, and service plan | New trim is assumed to fit an unidentified old valve |
| Enclosure to stall | Finished opening range, mounting surface, threshold, and backing requirements | A door is chosen from the base’s nominal width alone |
| Accessories to support | Seat or grab bar instructions and specified backing | A decorative panel or towel bar is expected to support a person |
Keep the documents together rather than relying on several open shopping tabs. Highlight the matching model numbers and relevant drawing labels. Ask the supplier to resolve conflicting information before the order becomes difficult to return.
Wall attachment and trim limits can change the purchase
Two wall systems can look similar from inside the shower yet attach differently. Some bond to a prepared solid surface. Others fasten to framing and require a specific stud layout.
For a documented contrast, the Mustee 237, 247, and 260 wall instructions specify solid supporting walls. They prohibit installation over open studs or existing tile. The same manual permits certain flat panel trimming but prohibits trimming the formed corners.
Its 760T wall system instructions show mounting flanges attached to studs and list particular matching bases. Compare that with the solid wall installation instructions before purchase. These examples aren’t recommendations that either system fits your bathroom.
For any candidate, find four answers: required backing, allowed trimming, joint treatment, and curing or waiting periods. A product described as customizable may allow only particular cuts. Cutting a molded corner or flange can destroy the detail you needed to keep.
Don’t choose adhesive from a generic construction adhesive label alone. Confirm it works with the panel material, backing surface, and manufacturer instructions. Keep adhesive selection separate from the sealant specified at exposed joints.
If the old wall is soft, swollen, loose, or wet, stop treating it as a usable attachment surface. Have the moisture source and damaged materials assessed. Covering them with a clean panel leaves the underlying problem unresolved.
Check the drain location and connection separately
Draw the drain center from two fixed reference lines shown on the candidate base drawing. Record its distance from the back and side references. “Left drain” or “center drain” isn’t enough to locate it precisely.
A hypothetical comparison makes the problem clearer. Suppose two pans share an advertised width, but their drawings locate the drain differently. You need a plumbing assessment even though both pans appear to occupy the same floor space.
Next identify the required drain fitting and existing pipe. Confirm how the fitting seals to the base, how it connects to the pipe, and where assembly happens. A drain cover tells you little about the connection beneath it.
Ask whether the work needs access from below or behind the shower. Identify the trap, venting arrangement, pipe route, and obstructions before promising a simple swap. Have a plumber assess any required relocation; don’t cut framing to make a drawing fit.
Sealant compatibility belongs on the parts list too. Oatey’s current guidance excludes its plumber’s putty from ABS and ABS containing shower bases, including some acrylic blends. Its material compatibility guidance explains why “acrylic” alone doesn’t settle the choice.
Use the fitting and base instructions together. If they conflict, ask the manufacturers for a compatible detail before proceeding. This buying check doesn’t replace the exact drain installation instructions.
Plan the valve before closing the walls
The showerhead, handles, and decorative trim aren’t necessarily a complete valve. Identify the concealed or mounted valve body and its connection arrangement. Ask what the package supplies and what must be retained or purchased separately.
Have the installer compare valve depth with the proposed finished wall buildup. Confirm that controls clear shelves and remain usable at the intended location. Plan future service access before selecting an attractive panel that conceals the connection.
The federal manufactured housing construction standard includes specific shower mixing valve requirements. It calls for compliant balanced pressure, thermostatic, or combination valves with adjustable handle stops. The current plumbing fixture provisions also address watertight joints and listed prefabricated fixtures.
Those provisions don’t establish a universal retrofit approval for every older home. Ask the installer and responsible local or state authority which requirements apply to your alteration. A seller’s “mobile home compatible” description doesn’t answer that question.
Resolve water isolation before removal begins. The water shutoff identification guide helps you find the relevant control. If the work uncovers unfamiliar supply pipe, use the water line identification and repair guide to keep that separate problem in view.
Choose the enclosure and supports before finishing the stall
A shower door needs the finished opening dimensions, suitable mounting surfaces, and the threshold geometry its instructions specify. The base’s advertised width isn’t the door opening. Wall panels and their contours occupy some of that width.
Measure at the locations the door maker requires after the wall finishes are complete. Record width variation and whether the walls are vertical. Delta’s door measurement guide specifically distinguishes the finished opening from unfinished construction.
Choose the intended door or curtain arrangement early enough to plan its attachment. Check how an opening door interacts with the toilet, vanity, and bathroom door. For a sliding design, check the usable entry opening rather than its total frame width.
Grab bars and seats need their own documented support plan. Don’t assume the shower wall panel is structural backing. Specify their locations and mounting requirements while the framing remains available to inspect.
For mobility needs, compare the actual sequence of entering, turning, reaching controls, and sitting. A molded shelf isn’t automatically a seat. Ask for the accessory’s documented intended use and capacity rather than judging its shape.
Compare the complete project, not the box price
Ask each seller or installer to quote the same scope. A lower package price may exclude the drain, enclosure, valve, backing, delivery, or removal. An inclusive quote may still leave concealed damage as an allowance.
- Visible components: base, walls, trim, enclosure, showerhead, and accessories.
- Installation materials: specified backing, fasteners, support materials, compatible adhesive, and sealant.
- Plumbing work: drain connection, any relocation, valve arrangement, supply connections, and testing.
- Preparation and finish: demolition, damaged material repairs, adjacent wall finish, floor transitions, and disposal.
- Delivery and disruption: freight handling, inspection, storage, replacement parts, and bathroom downtime.
Keep uncertain work visible in the quote. Ask what happens if the floor or drain differs from the initial inspection. A written allowance or decision point is more useful than an unsupported promise of a fixed installation time.
Check delivery inspection and return terms before ordering bulky parts. Inspect the actual pieces for damage and confirm all cartons arrived before demolition. Keep packaging until you’ve followed the supplier’s inspection process.
Use a purchase release checklist
You’re ready to order a mobile home shower kit when the combination is documented and the remaining work is assigned. Use this final check with the person installing it. Don’t replace an unknown answer with a guess because the finish is on sale.
- Exact base, wall, enclosure, and plumbing model numbers are recorded.
- The package contents and separately purchased items are confirmed in writing.
- Opening measurements match the correct drawing reference surfaces.
- The largest components can reach the bathroom without unauthorized modification.
- The wall and base joint, attachment method, and floor support are resolved.
- Drain position, fitting compatibility, pipe connection, and working access are checked.
- Valve compatibility, applicable requirements, and future service are addressed.
- Entry clearance, enclosure attachment, and accessory support meet the intended use.
- The quote identifies preparation, concealed conditions, testing, and bathroom downtime.
If one item remains uncertain, ask a focused question with the relevant sketch and model number. For example: “Which wall system is documented to meet this base flange?” That gets a more useful answer than asking whether a shower generally fits mobile homes.
Found a detail that needs checking? Tell us about a correction.