

A mobile home exterior works best when its parts are treated as one weather protection system. The roof sheds rain, wall layers manage what reaches the siding, and the lower edge must release water. A new finish won’t solve a hidden leak, damaged framing, or an addition that loads the home incorrectly.
Start by identifying the existing materials and tracing where water goes. Then separate repairs that restore protection from changes made for appearance. That order helps you spend on the cause before covering it with something attractive.
Map your mobile home exterior before choosing an upgrade
Walk around the home with a phone and a simple sketch. Label each side by a permanent landmark, such as the driveway or rear fence. Photograph the whole elevation first, then the detail that needs attention.
The useful question is what each component does, not just what it’s called. Siding, wall sheathing, flashing, trim and skirting can sit close together while serving different purposes. Replacing one doesn’t automatically repair another.
| Exterior area | Main job | What to record |
|---|---|---|
| Roof covering and edges | Manage rain and weather exposure above the home | Known material, visible damage, roof intersections and previous repairs |
| Siding and trim | Provide the exposed wall finish and protect underlying layers | Panel type, loose areas, swollen edges and damaged transitions |
| Water control behind siding | Drain water that passes the cladding | Known barrier and flashing details, or mark them unknown |
| Doors, windows and penetrations | Maintain protection where the wall is interrupted | Head, sides, sill, mounting details and nearby stains |
| Skirting and lower wall edge | Enclose the underside while preserving required ventilation and access | Water traps, blocked openings, damaged panels and access doors |
| Porches, decks and other additions | Provide outdoor use through an appropriate support and connection design | Separate supports, contact with the home, flashing and design records |
| Ground and runoff routes | Move surface water away from the home and its supports | Ponding, erosion, downspout outlets and runoff from neighboring ground |
Keep unknown construction details marked unknown. A neatly finished wall doesn’t reveal whether its concealed layers drain correctly. The missing information belongs in the inspection scope, not in an assumption on a materials order.
Separate the visible finish from the wall that stays dry
Think of siding as the exposed screen. Some rain can get behind it through joints and openings. The assembly needs a way to handle that water without holding it inside the wall.
A water resistive barrier is a layer intended to control liquid water behind the cladding. Flashing redirects water at interruptions and transitions. These parts must work together, including at windows, doors and the bottom of the wall.
The current federal construction standard addresses weather resistant coverings, compatible joint sealants and drainage behind cladding. Its exterior envelope provisions are useful context for understanding those separate functions. They don’t establish the approved repair detail for every older home.
Don’t read a stain as a map of the entry point. Water may arrive at an upper transition and appear lower down. Photograph the visible damage, the area above it and nearby openings before asking for a diagnosis.
For example, consider a hypothetical lower wall stain below a window. Replacing the damaged siding may be necessary. It still leaves unanswered whether water entered at the window head, a wall joint, or a roof transition above.
The repair scope should identify the entry route, the damaged materials and the intended drainage exit. Otherwise, a fresh panel can hide the same unresolved path. Avoid accepting “seal everything” as a substitute for explaining how the assembly works.
Why some gaps shouldn’t be filled
Sealant has a real job at appropriate joints. It isn’t a substitute for every flashing detail or drainage outlet. A joint meant to accommodate movement also needs a compatible repair.
Vinyl siding illustrates the distinction. Its industry installation guidance preserves movement and leaves certain panel overlaps and receiving channels uncaulked. Those details aren’t instructions for every siding material, but they show why every visible gap isn’t a defect.
Before filling a gap, identify the material, the joint’s purpose and the applicable instructions. If the detail is concealed or unfamiliar, have the installer explain it. Don’t block an intended drain or vent just to make the surface look continuous.
Choose siding by the assembly it needs
A mobile home exterior can have metal panels, vinyl, wood based panels, fiber cement or another specified covering. The material name alone doesn’t settle whether a replacement system suits the home. Attachment, substrate, moisture details and loading still matter.
Use material comparisons to prepare questions rather than declare one universal winner. A product that looks convincing in a gallery may require different trim and backing from the existing wall. Installation labor and concealed repair can also change the project scope.
| Material family | Useful questions before selection | Avoid this shortcut |
|---|---|---|
| Vinyl | How are movement, wind exposure, flashing and the underlying barrier handled? | Tight fastening or caulking every joint to make panels feel rigid |
| Metal | Which profile, finish, fasteners and transition details apply to the exact product? | Assuming all metal panels share one repair or coating method |
| Wood or engineered wood | What edge protection, finish maintenance and clearance does the exact system require? | Covering a deteriorated lower edge without investigating moisture |
| Fiber cement | Are the wall, attachment design, product instructions and added loads suitable? | Treating a durable panel as approval for the whole wall assembly |
| Masonry or masonry look finishes | Is this a lightweight panel or a supported masonry system, and what does its design require? | Assuming similar appearance means similar weight or support needs |
Ask for the exact product identification before agreeing to replacement. The proposal should state whether existing siding remains or comes off. It should also explain how the installer will inspect and address damaged backing.
Some panels or sheathing may form part of the home’s structural design. Don’t assume a sheet is disposable decoration because another layer will cover it. Removing or changing structural components needs qualified assessment.
The same applies to added layers. “We’ll put it over what’s there” should lead to questions about flatness, moisture, attachment and total assembly weight. An overlay is a project detail to verify, not an automatic repair strategy.
Inspect the roof as part of the exterior system
Look from the ground for changed roof edges, displaced material, damaged trim and obvious separation at intersections. Compare safe exterior observations with interior ceiling stains. You don’t need to climb onto the roof to make a useful first record.
The covering isn’t the entire roof. A proposal may also involve decking, flashing, penetrations, ventilation and underlying structure. Ask which parts are being repaired and which remain in service.
Don’t select a coating because its container mentions mobile homes. The existing covering, substrate condition and product instructions must support that use. A coating also doesn’t establish that wet or damaged material below it is sound.
Raising the roofline or adding a roof over the home is a different project from renewing its covering. It changes the design questions, including added weight and support. Have those questions resolved before treating the new silhouette as a cosmetic choice.
At an attached porch or addition, record the roof junction separately. A continuous bead of old sealant doesn’t reveal how the original flashing was arranged. Ask who will resolve the junction, rather than letting each contractor exclude the other side.
Check openings and small penetrations together
Windows and doors interrupt both the visible siding and the concealed wall layers. The opening must be integrated with those layers. A replacement can fit its opening yet still have an incomplete water management detail.
Record whether moisture appears at the glass, frame, surrounding trim, or wall below. Note weather conditions and which side of the home was exposed. Our window leak investigation guide separates those possibilities before a replacement decision.
If replacement becomes necessary, use the window selection guide for the complete assembly questions. Don’t order from a guessed “standard mobile home size.” The opening, frame, wall depth and installation method need their own checks.
At doors, distinguish a worn weather seal from a problem at the surrounding wall. Our door seal guide covers the first task. A leaking head flashing or damaged jamb calls for a broader scope.
Small wall penetrations deserve the same attention. Photograph exterior lights, hose connections, utility entries and vent hoods near the damaged area. Don’t cover a vent or drill new attachment holes while chasing a stain.
Keep roof plumbing vents distinct from roof cavity ventilation. They have different functions and can’t substitute for each other. The plumbing vent guide explains the drainage air route if a roof project involves one of those pipes.
Keep the siding to skirting transition from becoming a water trap
The lower edge deserves a close look because several systems meet there. Siding ends, skirting starts, runoff reaches the ground, and utility access must remain usable. Neat trim can conceal a poor water path.
Look for swollen lower edges, staining above the skirting, loose corners and water collecting against the perimeter. These observations don’t prove a single cause. They justify inspecting the transition before replacing only the visible panels.
The federal installation standard’s skirting provisions address attachment that traps water or restricts exterior covering movement. That helps frame the repair question: can water leave, and can the covering move as intended? The proper detail still depends on the home and materials.
Skirting doesn’t replace wall sheathing, floor framing, the bottom covering, or foundation supports. A panel with a stone pattern doesn’t establish a masonry foundation. Have deteriorated structural material assessed before dressing the perimeter.
Preserve required crawlspace ventilation and access when changing panels or adding landscaping. Dryer exhaust and combustion air openings also need their proper outdoor routes. Don’t turn a cosmetic perimeter project into an improvised sealed enclosure.
Under the home, ground moisture control is a separate part of the system. It doesn’t replace surface drainage. If water ponds beneath the home, replacing the skirting alone doesn’t explain how that water will be removed.
Follow runoff beyond the downspout
Watch where rain goes from a safe place during ordinary rainfall. Record roof runoff, overflowing gutters, downspout discharge and water arriving from higher ground. A dry day photo won’t show all those paths.
Gutters can redirect roof runoff where the home is suitable for their installation. The manufacturer’s installation instructions should address that suitability. Don’t assume the existing fascia or roof edge accepts any gutter attachment.
A working gutter still needs a useful discharge route. Water released beside the skirting may continue toward the underside of the home. Trace its destination rather than stopping the inspection at the end of the pipe.
Keep drainage changes within the actual site constraints. Property boundaries, neighboring lots, buried services and community rules may affect the solution. Have grading and drainage work planned rather than piling soil against the lower wall.
If erosion is visible near supports, have the condition assessed promptly. Don’t fill, jack or reposition supports based on the exterior appearance alone. The aim is to protect the installed support system while correcting the water source.
Plan additions around both support and flashing
A porch can improve how an entrance works. It also introduces questions about loads, movement, access and water at the home connection. A siding screw isn’t evidence that the wall can support a structure.
Start with the home’s installation information and the proposed structure’s design. Determine whether it supports its own loads or relies on a specifically approved connection. A registered design professional may be needed to resolve that boundary.
HUD’s homeowner resources advise consulting the appropriate authorities before significant additions or structural changes. Permits and community approval are separate questions. One doesn’t automatically answer the other.
Water protection still needs a solution even when the structure has its own supports. Ask how the joint accommodates movement and sheds water. Also check that the addition won’t conceal service access, required openings, or an existing defect.
Keep the home’s identification records before exterior work begins. The exterior certification label and interior data plate serve different purposes. Photograph them and ask the contractor to preserve the labels rather than burying them behind new finishes.
Turn observations into a repair scope
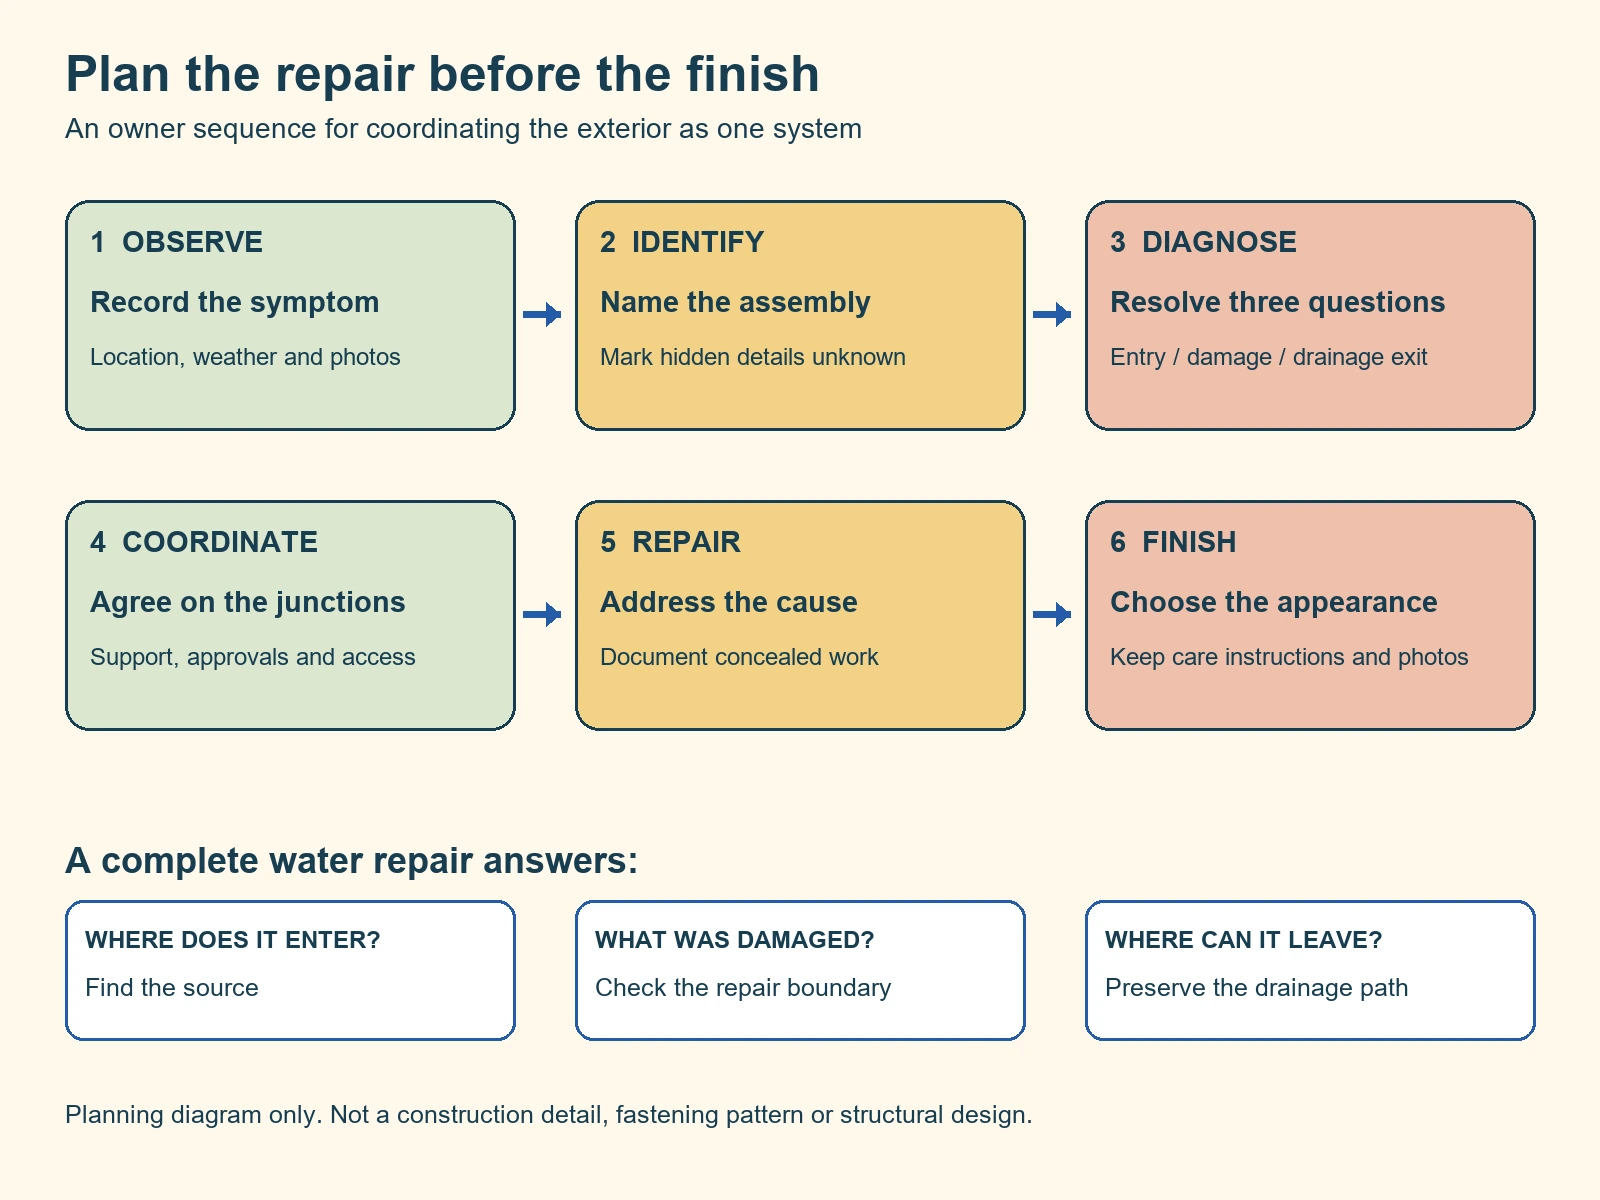
Use the following sequence to organize a mobile home exterior project. It is a planning method, not a universal installation procedure. The repair detail comes from the home, product instructions and applicable approval process.
- Record the symptom. Note the location, date, weather and whether the condition is changing. Keep the wide photo with the close view.
- Identify the assembly. Record known materials and previous additions. Ask for help where concealed layers or structural roles remain unknown.
- Find the cause and damage boundary. Have the relevant contractor distinguish an entry route from the place damage appears. Include inspection of concealed material where needed.
- Agree on the complete detail. Specify how roof, wall, opening, trim and drainage interfaces will be left. Resolve which contractor owns each junction.
- Confirm approvals and access. Check manufacturer guidance, applicable permits and community requirements. Plan safe access and temporary weather protection.
- Repair, document and finish. Preserve photos of concealed work before it closes. Add the completed detail and maintenance instructions to the home record.
Suppose a hypothetical project includes damaged siding, a leaking window and a planned porch. Buying panels first could lock in trim details before the window and porch junctions are settled. Coordinate those interfaces, then order the specified assembly.
This doesn’t mean every small repair needs a complete exterior renovation. A local defect may have a local solution. The scope should explain why the surrounding material can remain, rather than simply overlooking it.
What to ask each contractor to include
A useful estimate names the work instead of promising an “exterior refresh.” Ask for removal and disposal, concealed inspection, repair allowances and the exact replacement system. Identify who handles changed findings and who authorizes extra work.
Request separate descriptions for the visible finish and the water control details. Include openings, roof junctions and the lower termination where the project touches them. Record exclusions clearly so an unfinished junction doesn’t fall between trades.
Ask how the installer will protect an opened wall from weather. Request completion photos, applicable warranties and care instructions. Compare estimates on those deliverables before comparing the final totals.
The parts compatibility guide helps with another common shortcut. A component marketed for ordinary houses isn’t automatically unsuitable, but a mobile home label doesn’t guarantee compatibility either. The specifications and actual assembly decide.
Make appearance changes after the protection questions are settled
For a coherent exterior, choose a restrained combination of main siding, trim and a focal point at the entry. View samples in the actual light. Check the material and coating instructions before choosing a new finish.
Use texture changes deliberately. A small accent can add interest without forcing several new material junctions around the whole home. Each added transition still needs an appropriate detail.
Keep a clear separation between appearance and performance claims. A stone look doesn’t certify foundation strength. A new dark finish, porch roof, or decorative gable doesn’t establish better energy performance or a suitable structural design.
Plan planting and decorations around inspection, access and drainage. Leave room to see the lower wall and reach service openings. An attractive layout is easier to maintain when it doesn’t hide the places you need to check.
Keep an exterior record you can use next season
After repairs, keep the same elevation photos as your baseline. Repeat the walkaround seasonally and after significant storms when conditions are safe. Focus on changes rather than trying to certify the structure yourself.
Save product names, care instructions, installer details and concealed work photos in one folder. Include the approved repair scope and any unresolved observations. A future contractor can make better decisions with that record than with a guess about the home’s age.
A practical mobile home exterior plan ends with a clear next action for each concern. Some areas need cleaning or monitoring; others need diagnosis, repair, or design review. Finish choices belong alongside those decisions, once the home has a sound way to shed and release water.
Found a detail that needs checking? Tell us about a correction.